This post may contain affiliate links, please read my full disclosure policy for more details.
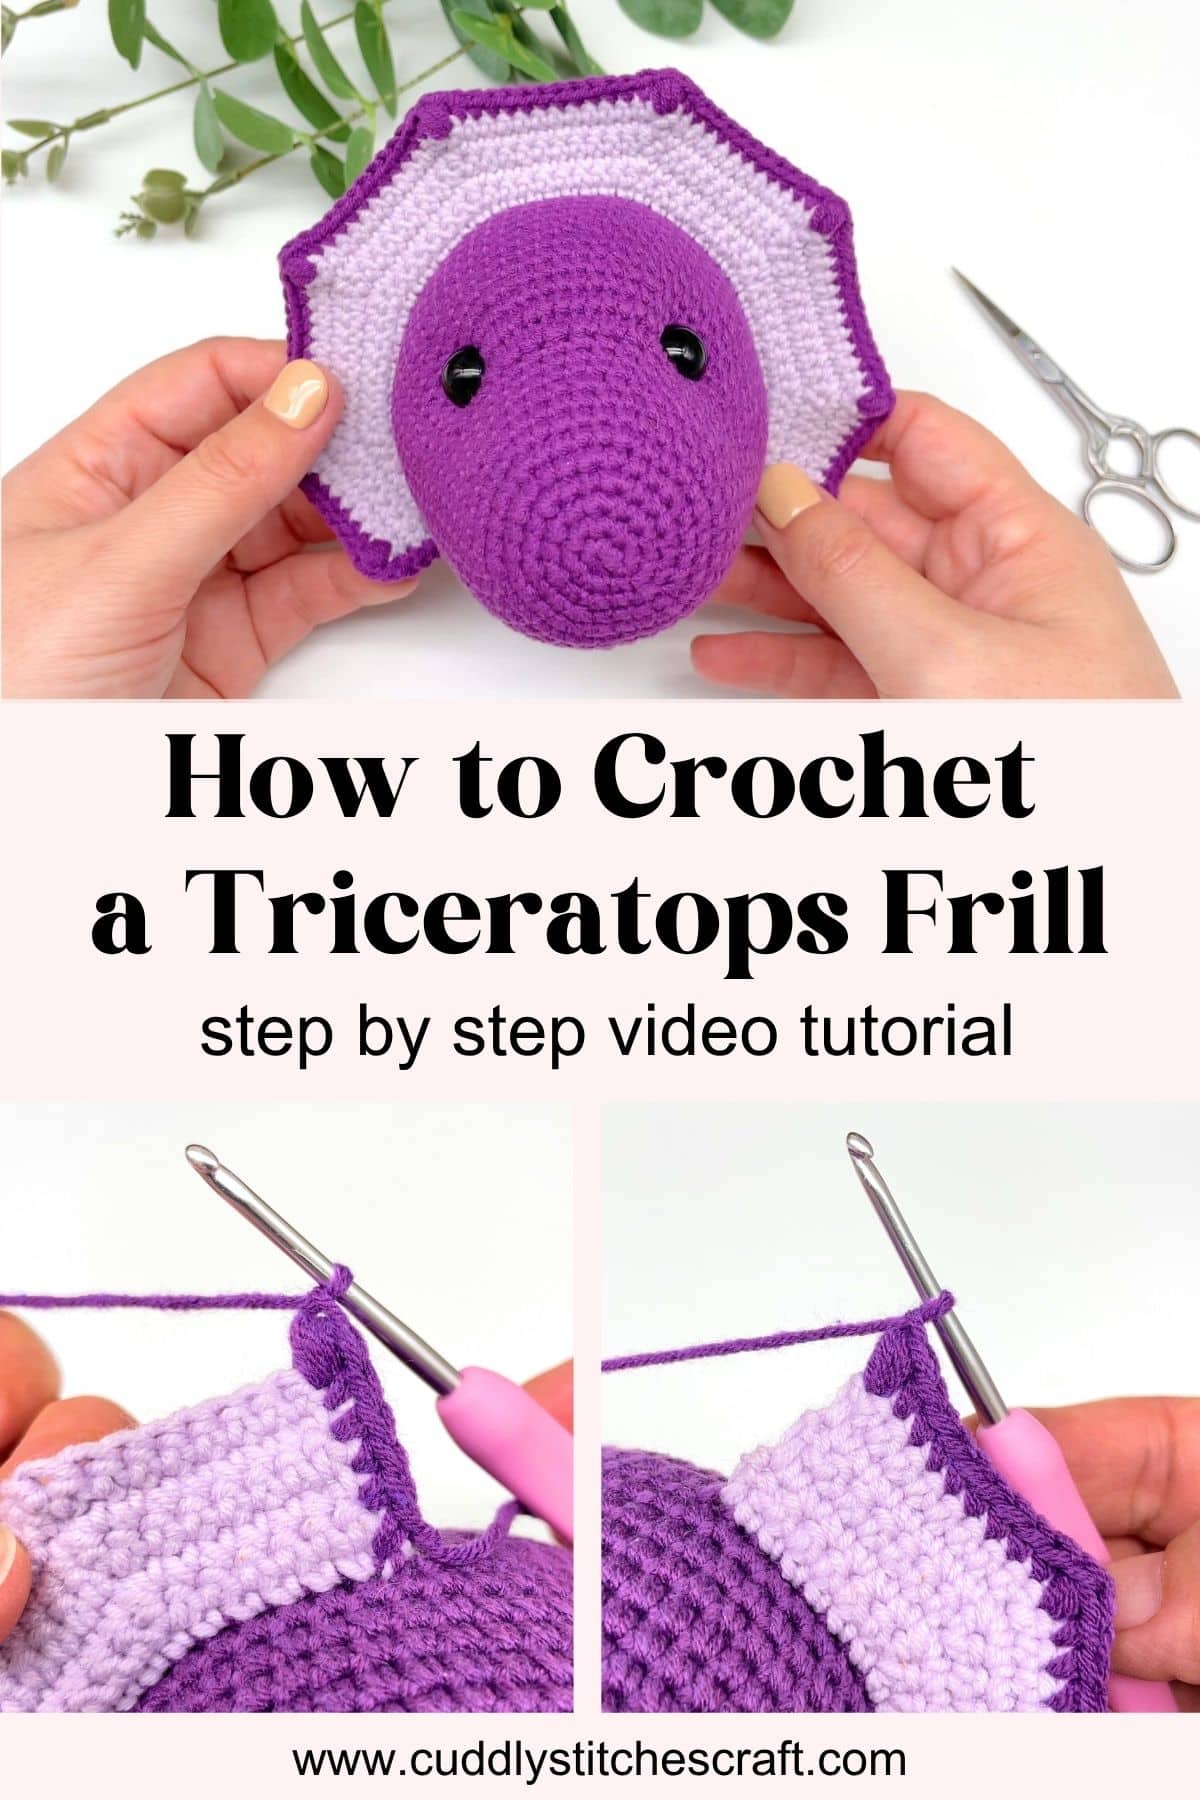
Learn how to crochet a triceratops frill directly onto the head of your crochet toy in this step-by-step video tutorial. This Amigurumi tutorial shows you how to create a cute Amigurumi triceratops frill without extra sewing or complicated assembly, making it perfect for anyone wanting a smooth and simple finish.
In this video, I’ll guide you each step of the way so you can easily follow along and recreate the frill with confidence.
If you can’t see the video, it might be due to an ad-blocker. Try turning it off or using a different browser to view the video.
Subscribe to my YouTube channel to receive an update every time I publish a new video so you don’t miss any of my crochet tips.
How to Crochet a Triceratops Frill – Step by Step
You’ll work the frill in rows rather than rounds, before adding an edging around the outer shape to finish it off. The entire technique uses only basic crochet stitches, making it suitable for crocheters of all skill levels. Each stage is explained clearly so you can follow along with confidence and achieve the same result in your own project.
You can also follow the below written pattern or refer to it later.
Abbreviations
This pattern is written using US crochet terminology
CH: chain
ST: stitch
SL ST: slip stitch
SC: single crochet stitch
INC: increase = two single crochet stitches in the same stitch
SPS: small puff stitch:
- Yarn over, insert your hook into the next stitch, yarn over and pull up a longer loop (you will have 3 loops on the hook)
- Yarn over, insert your hook into the same stitch, yarn over and pull up a longer loop (you will have 5 loops on the hook)
- Yarn over, insert your hook into the same stitch, yarn over and pull up a longer loop (you will have 7 loops on the hook)
- Yarn over and pull through all 7 loops, chain 1x to close the puff stitch
FL ST: front loop stitch
FO: fasten off
TO: turn over
(…..) x 6: repeat the pattern inside the brackets by the given number (in this example, repeat the pattern in the brackets 6 times)
{…}: number shown inside these brackets equals the number of stitches at the end of each round
Triceratops Frill Pattern – Frill Body
To crochet the frill directly onto the head, you’ll need a section of 49 unworked front loops across the top. The frill is then worked into these front loops to form the shape. For full instructions on how to create the head with these front loop stitches, see my crochet triceratops free pattern.
Row 1: insert your hook into the 1st FL ST on the head and pull up a loop; CH 1x – this chain will count as your first ST in this row; SC in next 47 STs, SL ST into last FL ST, CH 1x and TO {49 excl CH at the end}
Row 2: SL ST into 1st ST, SC in next 5 STs, INC, (SC in next 6 STs, INC) x 2, SC in next 7 STs, INC, (SC in next 6 STs, INC) x 2, SC in next 5 STs, SL ST into last ST, CH 1x and TO {55 excl CH at the end}
Row 3: SL ST into 1st ST, SC in next 5 STs, INC, (SC in next 7 STs, INC) x 2, SC in next 8 STs, INC, (SC in next 7 STs, INC) x 2, SC in next 6 STs, SL ST into last ST, CH 1x and TO {61 excl CH at the end}
Row 4: SL ST into 1st ST, SC in next 6 STs, INC, (SC in next 8 STs, INC) x 2, SC in next 9 STs, INC, (SC in next 8 STs, INC) x 2, SC in next 6 STs, SL ST into last ST, CH 1x and TO {67 excl CH at the end}
Row 5: SL ST into 1st ST, SC in next 6 STs, INC, (SC in next 9 STs, INC) x 2, SC in next 10 STs, INC, (SC in next 9 STs, INC) x 2, SC in next 7 STs, SL ST into last ST, CH 1x and TO {73 excl CH at the end}
Row 6: SC in first 8 STs, INC, (SC in next 10 STs, INC) x 2, SC in next 11 STs, INC, (SC in next 10 STs, INC) x 2, SC in last 8 STs, FO {79}, weave both yarn tails in
Mystery Crochet Along
Join our free crochet along and unravel the mystery as you stitch along with other fellow crocheters.
Triceratops Frill Pattern – Edging
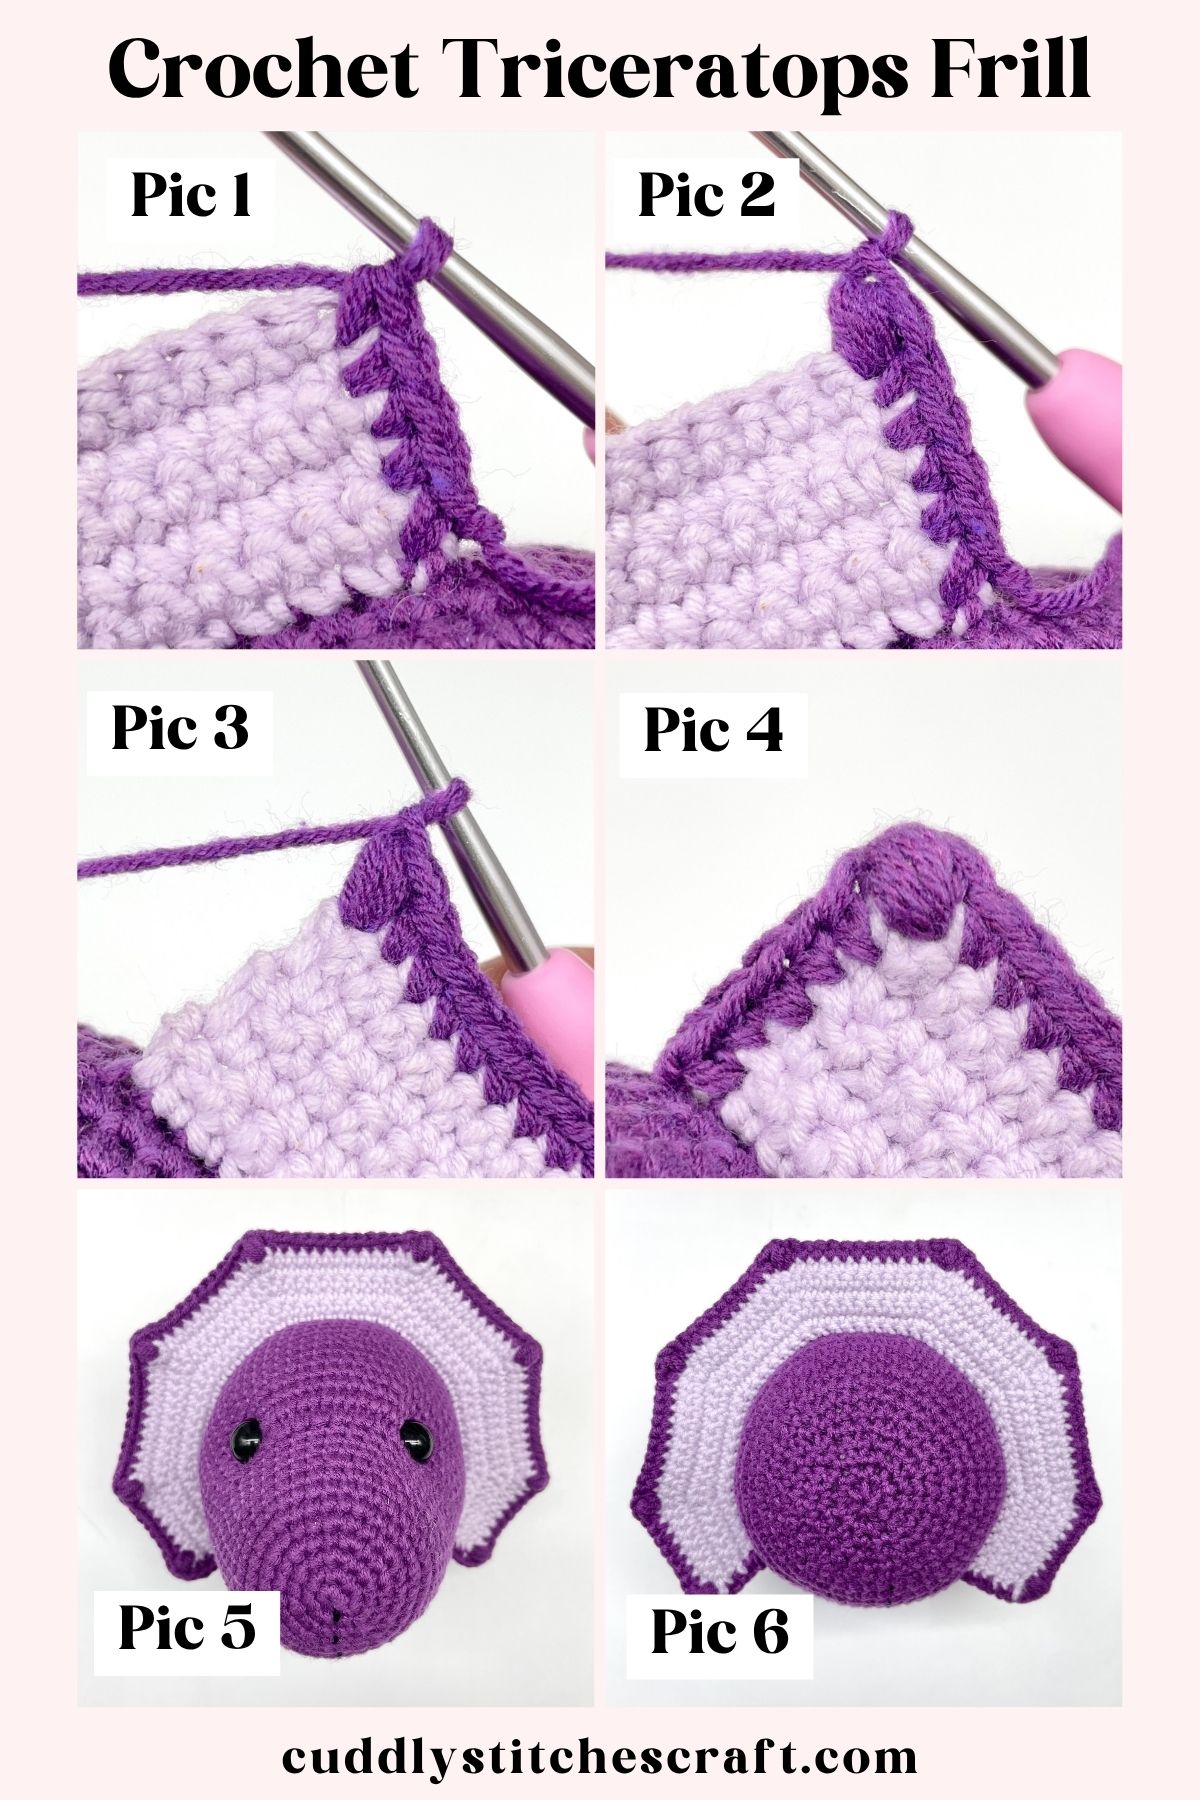
Step 1: create a slip knot on your hook and SC 5x into the right side of the frill while facing the triceratops, i.e. SC once into the side of each row (Pic 1)
Step 2: crochet a SPS into last ST of Row 6 (Pic 2)
Step 3: SC into the same ST you created the SPS in, SC in next 7 STs, SPS, (SC in next 11 STs, SPS) x 2, SC in next 12 STs, SPS, (SC in next 11 STs, SPS) x 2, SC in next 8 STs, SPS in last ST (Pic 3) – push the puff stitches to the front so they stand out more
Step 4: SC into the side of each row, i.e. SC 5x into the side of the frill (Pic 4)
Step 5: FO and weave both yarn tails in (Pic 5 & 6)
And that’s how you crochet the triceratops frill directly onto the head of your Amigurumi! By working the frill in rows directly onto the head and finishing it with a simple edging, you’ll achieve a clean look that brings your little dinosaur to life. I hope you enjoyed following along and found this Amigurumi tutorial helpful.
Explore More of My Amigurumi Tutorials
Join me in my step by step video tutorials and learn how to crochet simple projects with confidence. Fun and easy to follow videos that will guide you through the creative process!
Best Yarn for Amigurumi – Get the Free Guide Now!
Sign up for my newsletter and receive the free guide straight into your inbox. Plus stay in the loop with updates on new designs, tutorials and special offers.
Find the Perfect Crochet Pattern!
Create beautiful crochet toys with my collection of free Amigurumi patterns. From easy patterns for beginners to more advanced designs, there is something for everyone to enjoy!
Here are just a few patterns you may love. Why don’t you give them a try?!
LOW-SEW crochet cat free pattern
Free crochet bunny lovey pattern
Happy crocheting!
Frequently Asked Questions
Have a question? Why don’t you search for the answer in the FAQ below.
Yes, absolutely. My crochet animal patterns work great with a variety of different yarns including worsted weight yarn. Your crochet toy will just be a bit bigger than specified.
However, I wouldn’t use worsted weight yarn for making my loveys as they could feel a bit bulky. I prefer using thinner yarn such as Sport yarn #2 of Light worsted yarn #3 for a nice cuddly feel.
Having said that, my lovey patterns will absolutely work with worsted weight yarn if that’s the type of yarn you prefer using. But bear in mind that your loveys will be a bit bigger than specified in this pattern.
To find out more about the best yarn for making crochet toys have a read of my Best Yarn for Amigurumi Crochet tutorial.
I am very happy to help and provide support with any of my patterns. Visit my Contact page for different options on how to get in touch with me.
I would be very grateful if you could link to my patterns and tutorials on social media. But sharing of my actual written patterns on social media is strictly prohibited. For more details, have a read of my Copyright Policy.
You may sell finished items that you made using my Amigurumi patterns, provided you credit me as the original designer and provide a link back to my blog.
My free patterns are only available online on my blog and are not printable. If you would like to download a PDF version of my patterns then you can purchase them for a small fee from my Etsy store or Ravelry store.