
This post may contain affiliate links, please read my full disclosure policy for more details.

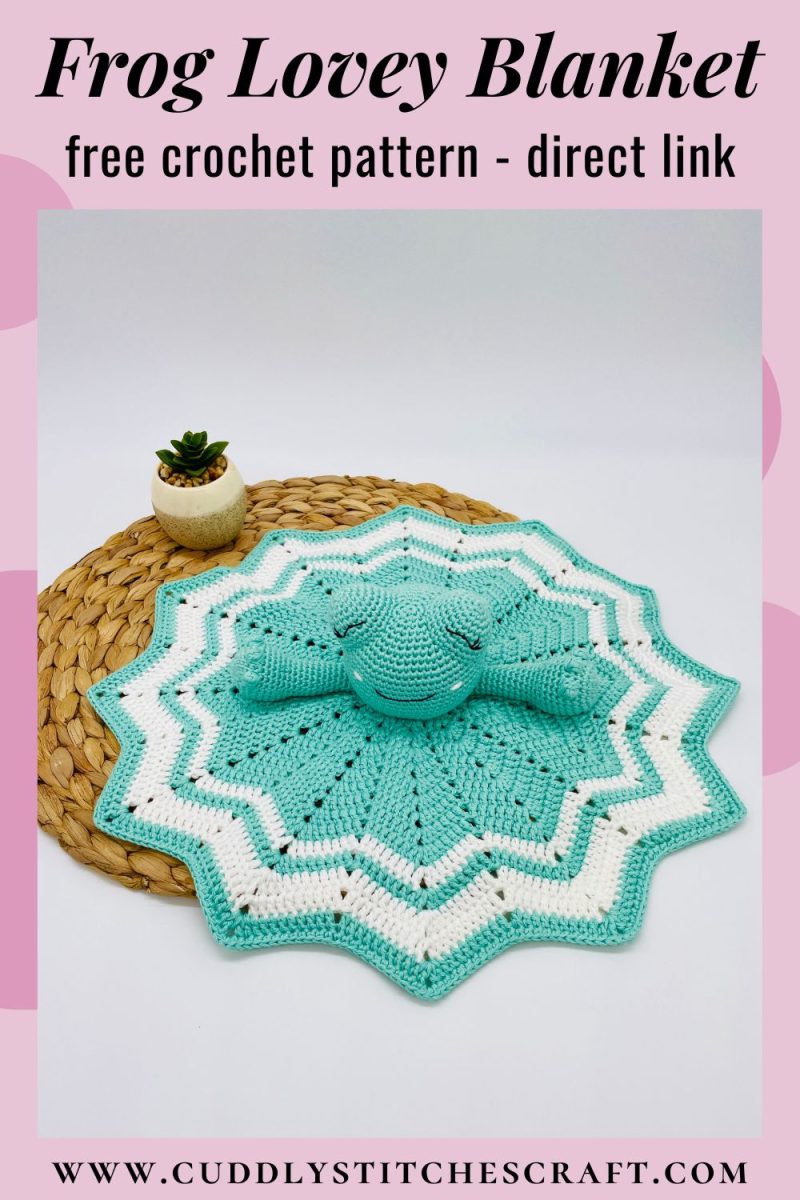
With my free frog crochet lovey pattern, you can make something special for the special little person in your life. This pattern is simple and easy to follow, so even a beginner crocheter can have a go at creating this beautiful Amigurumi frog lovey.
So why not give it a try and make someone’s day a little brighter. 🙂

Free Frog Crochet Lovey Pattern – Notes
Skill level: intermediate crochet skills and knowledge
Finished size – blanket’s diameter: 36cm (14 inches)
Finished size – frog height: 5cm (3 inches)
Free Frog Crochet Lovey Pattern – Materials and Equipment
Yarn I used for this free frog crochet lovey pattern:
– Light worsted #3 = DK/8 ply
– 51% cotton and 49% bamboo blend
– 2x ball of mint green yarn – Coboo Lion Brand – colour 173 – (100g/212m)
– 1x ball of white yarn – Coboo Lion Brand – colour 100 – (100g/212m)
I love using the cotton and bamboo blend for this pattern as it makes the frog lovey blanket super soft and cuddly. You can purchase the Coboo Lion Brand yarn from Lion Brand in US and LoveCrafts in UK.
Or just simply use any 100% cotton that will work just as well. You can also use 100% acrylic if you prefer to work with this type of yarn. Have a read of my Best yarn for Amigurumi crochet tutorial to find out more about what types of yarn are the best for making crochet toys.
Other materials used: polyester fibre fill, a long piece of black thread yarn for eye and mouth embroidery
Crochet hook: I used 3mm = C/2 for the frog and 4mm = G/6 for the blanket, if using different weight of yarn then refer to hook size recommendations on the yarn but go one size smaller. I highly recommend this ergonomic crochet hook set from Amazon as it comes in a stylish case and with other accessories such as stitch markers etc.
Other equipment used: scissors, yarn needle, pins with large heads, stitch marker or thin yarn to use instead
Choking hazard warning: the use of safety eyes or buttons poses a choking risk for children under the age of 3 therefore I recommend using embroidery instead.
Free Frog Crochet Lovey Pattern – Abbreviations Used
This free frog crochet lovey pattern is written using US crochet terminology
– MR: magic ring
– ST: stitch
– SC: single crochet stitch
– HDC: half double crochet stitch
– DC: double crochet stitch
– TC: triple crochet stitch
– CH: chain
– STR CH: starting chain
– FSP: first space
– NSP: next space
– SSP: same space
– SL ST: slip stitch
– INC: increase = two single crochet stitches in the same stitch
– L INC: large increase = three single crochet stitches in the same stitch
– DEC: standard decrease
– INV DEC: invisible decrease = insert the hook into the front loop of the first stitch (two loops on hook) and immediately insert it again into the front loop of the next stitch (three loops on the hook). Yarn over and draw through the first two loops on the hook (two loops on the hook). Yarn over and draw through the two loops on the hook to finish your invisible decrease.
– BO ST: bobble stitch = 4 x incomplete DC STs in the same ST, you will have 5 loops left on the hook, yarn over and pull through all 5 loops
– BLO: back loops only
– FO: fasten off
– (…..) x 6: repeat the pattern inside the brackets by the given number (in this example, repeat the pattern in the brackets 6 times)
– {…}: number shown inside these brackets equals the number of total stitches at the end of each round
Mix and Match Your Crochet Lovey
Do you like this free crochet frog lovey pattern but would like to mix and match the frog with a different blanket? Then you can explore my crochet comforter patterns and pick from these adorable blankets:
Get a 15% discount on all PDF patterns!
Sign up and get a discount on all current and future patterns from my Etsy shop. Plus receive regular updates on latest patterns and video tutorials.
Free Frog Crochet Lovey Pattern – Let’s Get Started!
You may find these Amigurumi tutorials handy before you get started with this free frog crochet lovey pattern. And don’t forget to watch my step by step video tutorials for extra help with my patterns.
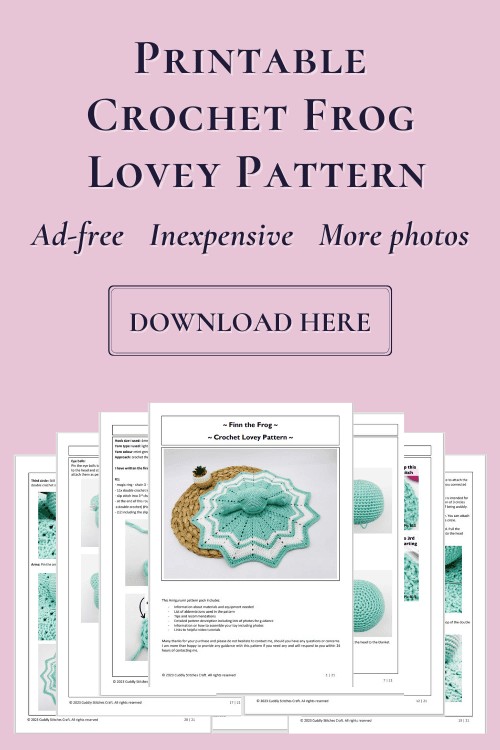
To view the free online pattern, please continue to scroll down. You can also download the ad-free and printable version of this pattern for a small fee from my Etsy shop. Your generous contribution will help towards the cost of materials and running this website so I can continue to publish my free online patterns for everyone to enjoy.
Join our Cuddly Stitches Community Facebook group to share your creations, chat to fellow Amigurumi makers or to exchange tips and tricks. You can also share feedback and ask for support when working with my patterns.
Take advantage of this AMAZING OFFER…open an Etsy shop and list your first 40 items for FREE!

How to Crochet the Eye Balls
Crochet from the top of the eye ball downwards.
R1: MR – 6 x SC into the ring {6} – watch this step by step video tutorial on How to crochet a magic ring for Amigurumi
R2: INC in each ST around {12}
R3: (SC in next ST, INC) x 6 {18}
R4: SC in next ST, INC, (SC in next 2 ST, INC) x 5, SC in next ST {24}
R5-R6 (2 rounds): SC in each ST around {24}
R7: (SC in next 3 ST, INC) x 6 {30}
R8: SC in each ST around {30}
FO leaving a long piece of yarn for sewing.
You will stuff the eye balls while sewing them to the head.
How to Crochet the Head
Crochet a ball.
R1: MR – 6 x SC into the ring {6}
R2: INC in each ST around {12}
R3: (SC in next ST, INC) x 6 {18}
R4: SC in next ST, INC, (SC in next 2 ST, INC) x 5, SC in next ST {24}
R5: (SC in next 3 ST, INC) x 6 {30}
R6: SC in next 2 ST, INC, (SC in next 4 ST, INC) x 5, SC in next 2 ST {36}
R7: (SC in next 5 ST, INC) x 6 {42}
R8: SC in next 3 ST, INC, (SC in next 6 ST, INC) x 5, SC in next 3 ST {48}
R9: (SC in next 7 ST, INC) x 6 {54}
R10: SC in next 4 ST, INC, (SC in next 8 ST, INC) x 5, SC in next 4 ST {60}
R11-R20 (10 rounds): SC in each ST around {60}
R21: SC in next 4 ST, INV DEC, (SC in next 8 ST, INV DEC) x 5, SC in next 4 ST {54} – watch this step by step video tutorial on How to crochet an invisible decrease for Amigurumi
R22: (SC in next 7 ST, INV DEC) x 6 {48}
R23: SC in next 3 ST, INV DEC, (SC in next 6 ST, INV DEC) x 5, SC in next 3 ST {42}
R24: (SC in next 5 ST, INV DEC) x 6 {36}
Start stuffing the head and keep stuffing as you go along.
R25: SC in next 2 ST, INV DEC, (SC in next 4 ST, INV DEC) x 5, SC in next 2 ST {30}
R26: (SC in next 3 ST, INV DEC) x 6 {24}
R27: SC in next ST, INV DEC, (SC in next 2 ST, INV DEC) x 5, SC in next ST {18}
R28: (SC in next ST, INV DEC) x 6 {12}
R29: SC in each ST around {12}
Stuff well, FO closing the hole using a yarn needle and leave a very long tail for sewing the head to the blanket.
Watch this step by step video tutorial on How to close a hole in an Amigurumi piece
How to Crochet the Arms
Crochet from the bottom of the arm upwards.
You will need to crochet 3 bobble stitches on each arm: Bobble stitch = BO ST = 4 x incomplete DC STs in the same ST, you will have 5 loops left on the hook (Pic AR1), yarn over and pull through all 5 loops
R1: MR – 6 x SC into the ring {6}
R2: INC in each ST around {12}
R3: (SC in next ST, INC) x 6 {18}
R4: SC in next ST, INC, (SC in next 2 ST, INC) x 5, SC in next ST {24}
R5: SC in each ST around {24}
R6: SC in next 2 ST, BO ST in next ST, SC in next 2 ST, BO ST in next ST, SC in next 2 ST, BO ST in next ST, SC in next 15 ST {24}

R7-R10 (4 rounds): SC in each ST around {24}
R11: SC in next ST, INV DEC, (SC in next 2 ST, INV DEC) x 5, SC in next ST {18}
Start stuffing the arm.
R12: SC in next 2 ST, INV DEC, (SC in next 4 ST, INV DEC) x 2, SC in next 2 ST {15}
R13-R16 (4 rounds): SC in each ST around {15}
R17: INV DEC, SC in next 13 ST {14}
R18: SC in each ST around {14}
R19: INV DEC, SC in next 12 ST {13}
R20: SC in each ST around {13}
Stop stuffing the arm.
R21: INV DEC, SC in next 11 ST {12}
R22-R27 (6 rounds): SC in each ST around {12}
R28: SC in next 4 STs and then SC the opening together to close the arm – watch this step by step video tutorial on How to close a hole in a flat Amigurumi piece
FO leaving a long piece of yarn for sewing.
How to Crochet the Blanket
Crochet the blanket as a 12 pointed star starting from the middle.
I have written the first few rounds without using abbreviations so it is easier for you to follow the pattern.
R1:
– magic ring – chain 3 – this is your starting chain
– 11x double crochet into the ring
– slip stitch into 3rd chain of the starting chain
– at the end of this round you will have a circle with 12 double crochet stitches (starting chain counts as a double crochet) (Pic B4)
– {12 including the slip stitch}

R2:
– chain 3 – this is your starting chain in this round
– 1x double crochet into the stitch your starting chain is coming from
– 2x double crochet into each of the next 11 stitches
– slip stitch into 3rd chain of the starting chain
– at the end of this round you will have a circle with 12 sets of 2x double crochet stitches (starting chain counts as a double crochet) (Pic B9)
– {24 including the slip stitch}
R3:
– chain 3 – this is your starting chain in this round
– (skip one stitch, 1x double crochet into next stitch, chain 2, 1x double crochet into the same stitch) x 11 (Pic B11)
– skip one stitch, 1x double crochet into next stitch, chain 2 (Pic B13)
– slip stitch into 3rd chain of the starting chain
– at the end of this round you will have a circle with 12 single shells (single shell = 1x double crochet, chain 2, 1x double crochet)
– {48 including the slip stitch}

R4:
– slip stitch into the first space, i.e. the first single shell (Pic B17)
– chain 3 – this will be your starting chain in this round
– 1x double crochet into the same space, chain 2, 2x double crochet into the same space (Pic B19)
-(2x double crochet into the next space, chain 2, 2x double crochet into the same space) x 11
– slip stitch into 3rd chain of the starting chain
– at the end of this round you will have a circle with 12 double shells (double shell = 2x double crochet, chain 2, 2x double crochet)
– you will notice that we started to create the 12 points of the star in this round
– {72 including the slip stitch}

I will now use abbreviations from R5 onwards so please refer to the list of abbreviations at the top of this page.
R5: SL ST into next ST, CH 3, 2x DC into FSP, CH 2, 2x DC into SSP, 1x DC in next ST (watch out for this stitch because it is often hidden under the double crochet stitches you made into the space and can be easily missed), skip 2 STs, (1x DC in next ST, 2x DC into NSP, CH 2, 2x DC into SSP, 1x DC in next ST, skip 2 STs) x 11, SL ST into 3rd CH of STR CH {96 incl SL ST}
R6: SL ST into next ST, CH 3, 1x DC in next ST, 2x DC into FSP, CH 2, 2x DC into SSP, 1x DC in next 2 STs, skip 2 STs, (1x DC in next 2 STs, 2x DC into NSP, CH 2, 2x DC into SSP, 1x DC in next 2 STs, skip 2 STs) x 11, SL ST into 3rd CH of STR CH {120 incl SL ST}
You will notice that your blanket is starting to curl up a bit but don’t worry, this will be fixed in the next round.
R7: SL ST into next ST, CH 3, 1x DC in next 2 STs, 1x DC into FSP, CH 2, 1x DC into SSP, 1x DC in next 3 STs, skip 2 STs, (1x DC in next 3 STs, 1x DC into NSP, CH 2, 1x DC into SSP, 1x DC in next 3 STs, skip 2 STs) x 11, SL ST into 3rd CH of STR CH {120 incl SL ST}
R8: SL ST into next ST, CH 3, 1x DC in next 2 STs, 2x DC into FSP, CH 2, 2x DC into SSP, 1x DC in next 3 STs, skip 2 STs, (1x DC in next 3 STs, 2x DC into NSP, CH 2, 2x DC into SSP, 1x DC in next 3 STs, skip 2 STs) x 11, SL ST into 3rd CH of STR CH {144 incl SL ST}
R9: SL ST into next ST, CH 3, 1x DC in next 3 STs, 2x DC into FSP, CH 2, 2x DC into SSP, 1x DC in next 4 STs, skip 2 STs, (1x DC in next 4 STs, 2x DC into NSP, CH 2, 2x DC into SSP, 1x DC in next 4 STs, skip 2 STs) x 11, SL ST into 3rd CH of STR CH {168 incl SL ST}
R10: SL ST into next ST, CH 3, 1x DC in next 4 STs, 1x DC into FSP, CH 2, 1x DC into SSP, 1x DC in next 5 STs, skip 2 STs, (1x DC in next 5 STs, 1x DC into NSP, CH 2, 1x DC into SSP, 1x DC in next 5 STs, skip 2 STs) x 11, SL ST into 3rd CH of STR CH {168 incl SL ST}
R11: SL ST into next ST, CH 3, 1x DC in next 4 STs, 2x DC into FSP, CH 2, 2x DC into SSP, 1x DC in next 5 STs, skip 2 STs, (1x DC in next 5 STs, 2x DC into NSP, CH 2, 2x DC into SSP, 1x DC in next 5 STs, skip 2 STs) x 11, SL ST into 3rd CH of STR CH {192 incl SL ST}
R12: SL ST into next ST, CH 3, 1x DC in next 5 STs, 2x DC into FSP, CH 2, 2x DC into SSP, 1x DC in next 6 STs, skip 2 STs, (1x DC in next 6 STs, 2x DC into NSP, CH 2, 2x DC into SSP, 1x DC in next 6 STs, skip 2 STs) x 11, SL ST into 3rd CH of STR CH {216 incl SL ST}
R13: Change yarn to white colour and SL ST into next ST, CH 3, 1x DC in next 6 STs, 1x DC into FSP, CH 2, 1x DC into SSP, 1x DC in next 7 STs, skip 2 STs, (1x DC in next 7 STs, 1x DC into NSP, CH 2, 1x DC into SSP, 1x DC in next 7 STs, skip 2 STs) x 11, SL ST into 3rd CH of STR CH {216 incl SL ST}
R14: Change yarn to mint green colour and SL ST into next ST, CH 3, 1x DC in next 6 STs, 2x DC into FSP, CH 2, 2x DC into SSP, 1x DC in next 7 STs, skip 2 STs, (1x DC in next 7 STs, 2x DC into NSP, CH 2, 2x DC into SSP, 1x DC in next 7 STs, skip 2 STs) x 11, SL ST into 3rd CH of STR CH {240 incl SL ST}
R15: Change yarn to white colour and SL ST into next ST, CH 3, 1x DC in next 7 STs, 2x DC into FSP, CH 2, 2x DC into SSP, 1x DC in next 8 STs, skip 2 STs, (1x DC in next 8 STs, 2x DC into NSP, CH 2, 2x DC into SSP, 1x DC in next 8 STs, skip 2 STs) x 11, SL ST into 3rd CH of STR CH {264 incl SL ST}
R16: SL ST into next ST, CH 3, 1x DC in next 8 STs, 1x DC into FSP, CH 2, 1x DC into SSP, 1x DC in next 9 STs, skip 2 STs, (1x DC in next 9 STs, 1x DC into NSP, CH 2, 1x DC into SSP, 1x DC in next 9 STs, skip 2 STs) x 11, SL ST into 3rd CH of STR CH {264 incl SL ST}
R17: Change yarn to mint green colour and SL ST into next ST, CH 3, 1x DC in next 8 STs, 2x DC into FSP, CH 2, 2x DC into SSP, 1x DC in next 9 STs, skip 2 STs, (1x DC in next 9 STs, 2x DC into NSP, CH 2, 2x DC into SSP, 1x DC in next 9 STs, skip 2 STs) x 11, SL ST into 3rd CH of STR CH {288 incl SL ST}
R18: SL ST into next ST, CH 1, 1x SC in next 10 STs, (3x SC into NSP, 1x SC in next 22 STs) x 11, 3x SC into NSP, 1x SC in next 11 STs, SL ST into STR CH {300 incl SL ST} – this is the last round of your blanket so you can now FO and weave all yarn ends in
Free Frog Crochet Lovey Pattern – Assembly
Eye balls: Pin the eye balls to the head making sure they look symmetrical from the front, side and back. Sew the eye balls to the head and stuff well while sewing. I placed the eye balls between R2 and R13 of the head.
Eye and mouth embroidery: Embroider the eyes and mouth using a long piece of black thread yarn as shown in the photos below. I embroidered the eyes between R4 and R7 of the eye balls. The mouth is embroidered between R13 and R15 of the head with 9 stitches in between the corners of the mouth.
Watch this video tutorial on How to embroider eyes on Amigurumi. The eyes in the video are slightly different but the technique is the same.
Cheeks embroidery: Embroider the cheeks using the same white yarn you used for the blanket. I embroidered the cheeks between R13 and R14 of the head as shown in the photo below.

Attaching the head to the blanket:
Before attaching the head to the blanket, choose which way you would like the frog to face. I like to attach the head so that the frog is facing one of the points of the star. Preferably you want the bit, where you connected the rounds, to be behind the head.
It is important that the head is attached to the blanket firmly and securely as the baby the lovey is intended for is likely to pull on the head or the blanket often. I sew the head to the blanket following a pattern of 3 circles (Pic A1). This way the lovey can’t be pulled apart and the head will be nice and steady instead of being wobbly.
But don’t worry too much if you are finding it difficult to follow the assembly instructions below. You can attach the head the way you prefer. You can sew it together around 2 circles or even in a cross and one circle.
First circle: Thread your yarn needle with the yarn tail you were left with after finishing the head. Pull the needle through all the stitches in the centre of the blanket’s magic ring (Pic A2). Then go back into the head through the centre of the closing circle.

Second circle: Using the same yarn tail you used for the first circle, sew R28 of the head to the top of the double crochet stitches in R1 of the blanket.
Third circle: Still using the same yarn tail you used for the first two circles, sew R26 of the head to the top of the double crochet stitches in R2 of the blanket. Once you have completed the full circle, weave the yarn tail in.
Arms: Pin the arms to the blanket right by the side of the head and sew them securely. Weave the yarn tails in.
You have now finished your crochet baby lovey. I hope you found my crochet frog lovey pattern easy to follow and enjoyed making it.

Did You Enjoy Making this Crochet Frog Security Blanket?
- Leave a comment: share your feedback with us in the comment box below
- Pin this pattern: pin this pattern on Pinterest so you can return to it later
- Share your photos: I love to see your finished crochet toys so please share your photos on social media with the tag @cuddlystitchescraft
- Share this pattern: show me your love and link to this pattern on social media
- Subscribe: subscribe to my Newsletter to receive news and updates when I publish new patterns and video tutorials
- Join my Mystery Crochet Along: crochet a mystery Amigurumi toy along with other fellow crocheters for a lot of fun with a ‘surprise’ twist. Sign up for free!
- Explore more: visit my free Amigurumi crochet patterns for more crochet toys you will love!
Get a 15% discount on all PDF patterns!
Sign up and get a discount on all current and future patterns from my Etsy shop. Plus receive regular updates on latest patterns and video tutorials.
Explore More of My Free Amigurumi Crochet Patterns
If you like this free frog crochet lovey pattern, you may also love these patterns. Why don’t you give them a try?!
Free sleepy bunny rattle pattern
Free crochet lamb lovey pattern
Free crochet dinosaur pattern
Free crochet bunny lovey pattern
Free crochet bear lovey pattern
Or browse through my collection of crochet lovey and rattle patterns and make something special for your baby. Or surprise your friends and family with a beautiful baby gift!
Happy crocheting!


I would have loved to make this cute pattern but even as a very experienced crocheter, the blanket pattern is impossible for me to understand. It’s far too wordy, adding to the complexity of trying to understand what you’re describing, and uses abbreviations I’ve never even seen before. I’m not sure why you included photos for the first couple of rounds but then chose not to do so for the much more complicated rounds. Perhaps a pattern revision could do the trick, though I’d recommend having a friend try it out first before republishing.
Hi Morgan, many thanks for your feedback. I really appreciate any comments about my patterns and try to improve them based on the feedback. I intentionally made the few first rounds wordy to make it easier for everyone to follow the pattern. I have also included the explanation for the abbreviations at the beginning of the pattern so you can refer to them. As for the images, I am unable to include all images on my website because it would make it run very slow but the PDF pattern includes all images for every step of the blanket.
Love, Petra x
I loved making this frog lovey! The pattern was so easy to follow! Now I can’t wait to make the giraffe! So excited
Hi Heidi, so happy you liked making the frog lovey and found the pattern easy to follow! Music to my ears! haha :-)) I hope you enjoy making the giraffe and are happy with the end result! 🙂
Love, Petra x
How do I print the pattern off?
I am legally blind and need a paper copy in front of me to see it. You, Frog a sweetheart, my little granddaughter would love it. I see a little in each eye for a stroke. All the kids and families live in other states. Thank you for your time. M
Hi Mar, my online patterns are not printable, you can only view them online for free. If you would like to print one of my patterns you can purchase a PDF download for a small fee from my Etsy store here:
https://cuddlystitchescraft.etsy.com
Why don’t you contact me directly at info@cuddlystitchescraft.com and I will see if I can email you the pattern with a much larger print. 🙂
I am sure your grandchildren will love their gift from you! 🙂
Love, Petra x
how much yardage would be needed if all one colour?
Hi Cheryl, if you would like to crochet the frog lovey in one colour then you will be OK with 2 balls of the mint green. Each ball is 100g, 212m – light worsted #3 while using 3mm / C2 hook.
I hope this helps but please let me know if you have more questions.
Love, Petra x