
This post may contain affiliate links, please read my full disclosure policy for more details.

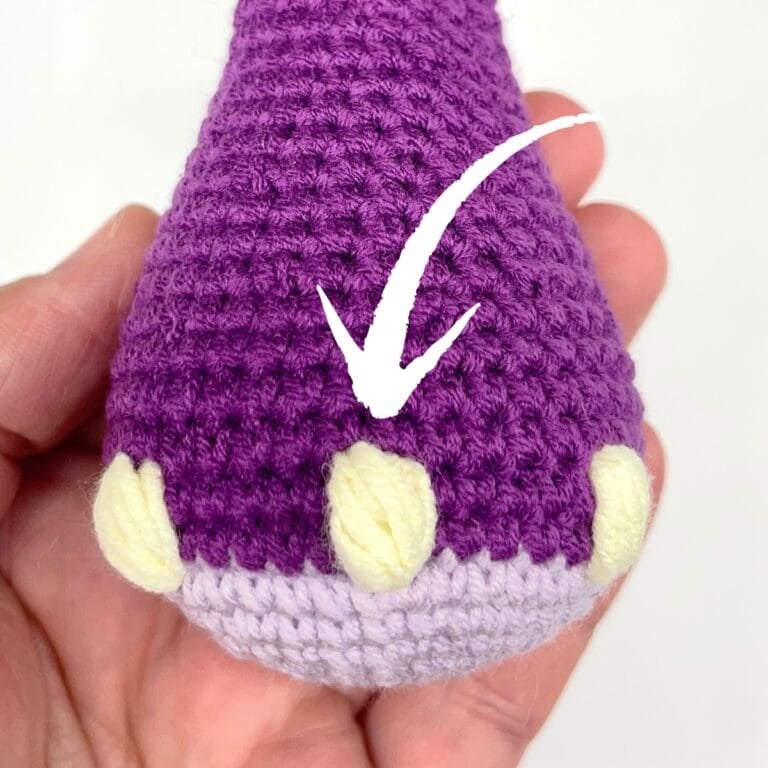
In this crochet video tutorial, I am going to show you how to indent eyes in Amigurumi crochet. Eye sculpting is a great way to add more character to your toys and it is easier to achieve than you might think.
I use this technique when working on most of my crochet toys and quite frankly…once you have tried it, there is no going back. 🙂 In this video, I will show you two simple methods so you can choose which one you prefer.
Scroll down to watch the step by step video tutorial on how to indent eyes in Amigurumi crochet.

How to Indent Eyes in Amigurumi Crochet – Instructions
1st method: This method will show you how to indent the eyes before finishing the crochet toy head piece. Basically, you will sculpt the eye sockets before inserting the safety eyes in and before putting the safety backs on.
2nd method: In this method, you will indent the eyes after your head piece is completed. This means the safety eyes will already be in including the safety backs.
I use the 1st method when designing my crochet toys but both techniques will result in a pretty similar look.
Join our Cuddly Stitches Community Facebook group to share your creations, chat to fellow Amigurumi makers or to exchange tips and tricks. You can also share feedback and ask for support when working with my patterns.
How to Indent Eyes in Amigurumi Crochet – Watch the Video Here

Did You Find this Tutorial Helpful?
- Leave a comment: share your feedback with us in the comment box below
- Pin this tutorial: pin this tutorial on Pinterest so you can return to it later
- Share this tutorial: show me your love and link to this tutorial on social media
- Subscribe: subscribe to my Newsletter to receive news and updates when I publish new patterns and video tutorials
- Join my Mystery Crochet Along: crochet a mystery Amigurumi toy along with other fellow crocheters for a lot of fun with a ‘surprise’ twist. Sign up for free!
- Explore more: visit my Amigurumi tutorials for more tips and tricks you will love!
Get a 15% discount on all PDF patterns!
Sign up and get a discount on all current and future patterns from my Etsy shop. Plus receive regular updates on latest patterns and video tutorials.
Explore More of My Amigurumi Tutorials
Discover my Amigurumi basics video tutorials, perfect if you want to learn new skills and techniques. Whether you need help with a particular pattern or just looking for helpful tips and tricks, these tutorials are just the thing for you!
Find the Perfect Crochet Pattern!
Create beautiful crochet toys with my collection of free Amigurumi crochet patterns. From easy patterns for beginners to more advanced designs, there is something for everyone to enjoy!
Here are just a few patterns you may love. Why don’t you give them a try?!
Free whale and narwhal crochet pattern
Free crochet bunny lovey pattern
Happy crocheting!


Trimakasih utk video tutorial lekukan mata,sngt membantu sekali utk saya.Saya menyukai metode yg pertama.Saya sngt sngt bertrimakasih sekali.Thanks.
Hi Eva, thank you for your lovely message. I’m really happy you liked the video tutorial and found it helpful.
Love,
Petra x
I think I would prefer to use your 1st method. It seems less fidgety!
Thank you, completely up to you as everyone prefers different ways. 🙂
Love, Petra x
I found this tutorial very helpful. I always use the first way if using safety eyes, it was good to see the other way which I can use for crocheting eyes. Thank you
You are very welcome Jen, I’m happy you found the tutorial helpful! 🙂
Love,
Petra x
Thank you, your instructions. regarding the eye sockets were easy to follow.
Thank you so much for your comment! Really happy to hear the tutorial was helpful! 🙂
Love,
Petra x
I am working on your tiger and would like to know how you change colors and keep a straight line. Do you have a video? I love your patterns and the no sew method. Thank you!
Hi Susan,
Many thanks for your message and I’m happy to hear you like my patterns and the no-sew method! 🙂
I change colours the standard way so I don’t actually have a straight line when changing colours. I know there are many ways how you can try to change colours so they are less visible but I feel none of them work 100%. You can always see the colour change a little bit. But I am planning at some point, to do a video or a guide on less visible colour changes. I don’t have one available at the moment but I know there are many videos on YT that you can watch.
Love,
Petra x
BTW…I used the first method for indenting the eyes and thought it was great!!! Will soon try the second!
Thank you Ingrid, happy to hear it was helpful! 🙂
Love, Petra x
Hi!
I´m making the cow! It´s adorable. I´m not a pro…it´s my second project, so I´m a little unsure about the spots. Do you have patterns for the black cow spots or do we just wing it?:)
Hi Ingrid, thank you and when it comes to the spots…they are not crocheted…they are cut out of a felt and sewed on. And you can just cut the shapes you like. I have not pattern for them.
Love, Petra x
I prefer the second method with the eyes in place. It’s easier to adjust around the eyes and get the look you want that way.
Hi Laura, thank you for your comment. Yes, some people prefer your method and some people the other method so I thought I would show both so people can choose which method suits them better. 🙂
Love, Petra x
How do you secure the loose yarn when you first put it through the stitch? How do you keep it from not coming apart after you indent.
Hi Trisha, when you first insert the needle in and go across the head, don’t pull on it hard so the yarn tail stays in. There is no need to secure it as it will anchor itself in the stuffing as you go through the head several times. Alternatively, you can leave a tail out and then when you finish indenting the eyes, come out with the needle through the same stitch the tail is coming out from. Tie a double knot and pull the knot inside your work through the same stitch.
I hope this helps but please let me know if you have more questions.
Love, Petra x
Thank you for sharing! I do like both methods and I will use then both.
Thank you so much Jennie, so happy to hear you found my video tutorial helpful! 🙂
Love, Petra x