
This post may contain affiliate links, please read my full disclosure policy for more details.
Welcome to the September 2026 Crochet Along!
This post contains the crochet pattern for Toy #2 of this month’s Crochet Along.
The pattern is divided into sections to make it easier to follow. Simply open the clickable table of contents that is located below the video player and click on the part of the pattern you’d like to view.
I hope you have lots of fun! 🙂
Abbreviations
This pattern is written using US crochet terminology
MR: magic ring
ST: stitch
SC: single crochet stitch
DC: double crochet stitch
CH: chain
STR CH: starting chain
CR SP: corner space
FSP: first space
NSP: next space
SSP: same space
SL ST: slip stitch
INC: increase = two single crochet stitches in the same stitch
DEC: standard decrease
INV DEC: invisible decrease = insert the hook into the front loop of the first stitch (two loops on hook) and immediately insert it again into the front loop of the next stitch (three loops on the hook). Yarn over and draw through the first two loops on the hook (two loops on the hook). Yarn over and draw through the two loops on the hook to finish your invisible decrease
BLO: back loops only
FO: fasten off
INV FO: invisible fasten off
(…..) x 6: repeat the pattern inside the brackets by the given number (in this example, repeat the pattern in the brackets 6 times)
{…}: number shown inside these brackets equals the number of stitches at the end of each round
Pattern Part 1 – Now Available
Pattern Part 1 – Section 1
Hook size if using Light worsted weight yarn (DK yarn #3): 3mm (C-2)
Hook size if using Worsted weight yarn (Aran yarn #4): 3.5mm (E-4)
Yarn color: color A and B
Number of pieces: make two – make one piece with color A and the other with color B
R1: MR – 6 x SC into the ring {6} – watch this video tutorial on How to crochet a magic ring for Amigurumi
R2: (SC in next ST, INC) x 3 {9}
R3: SC in next ST, INC, (SC in next 2 STs, INC) x 2, SC in next ST {12}
R4: SC in each ST around {12}
R5: (SC in next 3 STs, INC) x 3 {15}
R6: SC in next 2 STs, INC, (SC in next 4 STs, INC) x 2, SC in next 2 STs {18}
R7-R10 (4 rounds): SC in each ST around {18}
R11: SC in next 2 STs, INV DEC, (SC in next 4 STs, INV DEC) x 2, SC in next 2 STs {15}
R12: Do not stuff and SC the opening together to close the piece {7} – watch this video tutorial on How to close a hole in a flat Amigurumi piece
FO and weave the yarn tail in
Pattern Part 1 – Section 2
Hook size if using Light worsted weight yarn (DK yarn #3): 3mm (C-2)
Hook size if using Worsted weight yarn (Aran yarn #4): 3.5mm (E-4)
Yarn color: color A, B and C
Number of pieces: make two
Start with color C
R1: MR – 6 x SC into the ring {6}
R2: INC in each ST around {12}
R3: (SC in next ST, INC) x 6 {18}
R4: SC in next ST, INC, (SC in next 2 STs, INC) x 5, SC in next ST {24}
R5: SC in each ST around {24}
R6: (SC in next 7 STs, INC) x 3 {27}
R7-R8 (2 rounds): SC in each ST around {27}
Change your yarn to color B
R9: SC in each ST around {27}
Change your yarn to color A
R10: (SC in next 7 STs, INV DEC) x 3 {24} – watch this video tutorial on How to crochet an invisible decrease
R11: SC in each ST around {24}
R12: SC in next ST, INV DEC, (SC in next 2 STs, INV DEC) x 5, SC in next ST {18}
Start stuffing the piece
R13-R14 (2 rounds): SC in each ST around {18}
R15: SC in next 2 STs, INV DEC, (SC in next 4 STs, INV DEC) x 2, SC in next 2 STs {15}
R16: SC in each ST around {15}
R17: INV DEC, SC in next 13 STs {14}
Stop stuffing the piece
R18: SC in each ST around {14}
R19: INV DEC, SC in next 12 STs {13}
R20: SC in each ST around {13}
R21: INV DEC, SC in next 11 STs {12}
R22-R24 (3 rounds): SC in each ST around {12}
R25: SC the opening together to close the piece {5}
FO leaving a long tail for sewing
Pattern Part 2 – Now Available
Hook size if using Light worsted weight yarn (DK yarn #3): 3.5mm (E-4)
Hook size if using Worsted weight yarn (Aran yarn #4): 4.5mm (#7)
Yarn color: color A, B and C
Number of pieces: make one
Constructions: worked flat in rounds – I have written the first few rounds without using abbreviations so it is easier for you to follow the pattern
Please note: The photos show the project in different color but you can follow the color instructions given in this pattern. Or let your imagination run wild and choose your own color combination using the yarn you picked for this crochet along! 🙂
Start with color A
R1:
- Magic ring – chain 4 – this is your starting chain – make sure you leave a very long tail when creating the magic ring as you will use it for sewing at assembly
- (1x double crochet into the ring, chain 1) x 7
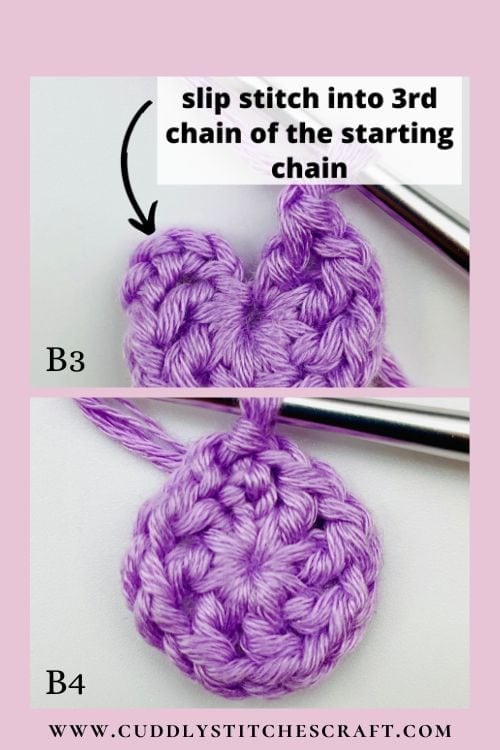
- slip stitch into 3rd chain of the starting chain (Pic B3)
- at the end of this round you will have a circle with 8 double crochet stitches (starting chain counts as a double crochet) and 8 spaces in between them (Pic B4)
- {16 including the slip stitch}
R2:
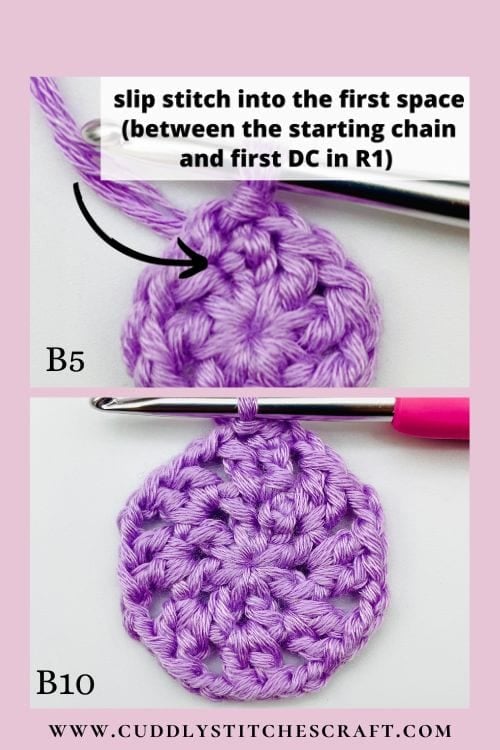
- slip stitch into the first space – between the starting chain and first double crochet in R1 (Pic B5)
- chain 3 – this is your starting chain in this round
- 1x double crochet into the same space
- (chain 2, 2x double crochet into the next space) x 7
- chain 2, slip stitch into 3rd chain of the starting chain
- at the end of this round you will have a circle with 8 sets of 2x double crochet stitches (starting chain counts as a double crochet) and 8 spaces in between them (Pic B10)
- {32 including the slip stitch}
R3:
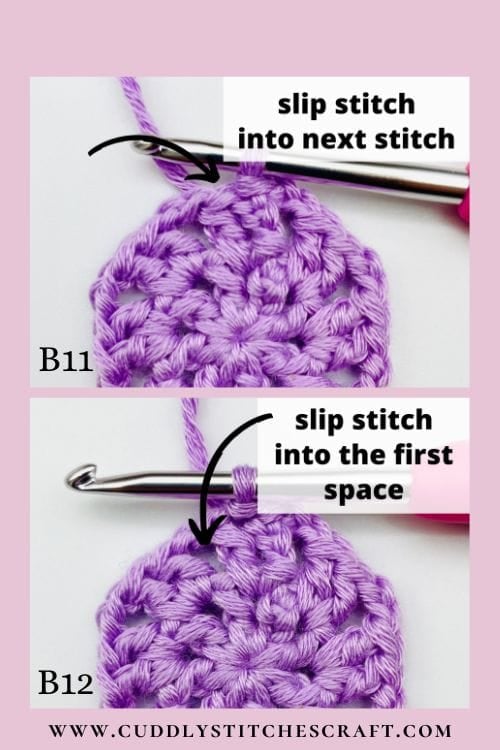
- slip stitch into next stitch (Pic B11)
- slip stitch into the first space (Pic B12)
- chain 3 – this is your starting chain in this round
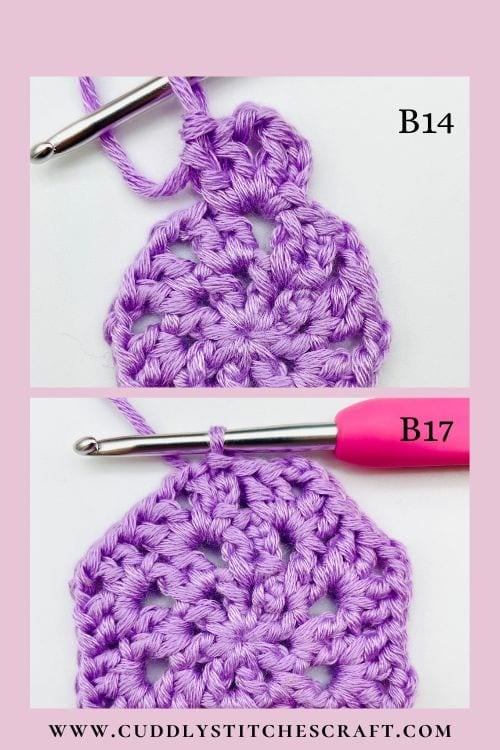
- 1x double crochet into the same space, chain 2, 2x double crochet into the same space (Pic B14)
- (2x double crochet into the next space, chain 2, 2x double crochet into the same space) x 7
- slip stitch into 3rd chain of the starting chain (Pic 17)
- {48 including the slip stitch}
R4:
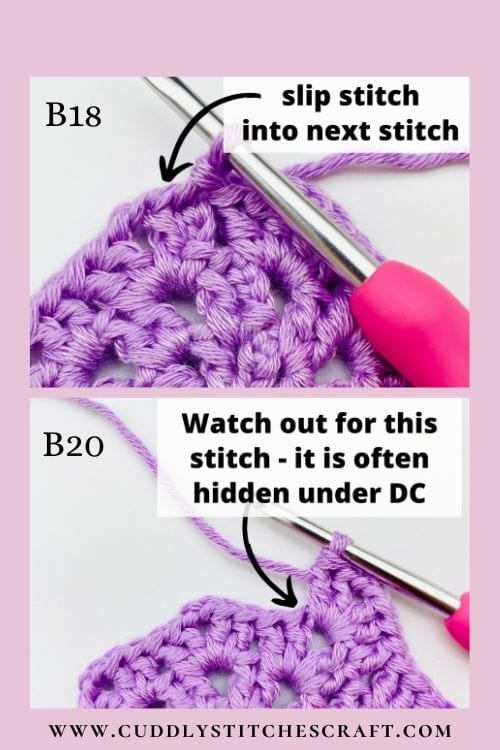
- slip stitch into next stitch (Pic B18)
- chain 3 – this will be your starting chain in this round
- 2x double crochet into the first space, chain 2, 2x double crochet into the same space, 1x double crochet in the next stitch – watch out for this stitch because it is often hidden under the double crochet stitches you made into the space and can be easily missed (Pic B20 & B21)
- (skip 2 stitches, 1x double crochet in the next stitch, 2x double crochet in the next space, chain 2, 2x double crochet in the same space, 1x double crochet in the next stitch – again watch out for this stitch) x 7
- skip 2 stitches and slip stitch into 3rd chain of the starting chain (Pic B24)
- {64 including the slip stitch}
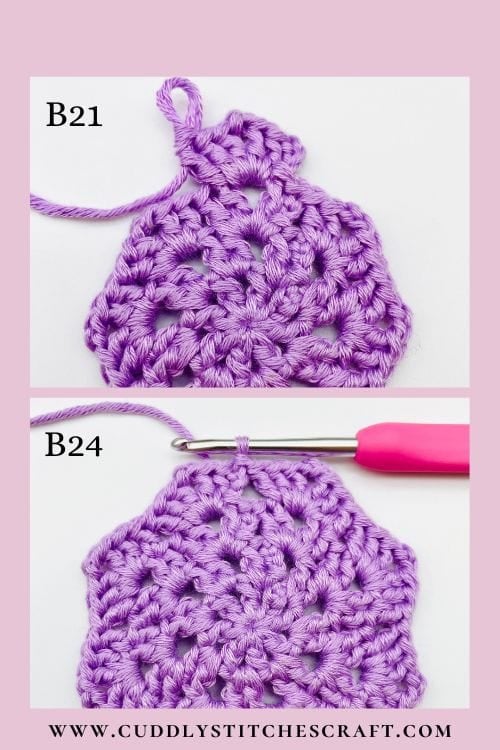
By now you might have noticed we are creating an 8 point star – also notice that there are 3 double crochet stitches on each side of the star point. Going forward, in each round, the number of double crochet stitches will increase by 1 on each side of the star point, e.g. in R5 you will have 4 double crochet stitches on each side of the star point.
I will now use abbreviations from R5 onwards so please refer to the list of abbreviations at the beginning of this pattern.
R5: SL ST into next ST, CH 3, DC in next ST, 2x DC into FSP, CH 2, 2x DC into SSP, DC in next 2 STs, (skip 2 STs, DC in next 2 STs, 2x DC into NSP, CH 2, 2x DC into SSP, DC in next 2 STs) x 7, skip 2 STs, SL ST into 3rd CH of STR CH {80 incl SL ST}
R6: SL ST into next ST, CH 3, DC in next 2 STs, 2x DC into FSP, CH 2, 2x DC into SSP, DC in next 3 STs, (skip 2 STs, DC in next 3 STs, 2x DC into NSP, CH 2, 2x DC into SSP, DC in next 3 STs) x 7, skip 2 STs, SL ST into 3rd CH of STR CH {96 incl SL ST}
R7: SL ST into next ST, CH 3, DC in next 3 STs, 2x DC into FSP, CH 2, 2x DC into SSP, DC in next 4 STs, (skip 2 STs, DC in next 4 STs, 2x DC into NSP, CH 2, 2x DC into SSP, DC in next 4 STs) x 7, skip 2 STs, SL ST into 3rd CH of STR CH {112 incl SL ST}
R8: SL ST into next ST, CH 3, DC in next 4 STs, 2x DC into FSP, CH 2, 2x DC into SSP, DC in next 5 STs, (skip 2 STs, DC in next 5 STs, 2x DC into NSP, CH 2, 2x DC into SSP, DC in next 5 STs) x 7, skip 2 STs, SL ST into 3rd CH of STR CH {128 incl SL ST}
R9: SL ST into next ST, CH 3, DC in next 5 STs, 2x DC into FSP, CH 2, 2x DC into SSP, DC in next 6 STs, (skip 2 STs, DC in next 6 STs, 2x DC into NSP, CH 2, 2x DC into SSP, DC in next 6 STs) x 7, skip 2 STs, SL ST into 3rd CH of STR CH {144 incl SL ST}
R10: SL ST into next ST, CH 3, DC in next 6 STs, 2x DC into FSP, CH 2, 2x DC into SSP, DC in next 7 STs, (skip 2 STs, DC in next 7 STs, 2x DC into NSP, CH 2, 2x DC into SSP, DC in next 7 STs) x 7, skip 2 STs, SL ST into 3rd CH of STR CH {160 incl SL ST}
R11: Change yarn to color C and SL ST into next ST, CH 3, DC in next 7 STs, 2x DC into FSP, CH 2, 2x DC into SSP, DC in next 8 STs, (skip 2 STs, DC in next 8 STs, 2x DC into NSP, CH 2, 2x DC into SSP, DC in next 8 STs) x 7, skip 2 STs, SL ST into 3rd CH of STR CH {176 incl SL ST}
R12: Change yarn to color B and SL ST into next ST, CH 3, DC in next 8 STs, 2x DC into FSP, CH 2, 2x DC into SSP, DC in next 9 STs, (skip 2 STs, DC in next 9 STs, 2x DC into NSP, CH 2, 2x DC into SSP, DC in next 9 STs) x 7, skip 2 STs, SL ST into 3rd CH of STR CH {192 incl SL ST}
R13: Change yarn to color C and SL ST into next ST, CH 3, DC in next 9 STs, 2x DC into FSP, CH 2, 2x DC into SSP, DC in next 10 STs, (skip 2 STs, DC in next 10 STs, 2x DC into NSP, CH 2, 2x DC into SSP, DC in next 10 STs) x 7, skip 2 STs, SL ST into 3rd CH of STR CH {208 incl SL ST}
R14: Change yarn to color B and SL ST into next ST, CH 3, DC in next 10 STs, 2x DC into FSP, CH 2, 2x DC into SSP, DC in next 11 STs, (skip 2 STs, DC in next 11 STs, 2x DC into NSP, CH 2, 2x DC into SSP, DC in next 11 STs) x 7, skip 2 STs, SL ST into 3rd CH of STR CH {224 incl SL ST}
R15: Change yarn to color C and SL ST into next ST, CH 3, DC in next 11 STs, 2x DC into FSP, CH 2, 2x DC into SSP, DC in next 12 STs, (skip 2 STs, DC in next 12 STs, 2x DC into NSP, CH 2, 2x DC into SSP, DC in next 12 STs) x 7, skip 2 STs, SL ST into 3rd CH of STR CH and INV FO {240 incl SL ST} – watch this video tutorial on How to crochet an invisible fasten off
Weave all yarn tails in apart from the starting tail from the magic ring that you will use for sewing at the assembly stage.
If your item is too wavy, you may need to block it or gently press it flat with an iron on a low temperature setting.
Pattern Part 3 – Now Available
Hook size if using Light worsted weight yarn (DK yarn #3): 3mm (C-2)
Hook size if using Worsted weight yarn (Aran yarn #4): 3.5mm (E-4)
Yarn color: color A, B and C
Number of pieces: make one
Start with color C
R1: MR – 6 x SC into the ring {6}
R2: INC in each ST around {12}
R3: (SC in next ST, INC) x 6 {18}
R4: SC in next ST, INC, (SC in next 2 STs, INC) x 5, SC in next ST {24}
R5: (SC in next 3 STs, INC) x 6 {30}
R6: (SC in next 9 STs, INC) x 3 {33}
R7: SC in each ST around {33}
Change yarn to color B
R8: SC in each ST around {33}
Change yarn to color A
R9: SC in next 5 STs, INC, (SC in next 10 STs, INC) x 2, SC in next 5 STs {36}
R10: INC in first ST, SC in next 35 STs {37}
R11: SC in next 13 STs, INC in next 11 STs, SC in next 13 STs {48}
R12: SC in each ST around {48}
R13: (SC in next 7 STs, INC) x 6 {54}
R14: SC in each ST around {54}
R15: SC in next 4 STs, INC, (SC in next 8 STs, INC) x 5, SC in next 4 STs {60}
R16-R18 (3 rounds): SC in each ST around {60}
R19: in this round, you will attach the pieces you made as Part 1 of this mystery pattern to this piece (I think by now you have gathered you will be attaching the ears :-)) – watch this video tutorial on How to attach ears to your Amigurumi toy without sewing
- SC in next 20 STs
- attach the 1st ear: SC in next 7 STs
- SC in next 8 STs
- attach the 2nd ear: SC in next 7 STs
- SC in next 18 STs {60}
R20-R21 (2 rounds): SC in each ST around {60}
R22: SC in next 4 STs, INV DEC, (SC in next 8 STs, INV DEC) x 5, SC in next 4 STs {54}
R23: (SC in next 7 STs, INV DEC) x 6 {48}
R24: SC in next 3 STs, INV DEC, (SC in next 6 STs, INV DEC) x 5, SC in next 3 STs {42}
R25: (SC in next 5 STs, INV DEC) x 6 {36}
Start stuffing and continue to stuff gradually
R26: SC in next 2 STs, INV DEC, (SC in next 4 STs, INV DEC) x 5, SC in next 2 STs {30}
R27: (SC in next 3 STs, INV DEC) x 6 {24}
R28: SC in next ST, INV DEC, (SC in next 2 STs, INV DEC) x 5, SC in next ST {18}
R29: (SC in next ST, INV DEC) x 6 {12}
R30: SC in each ST around {12}
Stuff well, close the hole using a tapestry needle and weave the yarn end in.
Watch this video tutorial on How to close a hole in an Amigurumi piece
Pattern Part 4 – Now Available
Today’s part is going to be a quick one, as there isn’t much to do! All we’re going to do is sculpt the ears to give them their cute floppy shape. Then, next week, we’ll move on to the finishing touches and final assembly.
For this part, you’ll only need your yarn needle, your scissors and a longer strand of the same yarn you used to make the head (about 30cm/12″). I’ve also included a couple of photos to help you out if you struggle with the sculpting. 🙂
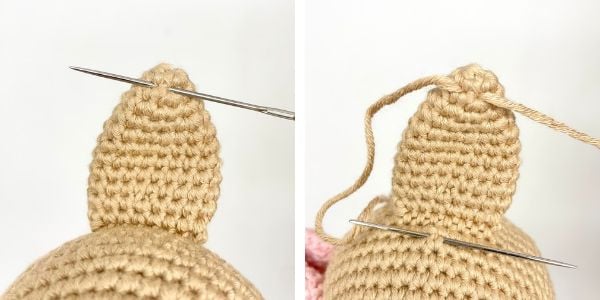
You can now sculpt the ears to give them a nice floppy shape:
- thread your yarn needle with a longer strand of the same yarn you used to make the head
- pull the needle through a couple of the front stitches at the top of the ear, leaving a longer tail
- pull the needle through a couple of stitches on the head, roughly halfway in front of the ear
- pull both yarn tails tight to fold the ear forward and down
- tie a double knot with both yarn tails and weave the tails inside the head
- repeat for the other ear
Pattern Part 5 – will be published on Monday 5th October 2026
Explore My Free Amigurumi Patterns and Tutorials
If you like my crochet along patterns, you may also love these Amigurumi patterns and video tutorials. Why don’t you give them a try?!
What is Amigurumi? And why you’ll love it!
Best yarn for Amigurumi crochet
Free crochet bunny lovey pattern
Happy crocheting!


Where can i find toy 2 pattern
Hi Morag, you can find the crochet along pattern for Toy 2 here: https://www.cuddlystitchescraft.com/mystery-amigurumi-crochet-along-toy-2/
Love,
Petra x