
This post may contain affiliate links, please read my full disclosure policy for more details.

This crochet baby rattle is a sweet addition to my crochet bunny lovey blanket and together they make a beautiful crochet baby gift your friends and family will love! This free crochet bunny rattle pattern is very simple pattern so it is an ideal crochet project for beginners. Plus it is a pretty quick make so you will have it done in no time! 🙂
I also love that this crochet rattle can be used as a crochet teether thanks to the wooden ring which is safe to use for babies and fits perfectly in their little hands.
Free Gift for You!
Download this crochet baby rattle pattern as a FREE PDF – just scroll down and find the ‘FREE Printable Pattern PDF’ section.

Crochet Rattle Free Pattern – Notes
Skill level: beginner crochet skills and knowledge
Finished size when using Light worsted #3 = DK/8 ply yarn weight and 3mm or C/2 hook:
- Height: 18cm (7 inches)
- Width: 8cm (3 inches)
Pattern Gauge:
- using 3 mm hook (C/2) & light worsted weight yarn (DK #3)
- flat crochet circle 2″ (5cm) in diameter = 6 rounds with 36 stitches in the last round
Crochet Rattle Free Pattern – Materials and Equipment
Yarn I used for this free crochet rattle pattern:
– Light worsted #3 = DK/8 ply
– 51% cotton yarn and 49% bamboo yarn blend
– 1x ball of pink yarn – Coboo Lion Brand – colour 101 – (100g/212m)
I love using the cotton and bamboo blend for this free Amigurumi pattern as it makes the crochet baby rattle super soft and cuddly. You can purchase the Coboo Lion Brand yarn from Lion Brand in US and LoveCrafts in UK.
Have a read of my Best yarn for Amigurumi crochet tutorial to find out more about what types of yarn are the best for making crochet toys.
Yarn Substitutes
US Suppliers:
Sport weight yarn (4ply #2):
- 100% cotton: Schachenmayr Pyramid Cotton
- blend of cotton/acrylic: WeCrochet Comfy
Light worsted weight yarn (DK #3):
- 100% cotton: WeCrochet Animation
- blend of cotton/acrylic: Sirdar Stories DK
- blend of cotton/bamboo: Stylecraft Naturals Bamboo & Cotton DK
UK Suppliers:
Sport weight yarn (4ply #2):
- 100% cotton: Scheepjes Catona
- 100% cotton: Paintbox Yarns Cotton
- blend of cotton/acrylic: YarnArt Jeans
Light worsted weight yarn (DK #3):
- 100% cotton: Paintbox Yarns Cotton DK
- blend of cotton/acrylic: Paintbox Yarns Cotton Mix DK
- blend of cotton/bamboo: Stylecraft Naturals Bamboo & Cotton DK
Other materials used: polyester fibre fill, a long piece of black embroidery thread yarn for eye embroidery, a long piece of white yarn (ideally DK/Light worsted yarn) for nose embroidery
Crochet hook: I used 3mm = C/2, if using different weight of yarn then refer to hook size recommendations on the yarn but go one size smaller. I highly recommend this ergonomic crochet hook set from Amazon as it comes in a stylish case and with other accessories such as stitch markers etc.
Other equipment used: scissors, yarn needle/tapestry needle, pins with large heads, stitch marker or thin yarn to use instead, rattle insert/rattle ball, wooden ring (outside diameter – 7cm/2.75 inches).
Choking hazard warning: the use of safety eyes or buttons poses a choking risk for children under the age of 3 therefore I recommend using embroidery instead.
Best Yarn for Amigurumi – Get the Free Guide Now!
Sign up for my newsletter and receive the free guide straight into your inbox. Plus stay in the loop with updates on new designs, tutorials and special offers.
Crochet Rattle Free Pattern – Abbreviations Used
This baby rattle crochet pattern is written using US terms
– MR: magic ring/magic circle
– SL ST: stitch
– SC: single crochet stitch
– HDC: half double crochet stitch
– DC: double crochet stitch
– TC: triple crochet stitch
– CH: chain stitch
– SL: slip stitch
– INC: increase = two single crochet stitches in the same stitch
– L INC: large increase = three single crochet stitches in the same stitch
– DEC: standard decrease
– INV DEC: invisible decrease = insert the crochet hook into the front loop of the first stitch (two loops on hook) and immediately insert it again into the front loop of the next stitch (three loops on the hook). Yarn over and draw through the first two loops on the hook (two loops on the hook). Yarn over and draw through the two loops on the hook to finish your invisible decrease.
– BLO: back loop only
– FO: fasten off
– (…..) x 6: repeat the pattern inside the brackets by the given number (in this example, repeat the pattern in the brackets 6 times)
– {…}: number shown inside these brackets equals the number of total stitches at the end of each round
Mystery Crochet Along
Join our free crochet along and unravel the mystery as you stitch along with other fellow crocheters.
How to Get Help with this Crochet Baby Rattle Pattern
You may find these Amigurumi tutorials handy before you get started with this free crochet pattern. And don’t forget to watch my step by step video crochet tutorials for extra help with my free Amigurumi toys.
Join our Cuddly Stitches Community Facebook group to share your crochet creations, chat to fellow Amigurumi makers or to exchange tips and tricks. You can also share feedback and ask for support when working with my patterns.
Cuddly Stitches Community
Join thousands of other Amigurumi crocheters in our Facebook group. Get help with your projects, show off your creations and share helpful tips and tricks.

Crochet Rattle Free Pattern – Let’s Get Started!
How to Crochet the Ears
Crochet from the top of the ear downwards.
R1: MR – 6 x SC into the ring {6} – watch this step by step video tutorial on How to crochet a magic ring for Amigurumi
R2: (SC in next ST, INC) x 3 {9}
R3: SC in each ST around {9}
R4: SC in next ST, INC, (SC in next 2 ST, INC) x 2, SC in next ST {12}
R5: (SC in next 3 ST, INC) x 3 {15}
R6: SC in next 2 ST, INC, (SC in next 4 ST, INC) x 2, SC in next 2 ST {18}
R7-R11 (5 rounds): SC in each ST around {18}
R12: SC in next 2 ST, INV DEC, (SC in next 4 ST, INV DEC) x 2, SC in next 2 ST {15} – watch this step by step video tutorial on How to crochet an invisible decrease for Amigurumi
R13-R14 (2 rounds): SC in each ST around {15}
R15: (SC in next 3 ST, INV DEC) x 3 {12}
R16: SC in each ST around {12}
R17: SC in next ST, INV DEC, (SC in next 2 ST, INV DEC) x 2, SC in next ST {9}
Do not stuff, FO leaving a long tail for sewing.
Fold the bottom of each ear in half and sew it together before attaching the ears to the head.
Explore My Popular Pattern Bundles!
Get Lifetime Access to All Patterns!
Don’t miss out on this fantastic offer! Get unlimited access to all of my printable crochet patterns.
How to Crochet the Head
Crochet a ball.
R1: MR – 6 x SC into the ring {6}
R2: INC in each ST around {12}
R3: (SC in next ST, INC) x 6 {18}
R4: SC in next ST, INC, (SC in next 2 ST, INC) x 5, SC in next ST {24}
R5: (SC in next 3 ST, INC) x 6 {30}
R6: SC in next 2 ST, INC, (SC in next 4 ST, INC) x 5, SC in next 2 ST {36}
R7: (SC in next 5 ST, INC) x 6 {42}
R8: SC in next 3 ST, INC, (SC in next 6 ST, INC) x 5, SC in next 3 ST {48}
R9: (SC in next 7 ST, INC) x 6 {54}
R10-R18 (9 rounds): SC in each ST around {54}
R19: (SC in next 7 ST, INV DEC) x 6 {48}
R20: SC in next 3 ST, INV DEC, (SC in next 6 ST, INV DEC) x 5, SC in next 3 ST {42}
R21: (SC in next 5 ST, INV DEC) x 6 {36}
Start stuffing the head and keep stuffing as you go along. If you wish, you can insert a rattle or a small plastic container with beads into the head at this stage. Insert it into the middle of the head and stuff around it to make sure the head is nice and soft all around it.
R22: SC in next 2 ST, INV DEC, (SC in next 4 ST, INV DEC) x 5, SC in next 2 ST {30}
R23: (SC in next 3 ST, INV DEC) x 6 {24}
R24: SC in next ST, INV DEC, (SC in next 2 ST, INV DEC) x 5, SC in next ST {18}
R25: (SC in next ST, INV DEC) x 6 {12}
R26: SC in each ST around {12}
Stuff well, FO closing the hole using a yarn needle and leave a long tail for sewing the head to the ring.
Watch this step by step video on How to close a hole in an Amigurumi piece
Planning to sell on Etsy?
Take advantage of this AMAZING OFFER! Open an Etsy shop by clicking on the button below and list your first 40 items FREE!
How to Crochet the Wooden Ring Stripe
Crochet in rows rather than in rounds.
R1: Chain 11 STs {11} – adjust the number of chain stitches if needed depending on the width of your wooden ring. The width of my wooden ring is 1cm so I chained 11 stitches. The stripe needs to be very tight when it is sewn to the wooden ring otherwise the bunny head will be too wobbly.
R2: SC in 10 STs starting from the 2nd CH from the hook {10}
R3: Chain 1x, turn over and SC in 10 STs (BLO) starting from the second chain from the hook {10}
R4–R21: Chain 1x, turn over and SC in 10 STs (BLO) starting from the 2nd CH from the hook {10}
FO and DO NOT cut the yarn tail off as you will use it to sew the stripe to the wooden ring.
Weave in the yarn tail left from the starting chain.

How to Assemble your Crochet Rattle
Attaching ears to the head: Pin the ears to the head making sure they look symmetrical from the front, side and back. Sew the ears to the head. I placed the ears between R4 and R6 of the head.
Eye and nose embroidery: Embroider the eyes using a long piece of black thread yarn as shown in the photo below. I embroidered the eyes between R11 and R13 leaving 5 stitches in between the eyes.
Watch this video tutorial on How to embroider eyes on Amigurumi. The eyes in the video are slightly different but the technique is the same.
To embroider the nose, use a long piece of white DK/light worsted yarn. I embroidered the nose between R14 and R18.

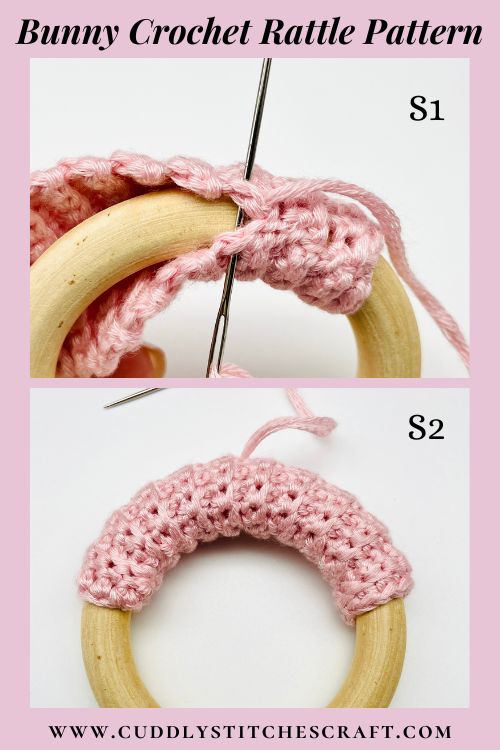
Sewing the stripe to the wooden ring: Sew the stripe to the wooden ring as shown in Pic S1. Make sure your stitches are very tight and the stripe is not loose otherwise the bunny head will be too wobbly.
Once done with the sewing, pull the yarn tail through the inside of the stripe and come out in the middle of it as shown in Pic S2. You will use this tail to secure the head to the ring.
Sewing the head to the wooden ring:
– you need to sew the head to the stripe really tight to make sure it can’t be pulled off
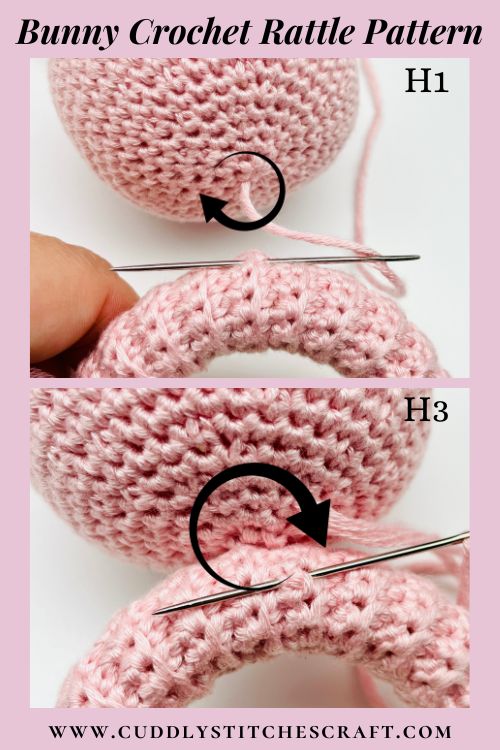
– thread your needle with the yarn tail left at the bottom of the head and sew R26 of the head to the stripe and then tie a knot with the yarn tail you pulled to the middle of the stripe after you attached it to the wooden ring (Pic H1)
– the head will be quite wobbly at this stage so you need to continue sewing
– you now need to sew R24 of the head to the stripe and again tie a knot with both yarn tails (Pic H3)
– if the head is nice and steady you can weave both yarn ends in while pulling the knot inside the stripe to hide it
– if the head is still wobbly, you can do one more round of stitches
You have now finished your Amigurumi rattle. And if you enjoyed the easy assembly then you will love these patterns:
No-Sew Amigurumi Crochet Patterns
Low-Sew Amigurumi Crochet Patterns
Free Printable Pattern PDF
Sign up for my newsletter and receive the crochet rattle free pattern straight into your inbox.

Grab this Free PDF Pattern – Crochet Bunny Rattle
Sign up for my newsletter and receive the free pattern straight into your inbox.
Explore More of My Free Amigurumi Patterns
If you like this crochet rattle free pattern, you may also love these crochet baby toys. Why don’t you give them a try?!
Free crochet bunny rattle pattern
Free crochet giraffe lovey pattern
Free crochet dinosaur pattern
Free crochet bunny lovey pattern
Free crochet bunny rabbit pattern
Or browse through my collection of crochet lovey and rattle patterns and make something special for your baby. Or surprise your friends and family with with an adorable baby shower gift!
Happy crocheting!
Frequently Asked Questions
Have a question? Why don’t you search for the answer in the FAQ below.
Yes, absolutely. My crochet animal patterns work great with a variety of different yarns including worsted weight yarn. Your crochet toy will just be a bit bigger than specified.
However, I wouldn’t use worsted weight yarn for making my loveys as they could feel a bit bulky. I prefer using thinner yarn such as Sport yarn #2 of Light worsted yarn #3 for a nice cuddly feel.
Having said that, my lovey patterns will absolutely work with worsted weight yarn if that’s the type of yarn you prefer using. But bear in mind that your loveys will be a bit bigger than specified in this pattern.
To find out more about the best yarn for making crochet toys have a read of my Best Yarn for Amigurumi Crochet tutorial.
I am very happy to help and provide support with any of my patterns. Visit my Contact page for different options on how to get in touch with me.
I would be very grateful if you could link to my patterns and tutorials on social media. But sharing of my actual written patterns on social media is strictly prohibited. For more details, have a read of my Copyright Policy.
You may sell finished items that you made using my Amigurumi patterns, provided you credit me as the original designer and provide a link back to my blog.
My free patterns are only available online on my blog and are not printable. If you would like to download a PDF version of my patterns then you can purchase them for a small fee from my Etsy store or Ravelry store.


Thanks so much Petra! what a cutie
Thank you and you are very welcome Arina! 🙂
Love, Petra x
bello, me quedé no puedo bordar los ojos tendrás un tutorial gracias realice los 2
Hi Devo, thank you for your comment. Unfortunately I don’t have a tutorial on how to embroider the eyes at the moment. But I am planning to do one this summer.
Love, Petra x