
This post may contain affiliate links, please read my full disclosure policy for more details.

Welcome to our Mystery Amigurumi Crochet Along!
I’m thrilled to announce that our ‘Mystery Crochet Along’ has now started and will run until Friday 26th June 2026! Don’t forget to sign up for free to get notified when each part of the mystery pattern is released! If you’ve joined one of my previous CALs, you’re already on the list. 🙂
You can simply scroll down to find all the details you need including the pattern. If you’re new to the idea of a crochet along or want to learn more, be sure to check out our ‘Mystery Amigurumi Crochet Along’ Hub.
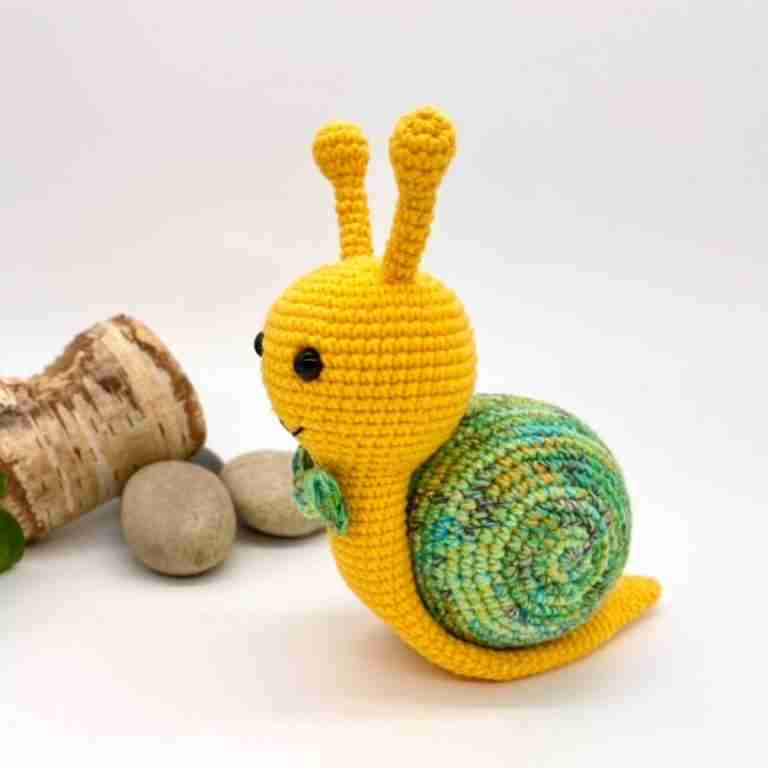
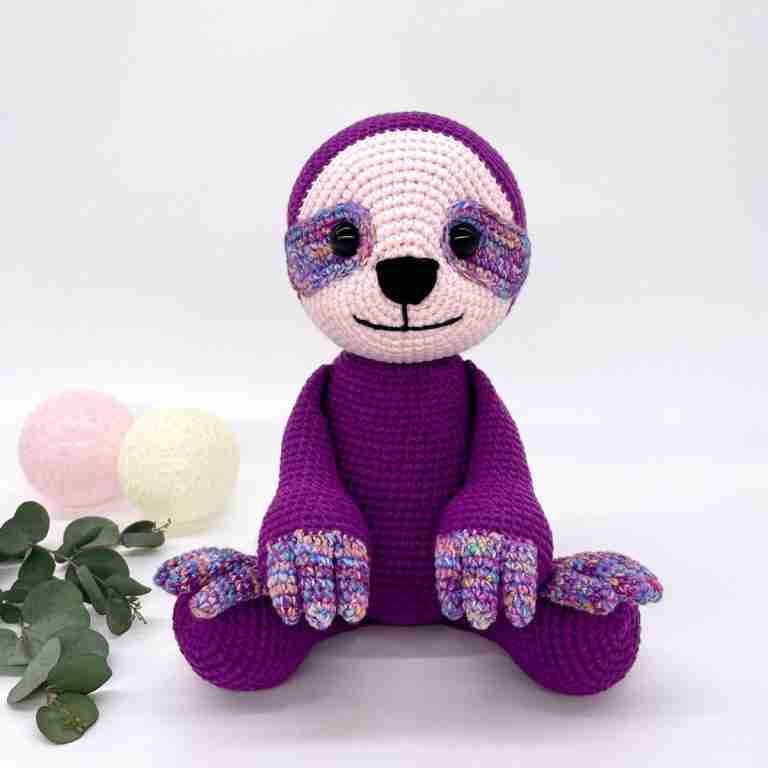
And because so many of you love making multiple toys during the event, I’ve decided to include not one, but TWO patterns this time! They’ll be very similar in style but will turn into two different animals. You can choose to make just one of them or make both and create a matching pair. 🙂
Mystery Crochet Along
Join our free crochet along and unravel the mystery as you stitch along with other fellow crocheters.
Mystery Crochet Along Details – June 2026
Prep Before We Start
- first of all you need to purchase the yarn needed for this project and prepare all other materials and equipment – you can already find all this information in this post
- make a note of the schedule so you know when to come back to this post when another part of the pattern is published
- subscribe to my Newsletter so you can be notified each time a new part of the pattern is published (no need to sign up if you signed up already during previous crochet alongs)
- join our Cuddly Stitches Community to share photos, feedback and ask for support
- and don’t forget to share this ‘crochet along’ with your family and friends…the more, the merrier!
Cuddly Stitches Community
Join thousands of other Amigurumi crocheters in our Facebook group. Get help with your projects, show off your creations and share helpful tips and tricks.
Schedule
I will publish the mystery pattern in 5 stages and you will receive a newsletter update each time a new part of the pattern is available.
Part 1 – now available
Part 2 – now available
Part 3 – now available
Part 4 – now available
Part 5 – will be published on Monday 22nd June 2026 by 10am EST
Competition Deadline – 8pm on Thursday 25th June 2026 (EST) – please share photos of your finished projects by this deadline if you would like to be in with a chance of winning the mystery pattern PDF.
Competition winners announced and final photos published – Friday 26th June 2026.
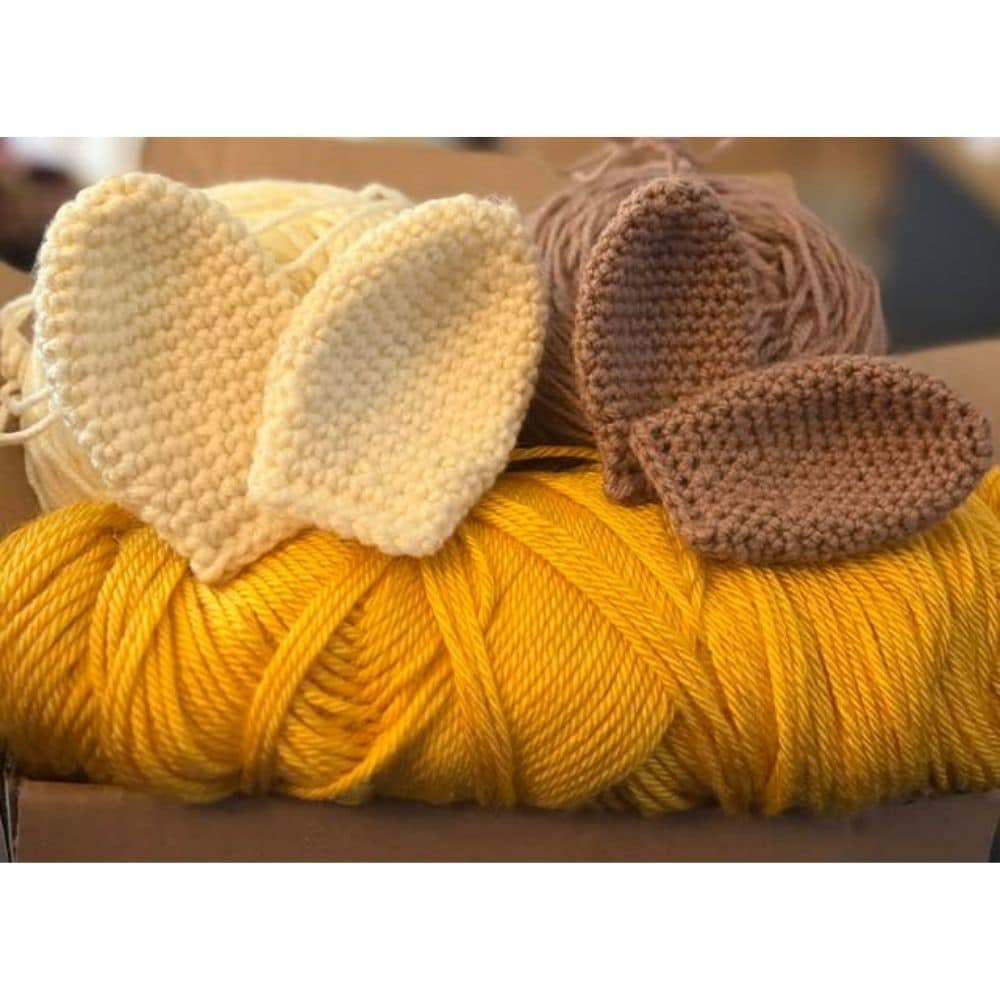
Yarn Requirements
Both patterns will work great with the below yarns:
- 100% cotton yarn, 100% acrylic yarn or a blend of cotton and acrylic
- Sport weight yarn (4ply #2)
- Light worsted weight yarn (DK #3)
- Worsted weight yarn (Aran #4)
Toy #1 – you will need the below colors:
- color A – yellow, cream or even ginger/mustard yellow
- color B – orange, cream or dark yellow – pick a color that creates a nice contrast with color A
Toy #1 – yardage needed – if using Sport weight yarn (4ply #2) and a 2.5mm crochet hook (B-1):
- color A – approx 40g (128m = 140yds)
- color B – approx 9g (29m = 32yds)
Toy #2 – you will need the below colors:
- color A – darker shade of green
- color B – light brown
- color C – dark brown
- color D – dark yellow or orange
- color E – white or cream
Toy #2 – yardage needed – if using Sport weight yarn (4ply #2) and a 2.5mm crochet hook (B-1):
- color A – approx 17g (54m = 59yds)
- color B – approx 23g (74m = 81yds)
- color C – approx 12g (38m = 42yds)
- color D – approx 9g (29m = 32yds)
- color E – approx 2g (6.5m = 7yds)
Yarn I have used for both patterns:
- Sport weight yarn (4ply #2)
- 55% cotton and 45% acrylic blend
- Toy #1 – Color A (yellow yarn) – YarnArt Jeans – color 88 – (50g/160m)
- Toy #1 – Color B (orange yarn) – YarnArt Jeans – color 35 – (50g/160m)
- Toy #2 – Color A (green yarn) – YarnArt Jeans – color 52 – (50g/160m)
- Toy #2 – Color B (beige yarn) – YarnArt Jeans – color 07 – (50g/160m)
- Toy #2 – Color C (dark brown yarn) – YarnArt Jeans – color 70 – (50g/160m)
- Toy #2 – Color D (orange yarn) – YarnArt Jeans – color 35 – (50g/160m)
- Toy #2 – Color E (white yarn) – YarnArt Jeans – color 62 – (50g/160m)
Yarn Substitutes
US Suppliers:
Sport weight yarn (4ply #2):
- 100% cotton: Schachenmayr Pyramid Cotton
- blend of cotton/acrylic: WeCrochet Comfy
Light worsted weight yarn (DK #3):
- 100% cotton:: WeCrochet Animation DK
- blend of cotton/acrylic: Sirdar Stories DK
Worsted weight yarn (Aran #4):
- 100% acrylic: Universal Yarn Uptown
- 100% acrylic: WeCrochet Brava
UK Suppliers:
Sport weight yarn (4ply #2):
- 100% cotton: Scheepjes Catona
- 100% cotton: Paintbox Yarns Cotton
Light worsted weight yarn (DK #3):
- 100% cotton: Paintbox Yarns Cotton DK
- blend of cotton/acrylic: Paintbox Yarns Cotton Mix DK
Worsted weight yarn (Aran #4):
- 100% acrylic: Universal Yarn Uptown
- 100% acrylic: Scheepjes Chunky Monkey
If you would like to check some more substitutes for YarnArt Jeans then have a read of my Best Yarn for Amigurumi Crochet tutorial. You can find the substitutes towards the end of the article.
Materials and Equipment
Other materials needed:
- some black thread embroidery yarn: approx 1m = 1yds
- some white yarn: approx 1m = 1yds
- polyester fibre fill
Crochet hook size:
- 2.5mm crochet hook (B-1) for Sport weight yarn (4ply #2)
- 3mm crochet hook (C-2) for Light worsted weight yarn (DK #3)
- 3.5mm crochet hook (E-4) for Worsted weight yarn (Aran #4)
- if using a different weight of yarn then refer to the hook size recommendations on the yarn label but go at least one size smaller
I highly recommend this ergonomic crochet hook set from Amazon as it comes in a stylish case and with other handy accessories such as stitch markers etc.
Other equipment needed:
- scissors
- tapestry needle/yarn needle
- pins with large heads
- stitch marker
- 10 mm safety eyes (2 pairs if making both toys) if using Sport weight yarn (4ply #2)
- 12 mm safety eyes (2 pairs if making both toys) if using Light worsted weight yarn (DK #3) or Worsted weight yarn (Aran #4)
Abbreviations
This pattern is written using US crochet terminology
– MR: magic ring
– ST: stitch
– SL ST: slip stitch
– SC: single crochet stitch
– CH: chain
– FL ST: front loop stitch
– BLO: back loop only
– INC: increase = two single crochet stitches in the same stitch
– INV DEC: invisible decrease = insert the hook into the front loop of the first stitch (two loops on hook) and immediately insert it again into the front loop of the next stitch (three loops on the hook). Yarn over and draw through the first two loops on the hook (two loops on the hook). Yarn over and draw through the two loops on the hook to finish your invisible decrease
– FO: fasten off
– INV FO: invisible fasten off
– (…..) x 6: repeat the pattern inside the brackets by the given number (in this example, repeat the pattern in the brackets 6 times)
– {…}: number shown inside these brackets equals the number of total stitches at the end of each round
Mystery Crochet Along June 2026 – Pattern
Pattern Part 1 – Now Available
Hi everyone, I’m so excited that we can finally make a start on our next crochet along! This time, the “mystery” part of the crochet along will be easier to guess because you’ll probably work out what we’re making fairly early on! But I wanted to try something new and bring a slightly different style of project to this CAL.
And as always please keep sharing photos of your work in progress in our Cuddly Stitches Community. 🙂 I can’t wait to see them! 🙂
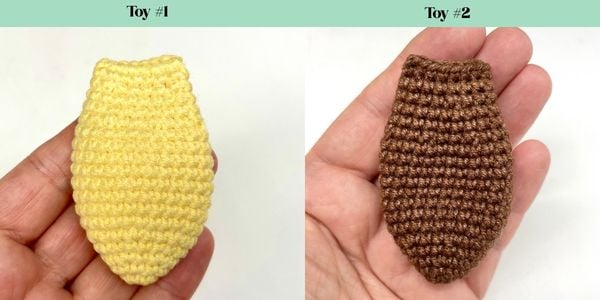
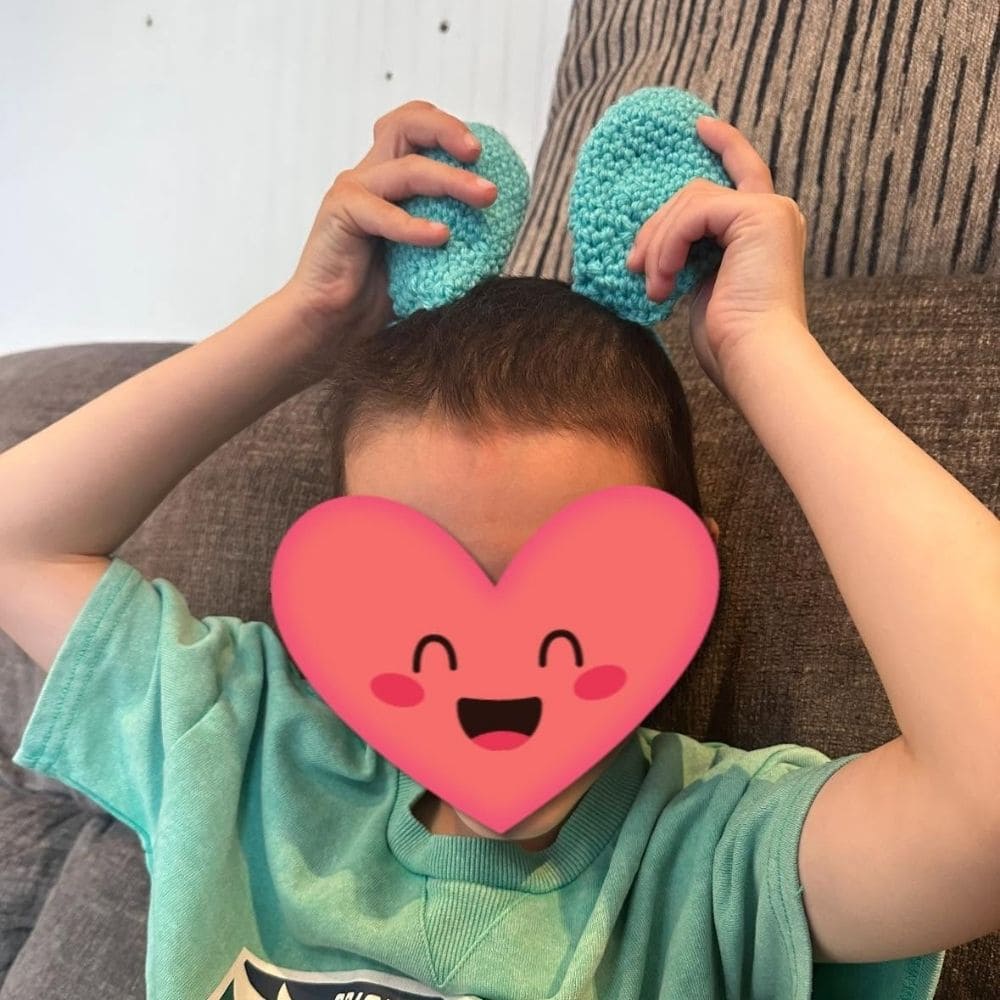
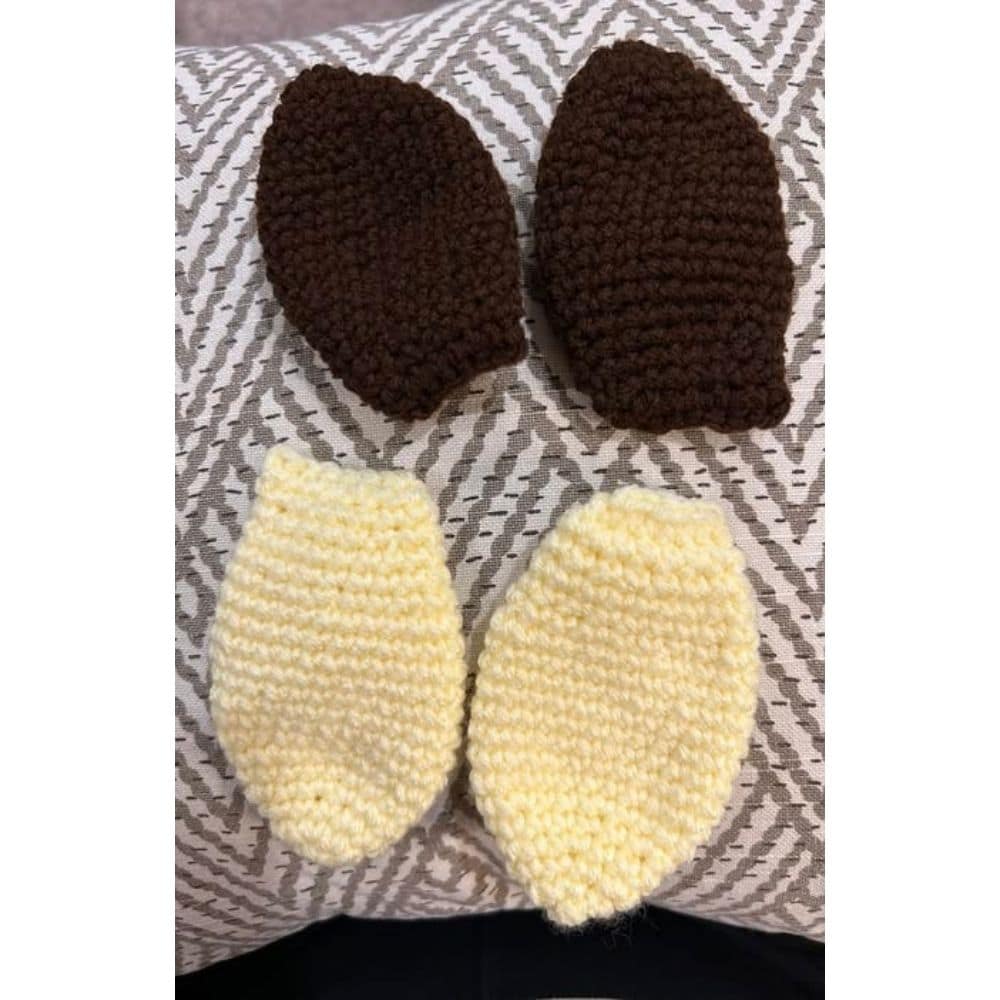
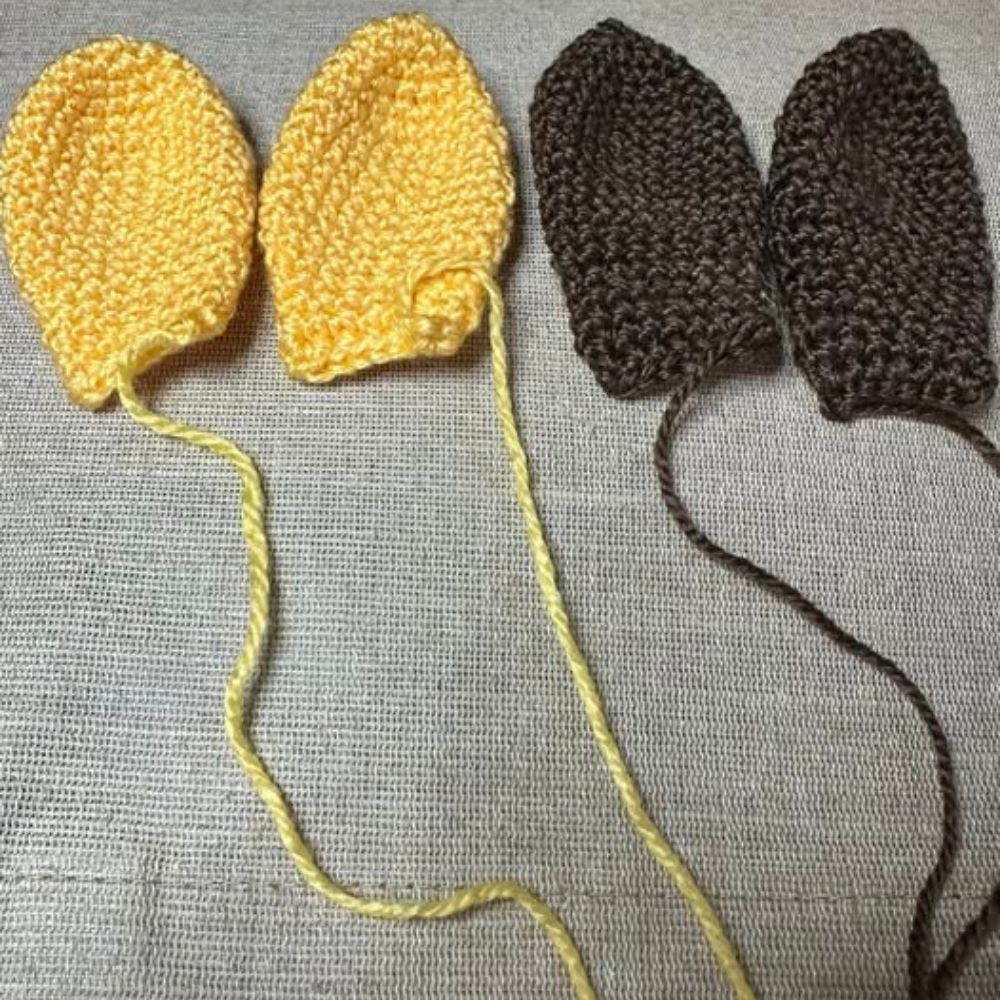
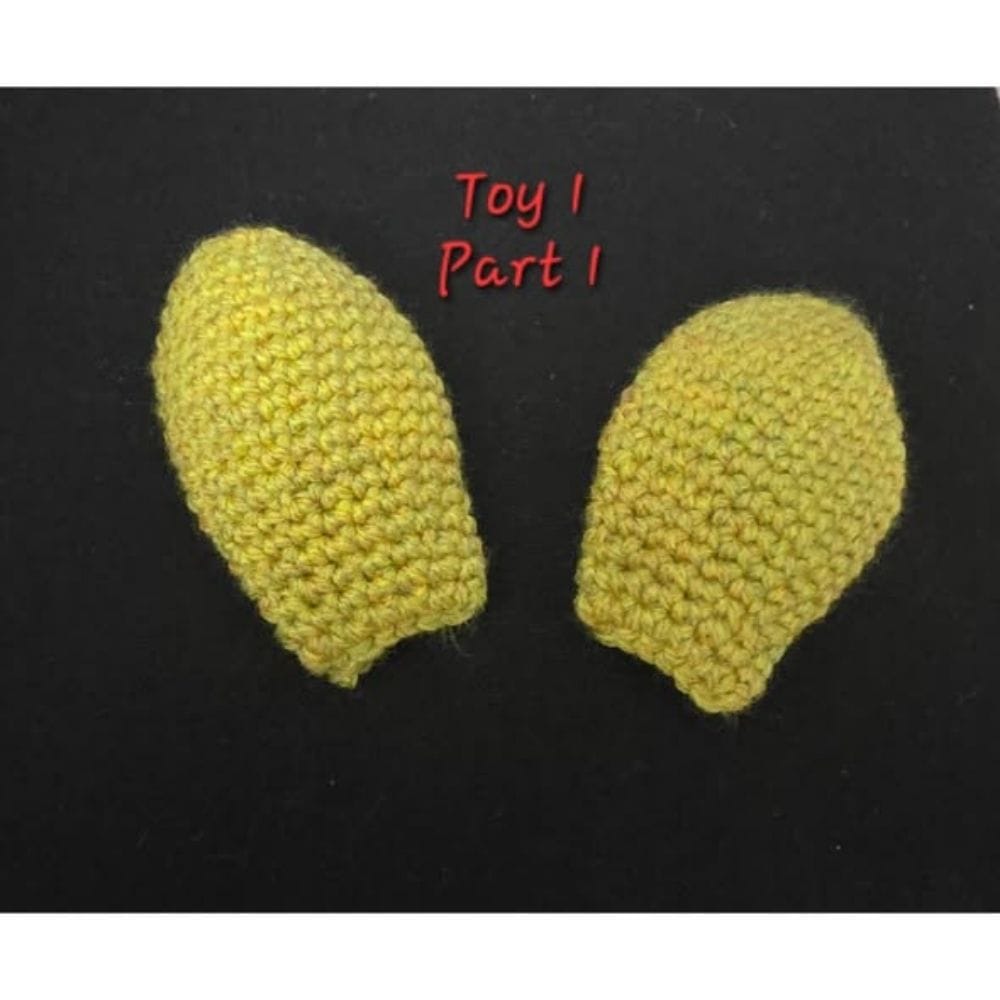
Part 1 is the same for both toys, just different colours:
- Toy #1 – use colour A
- Toy #2 – use colour C
Number of pieces: make two for each toy
R1: MR – 6 x SC into the ring {6} – watch this video tutorial on How to crochet a magic ring
R2: INC in each ST around {12}
R3: SC in each ST around {12}
R4: (SC in next ST, INC) x 6 {18}
R5: SC in each ST around {18}
R6: SC in next ST, INC, (SC in next 2 STs, INC) x 5, SC in next ST {24}
R7-R14 (8 rounds): SC in each ST around {24}
R15: SC in next ST, INV DEC, (SC in next 2 STs, INV DEC) x 5, SC in next ST {18} – watch this video tutorial on How to crochet an invisible decrease
R16-R17 (2 rounds): SC in each ST around {18}
R18: SC in next 2 STs, INV DEC, (SC in next 4 STs, INV DEC) x 2, SC in next 2 STs {15}
R19: SC in each ST around {15}
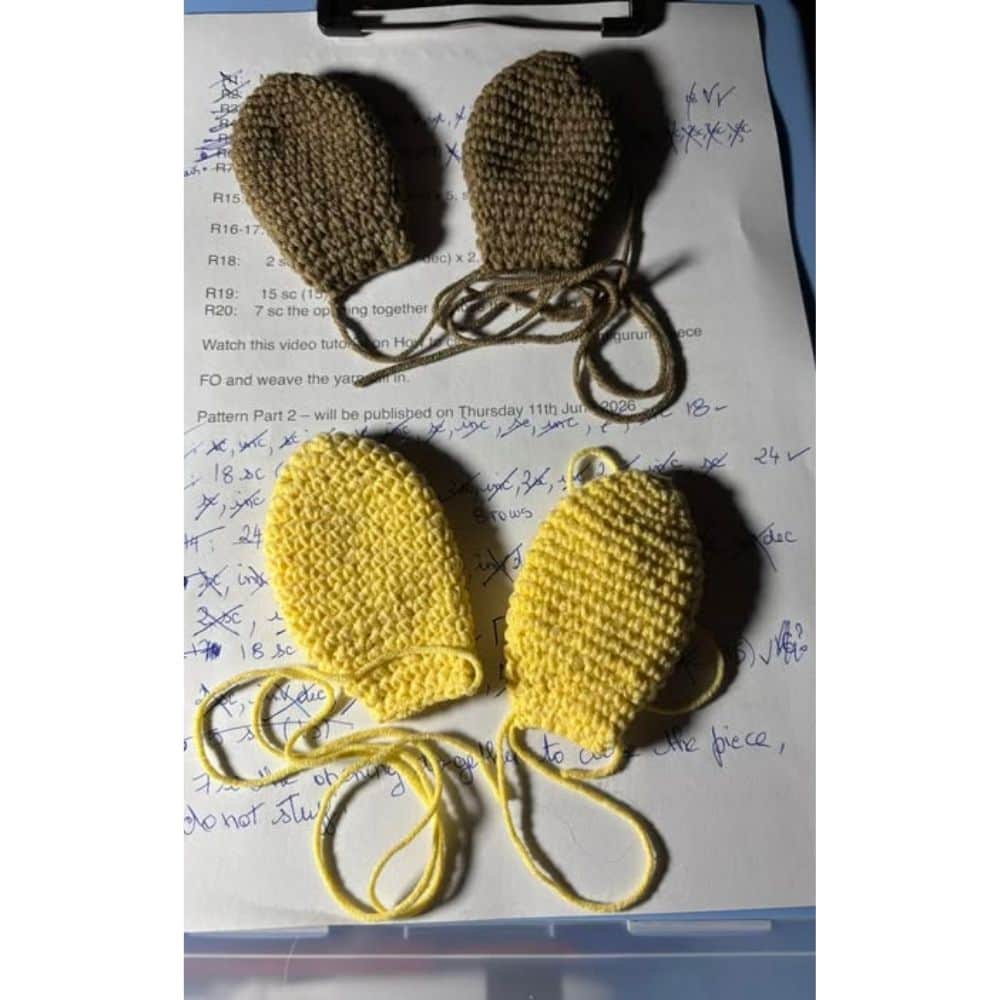
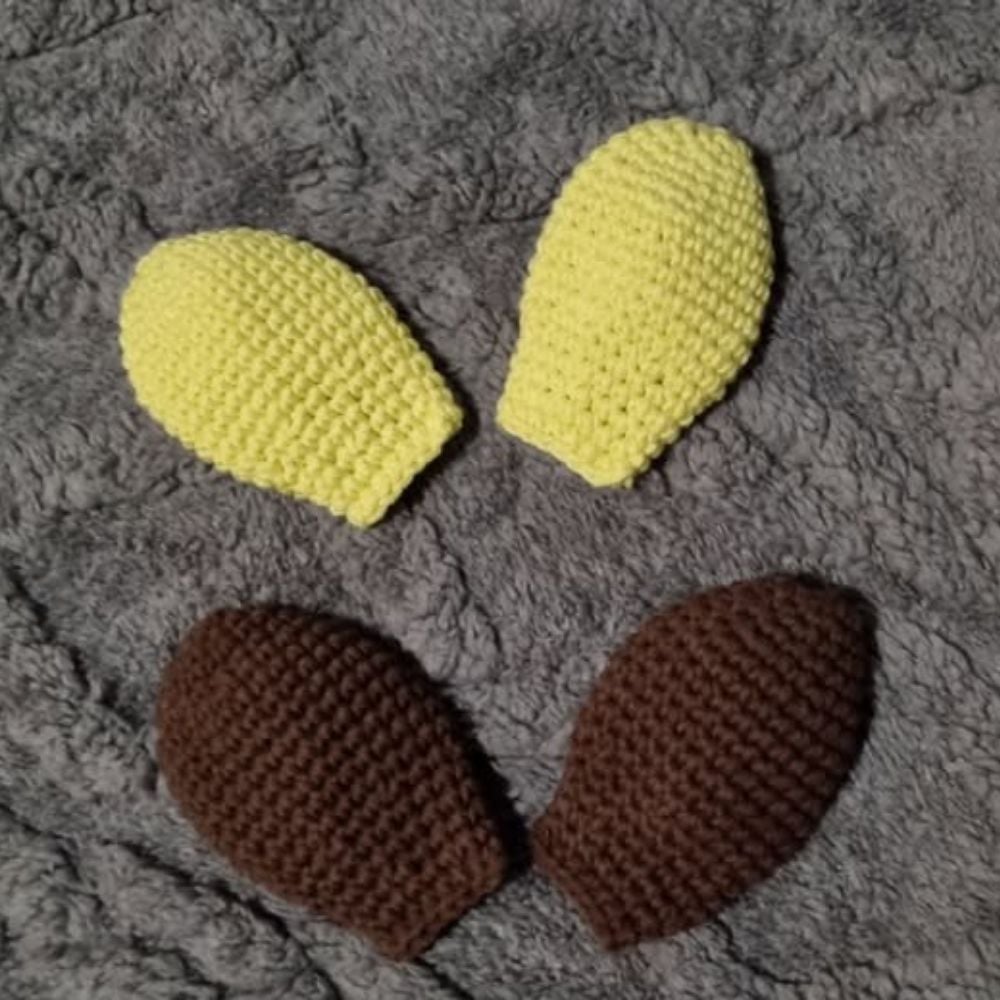
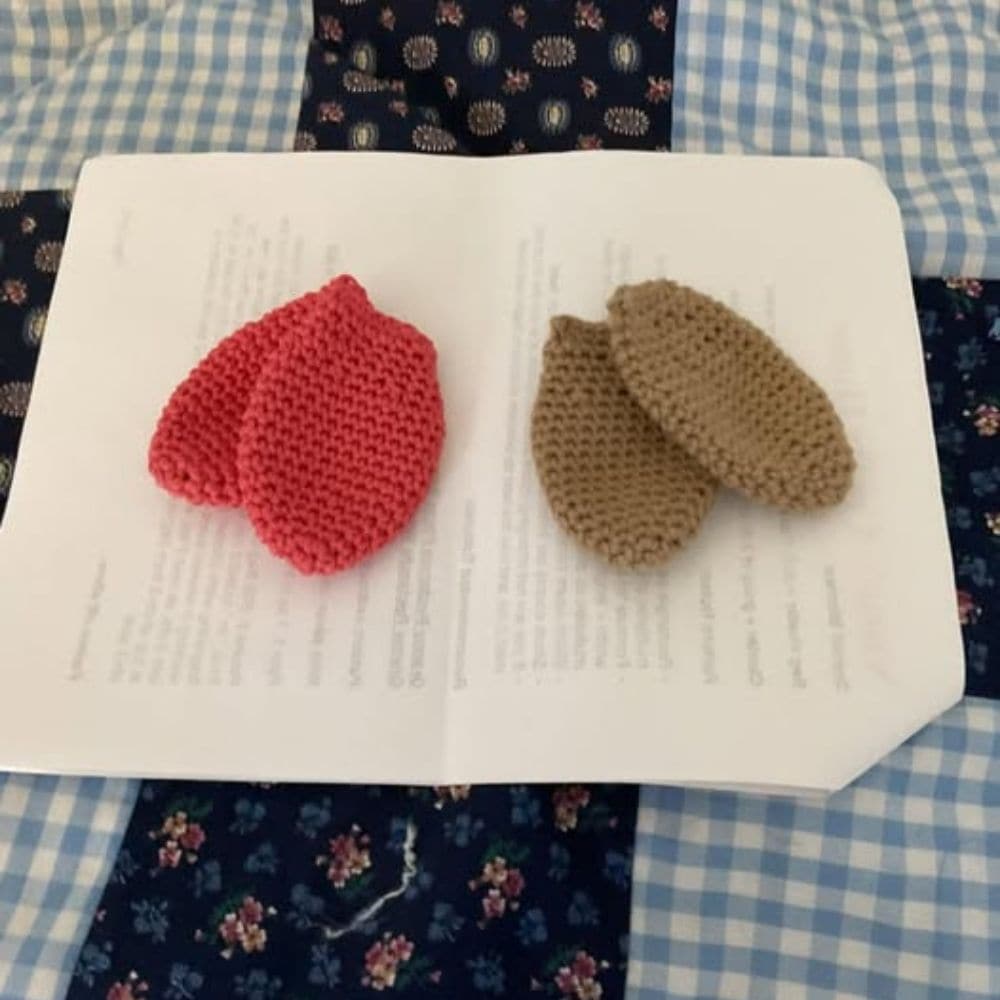
R20: SC the opening together to close the piece, do not stuff {7} – watch this video tutorial on How to close a hole in a flat Amigurumi piece
FO and weave the yarn tail in
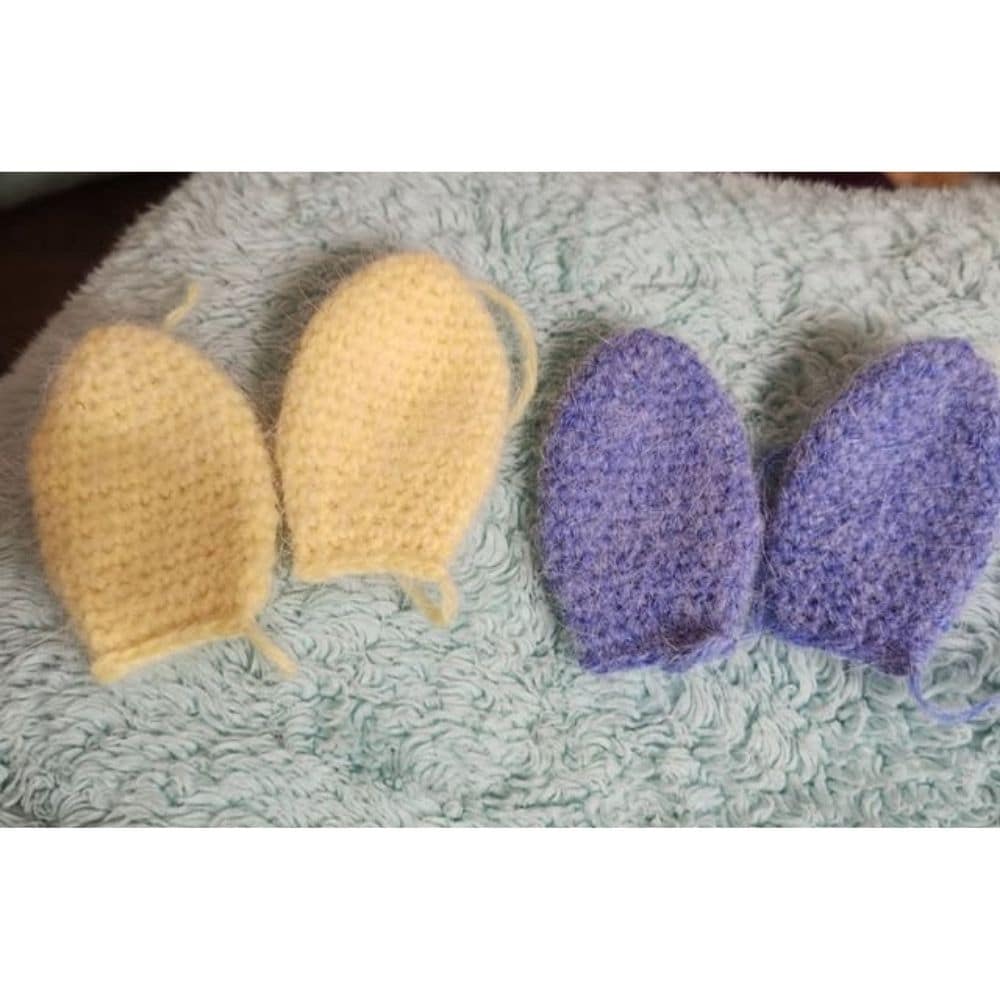
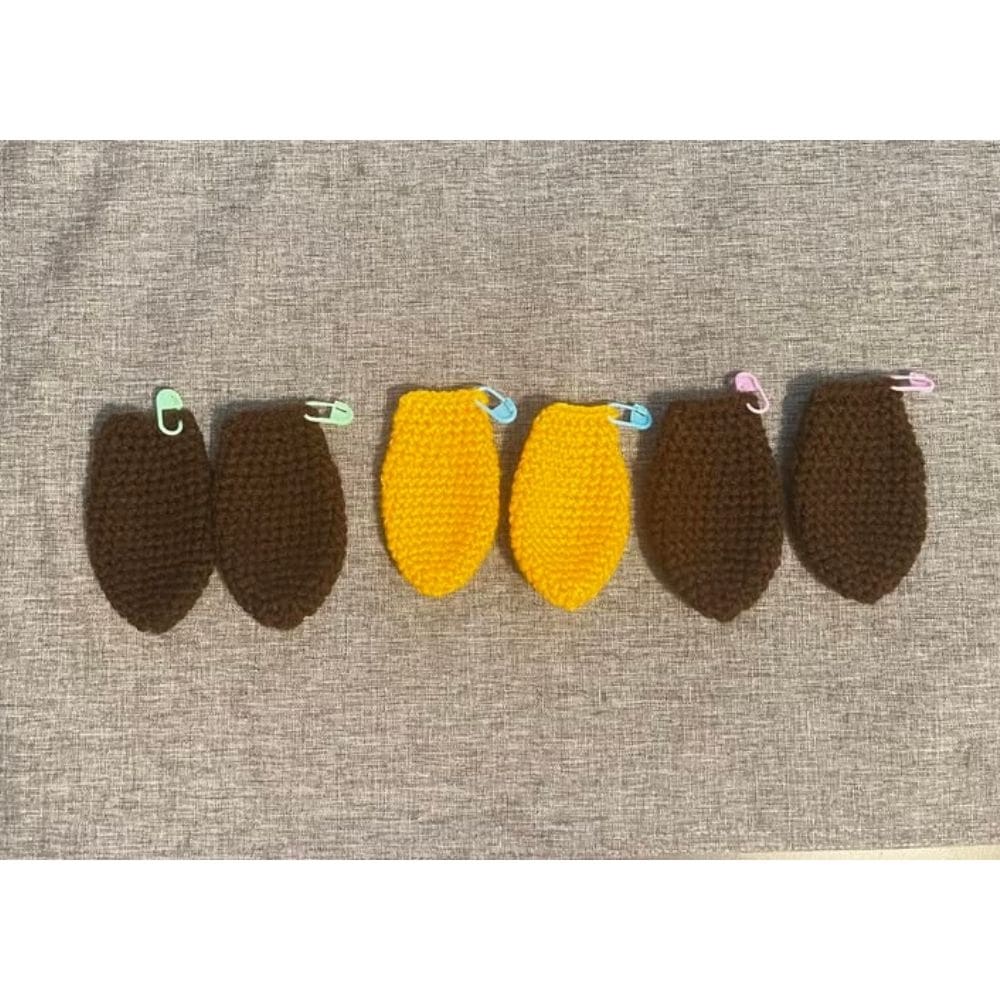
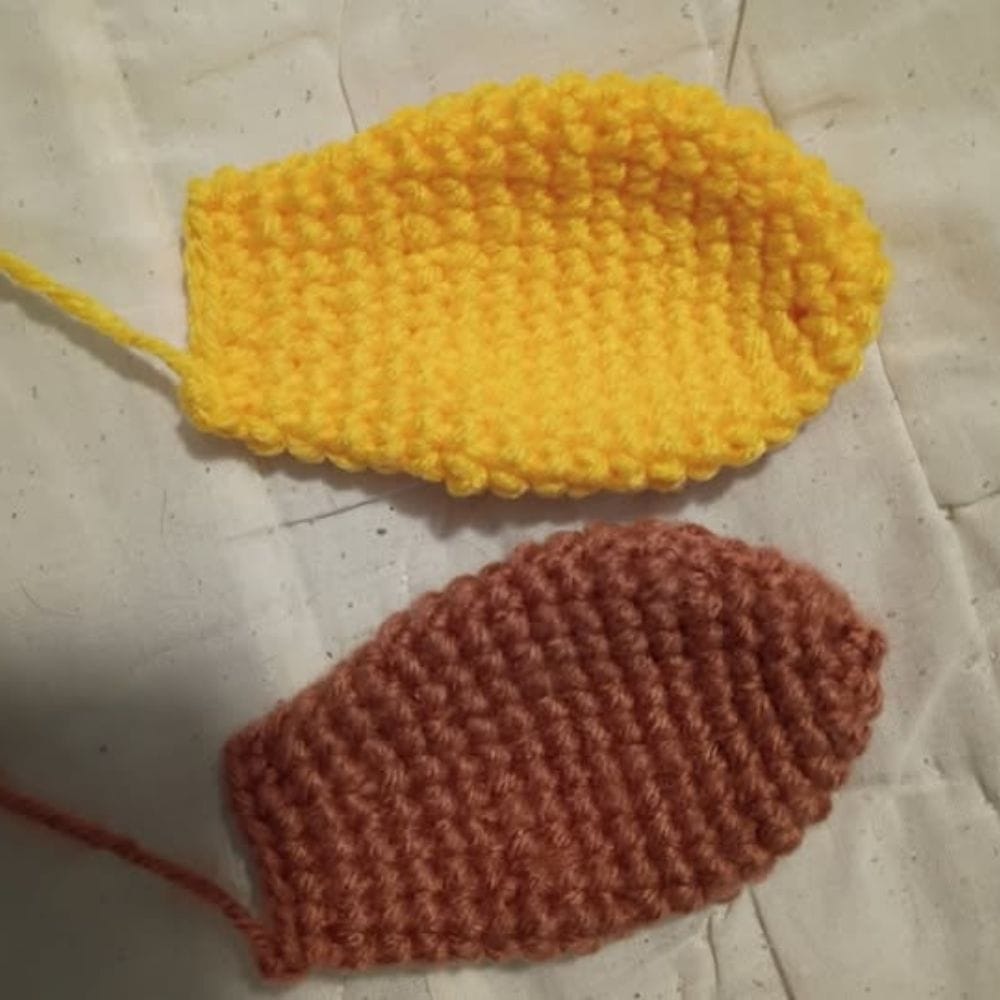
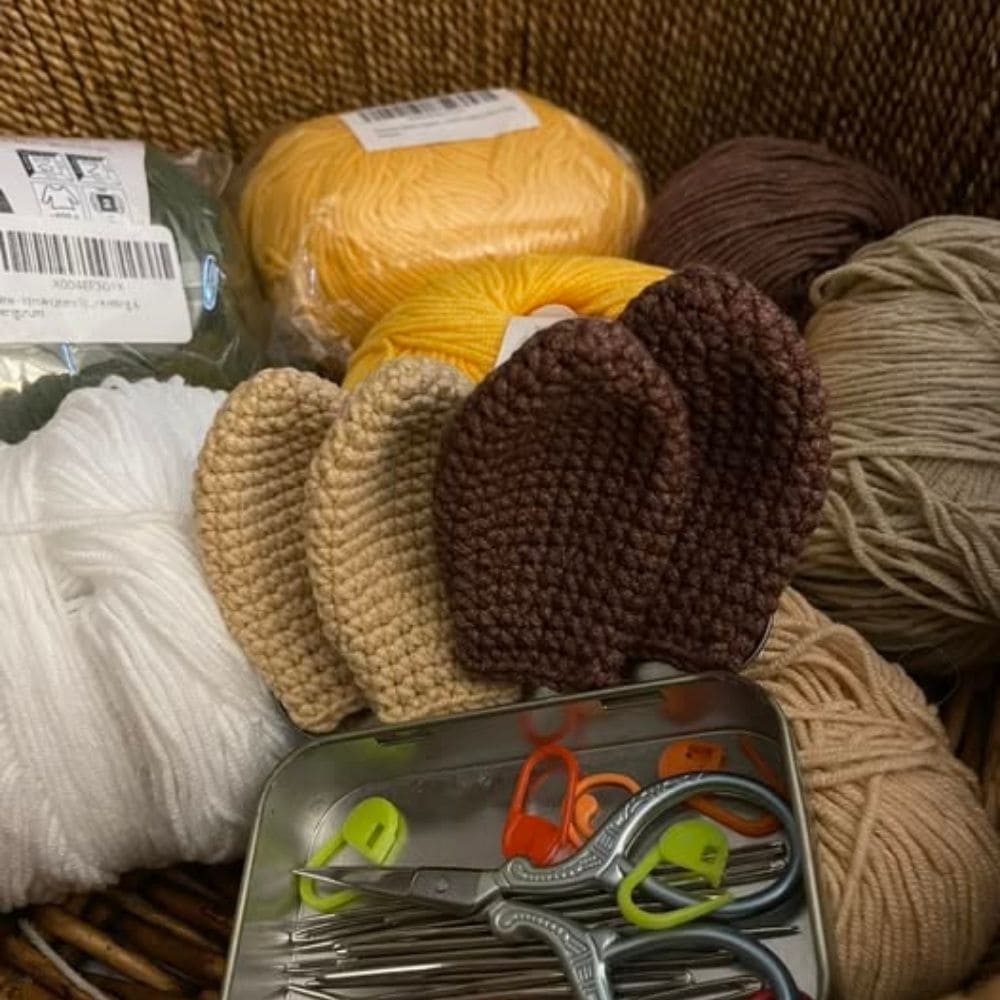
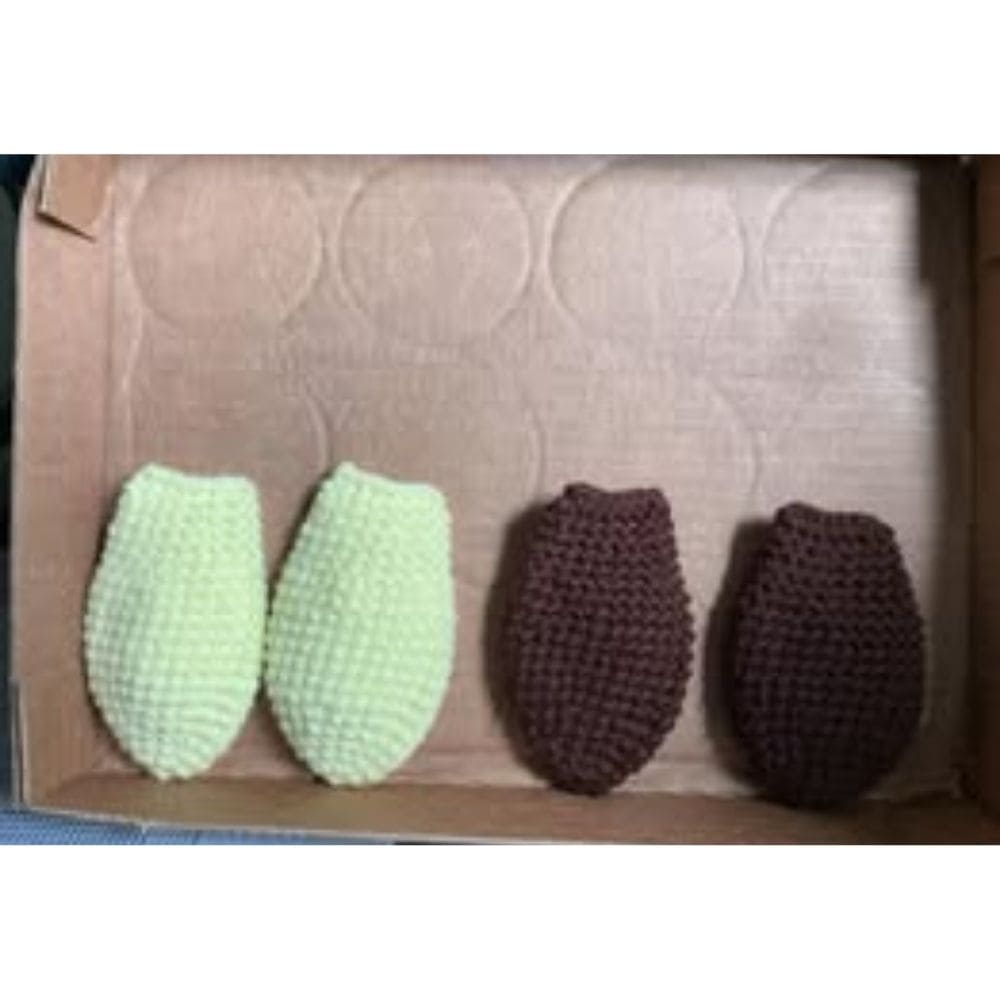
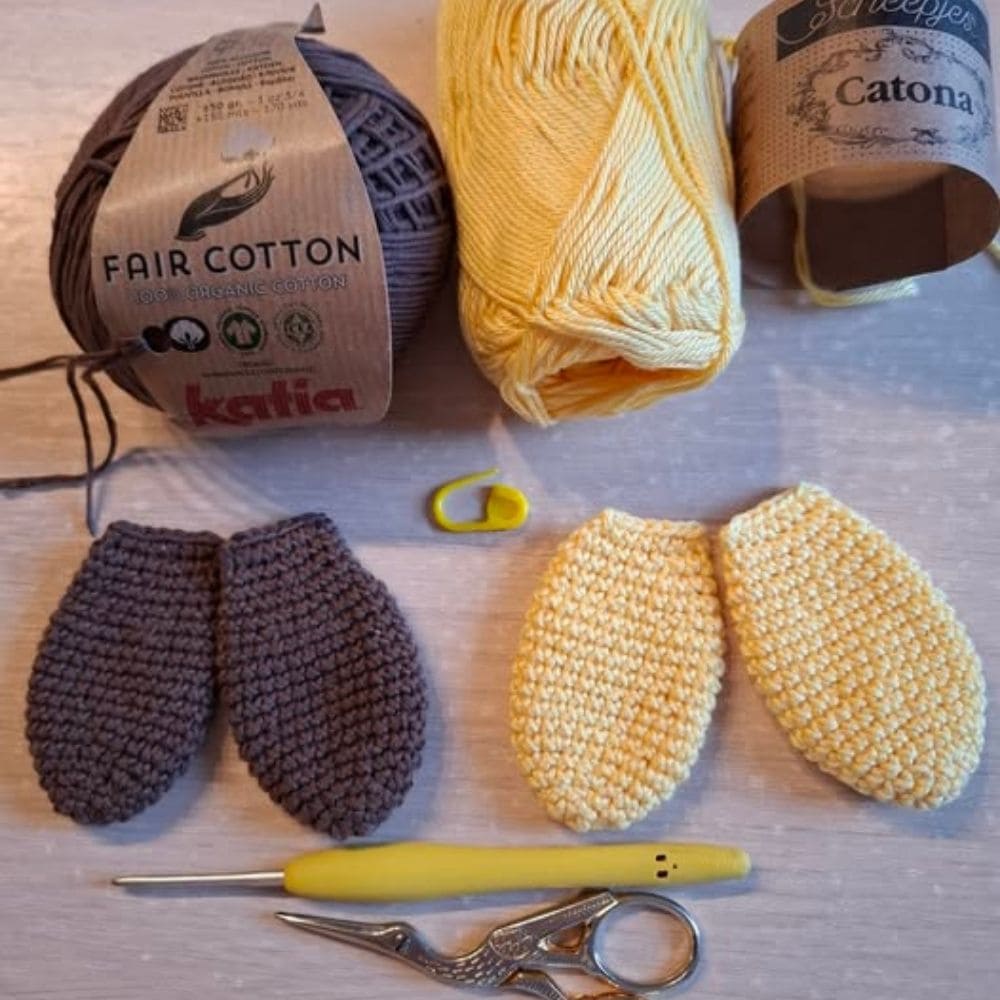
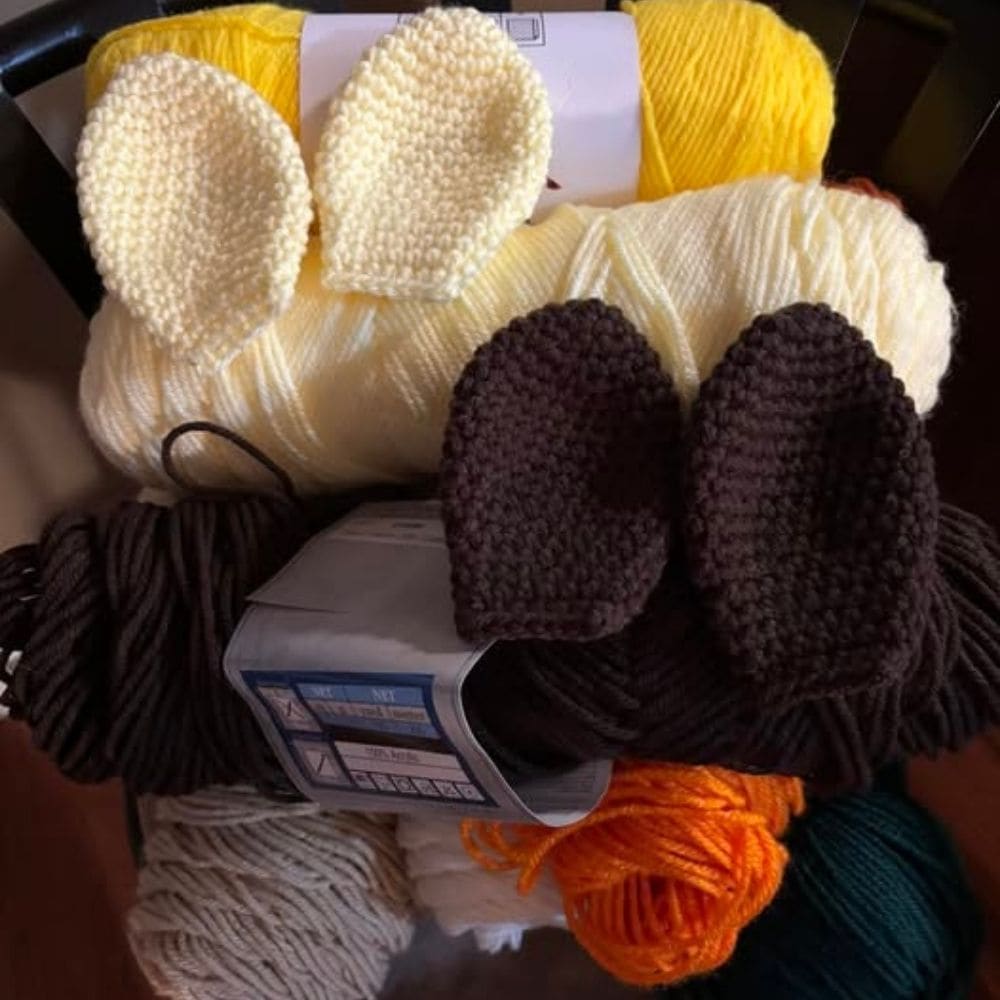
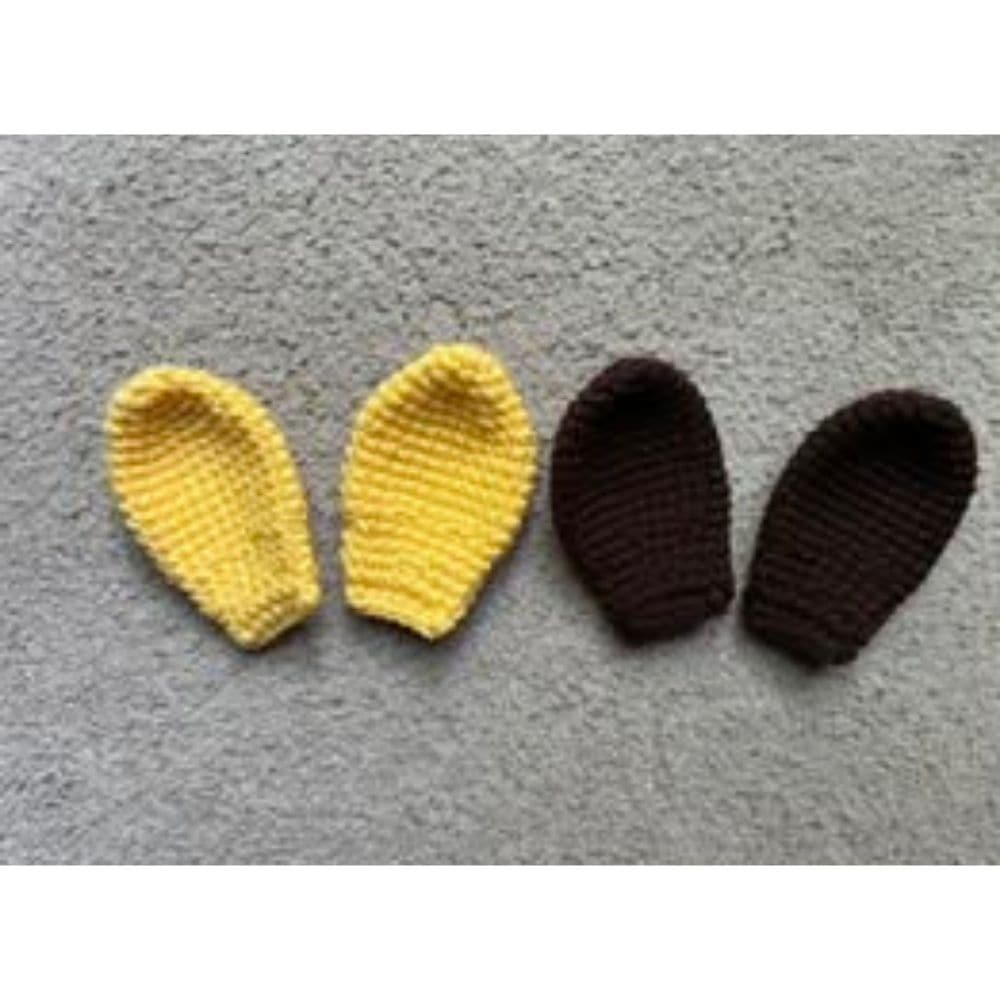
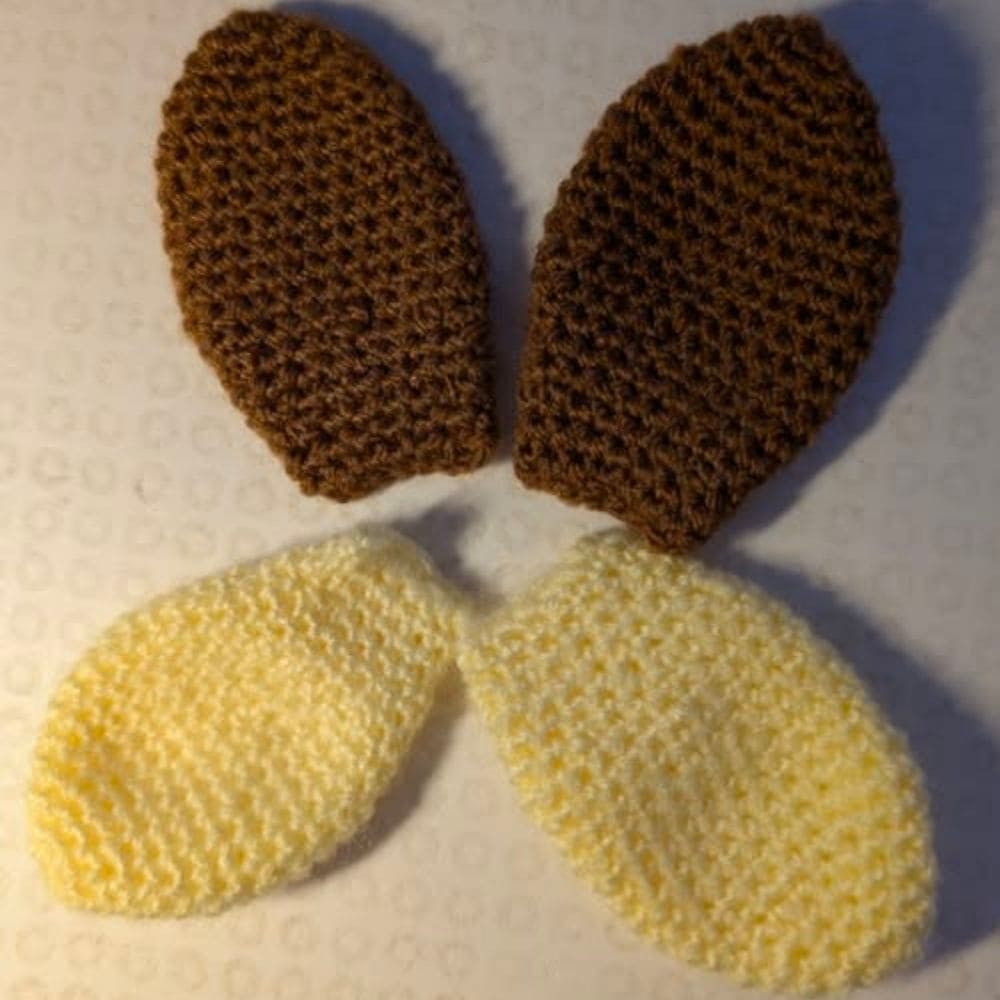
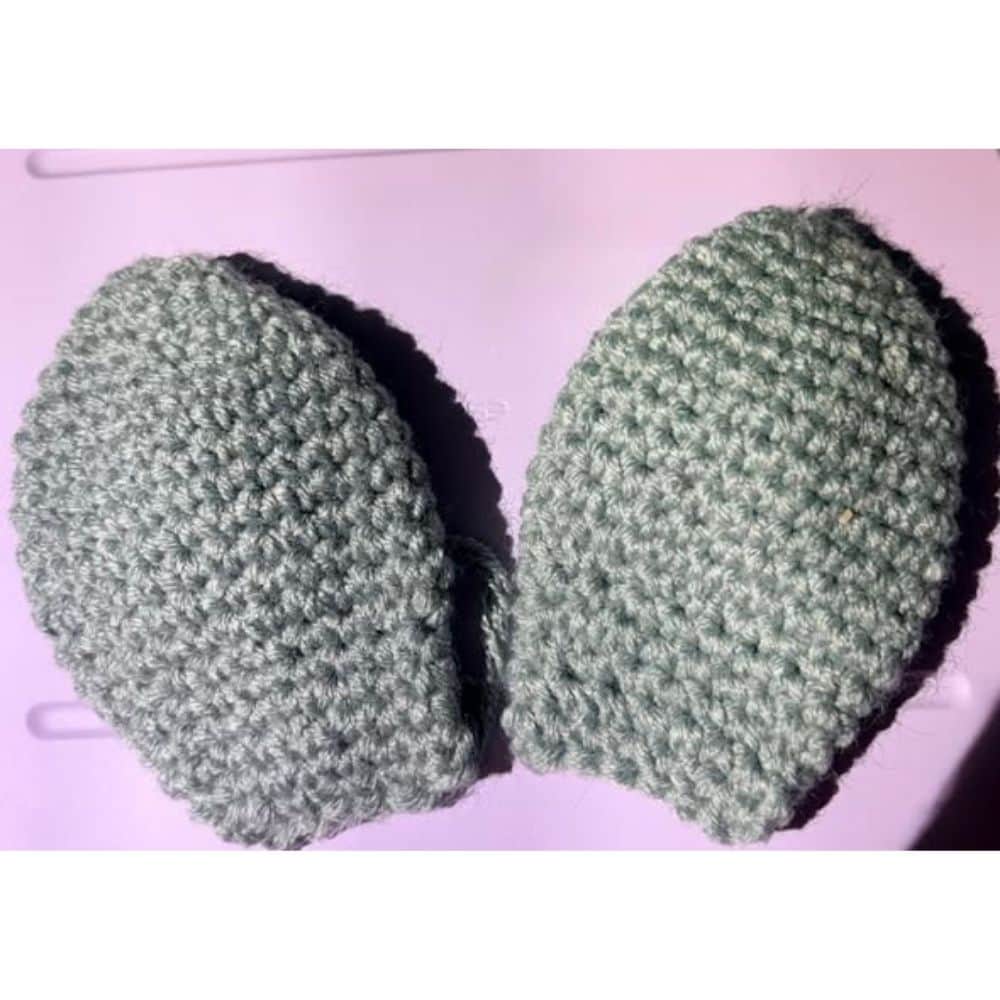
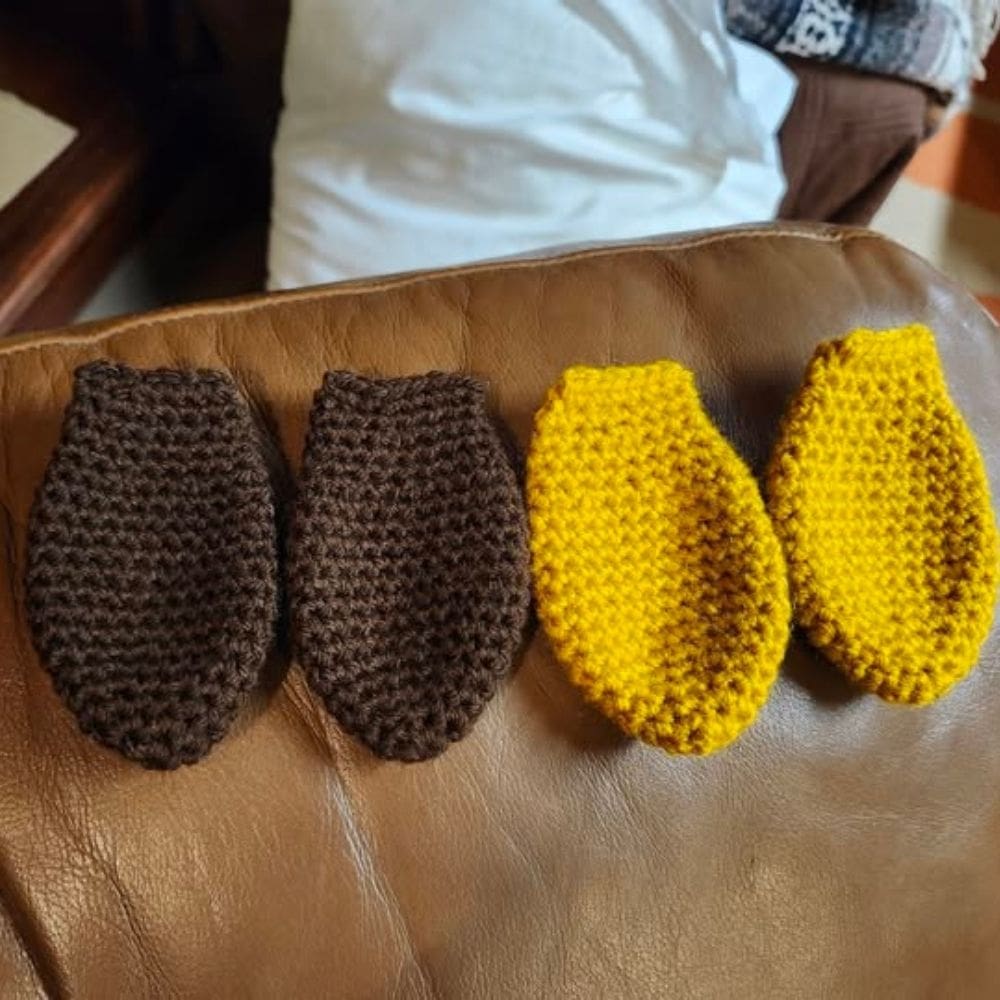
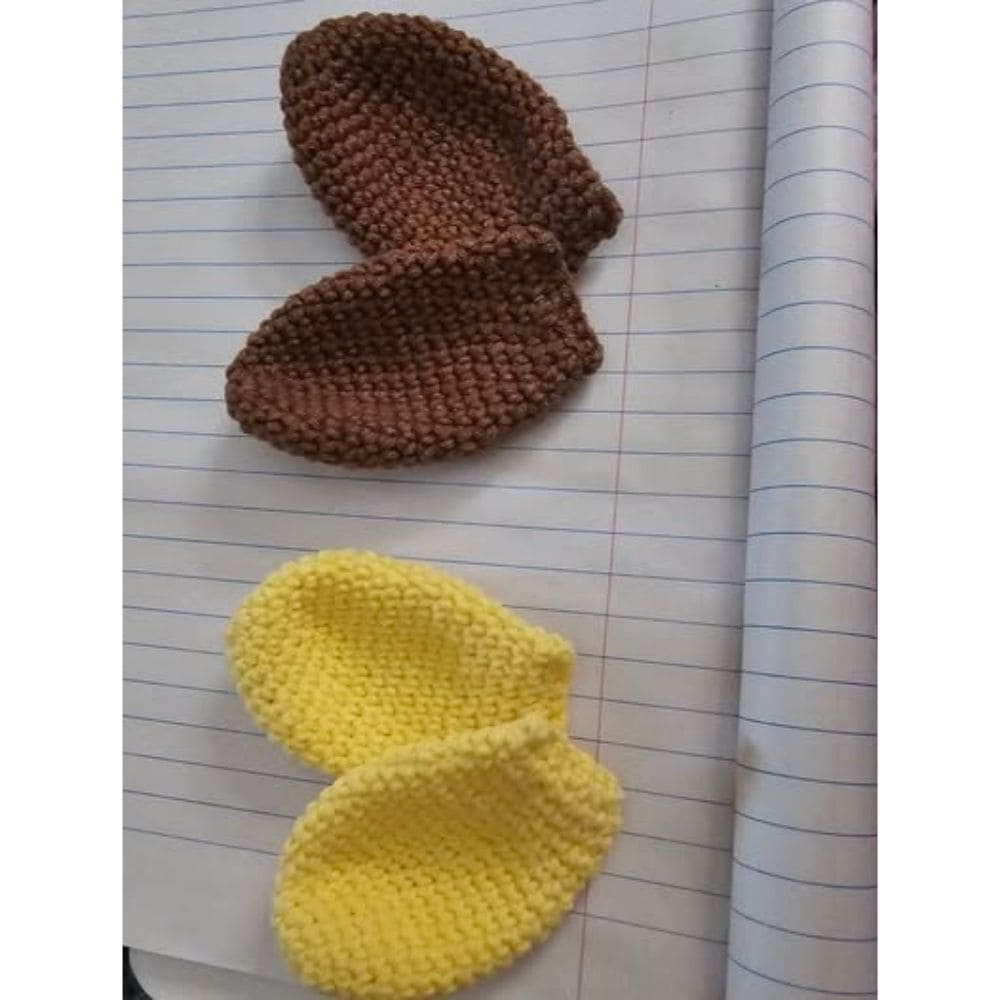
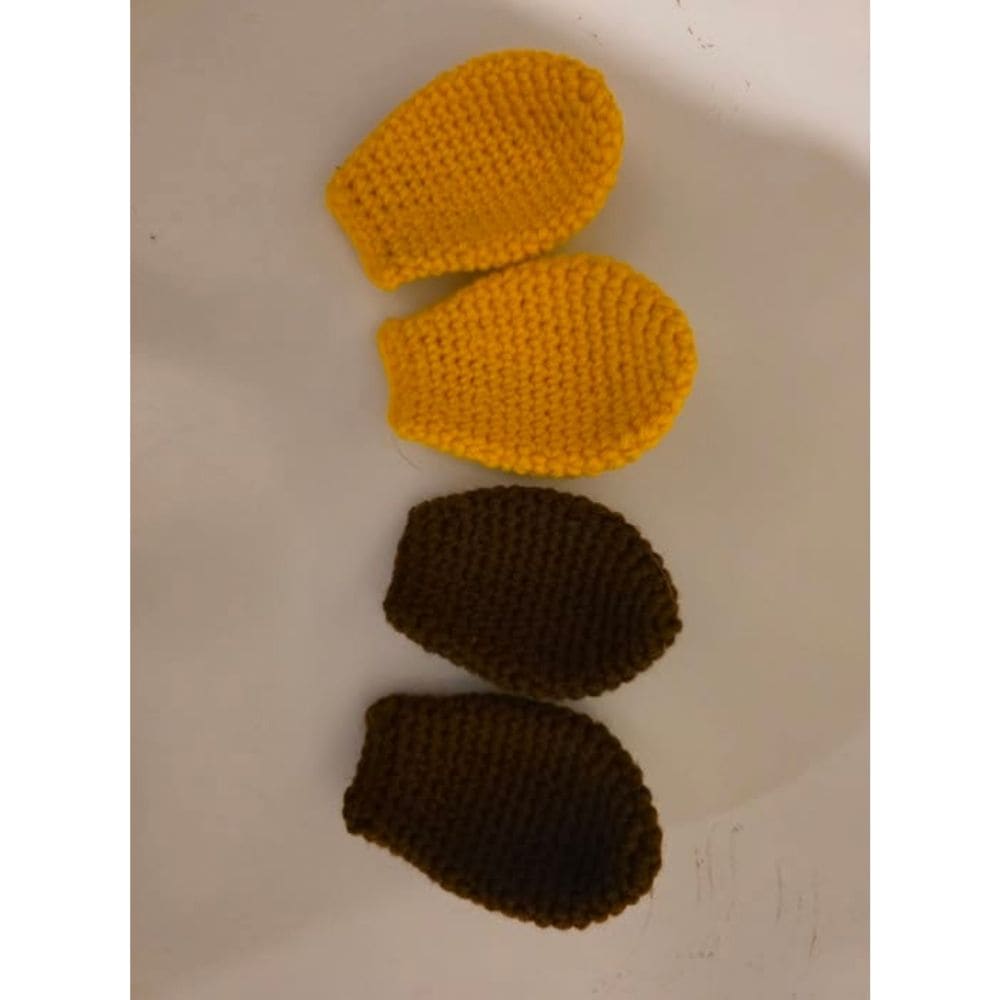
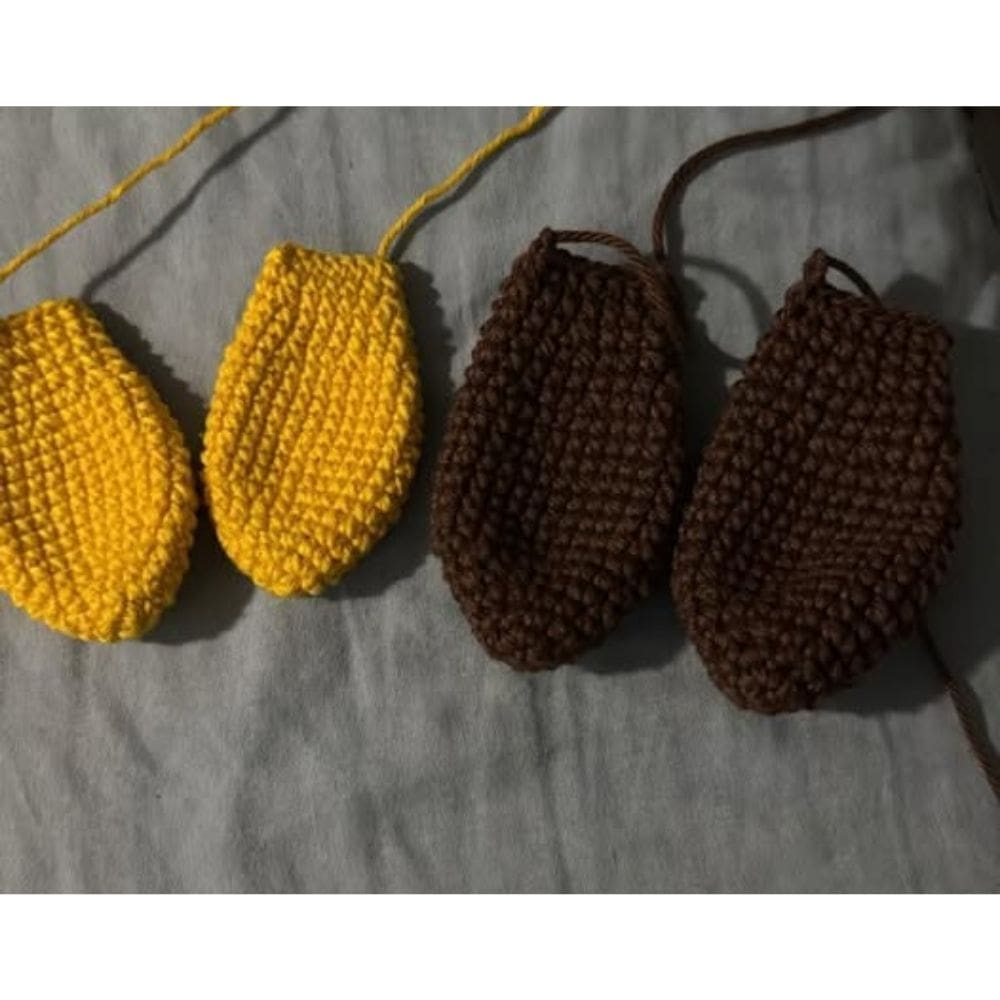
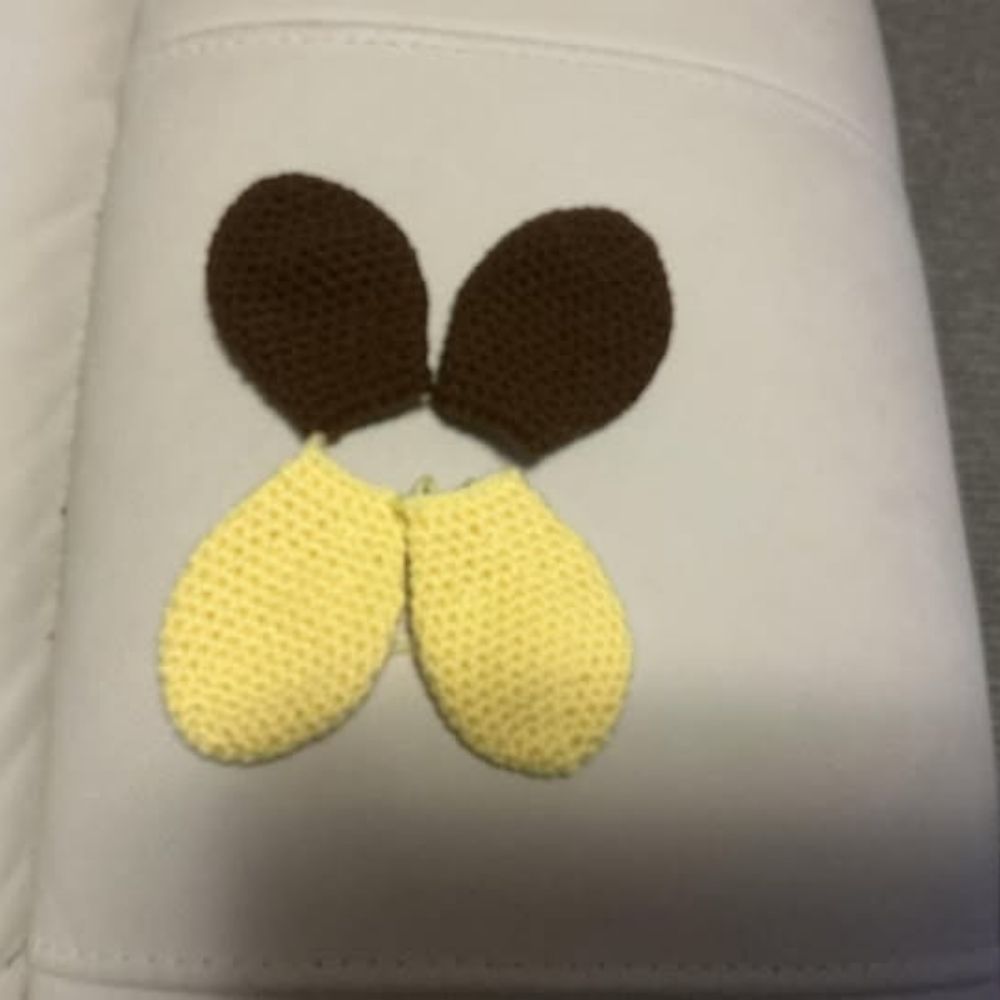
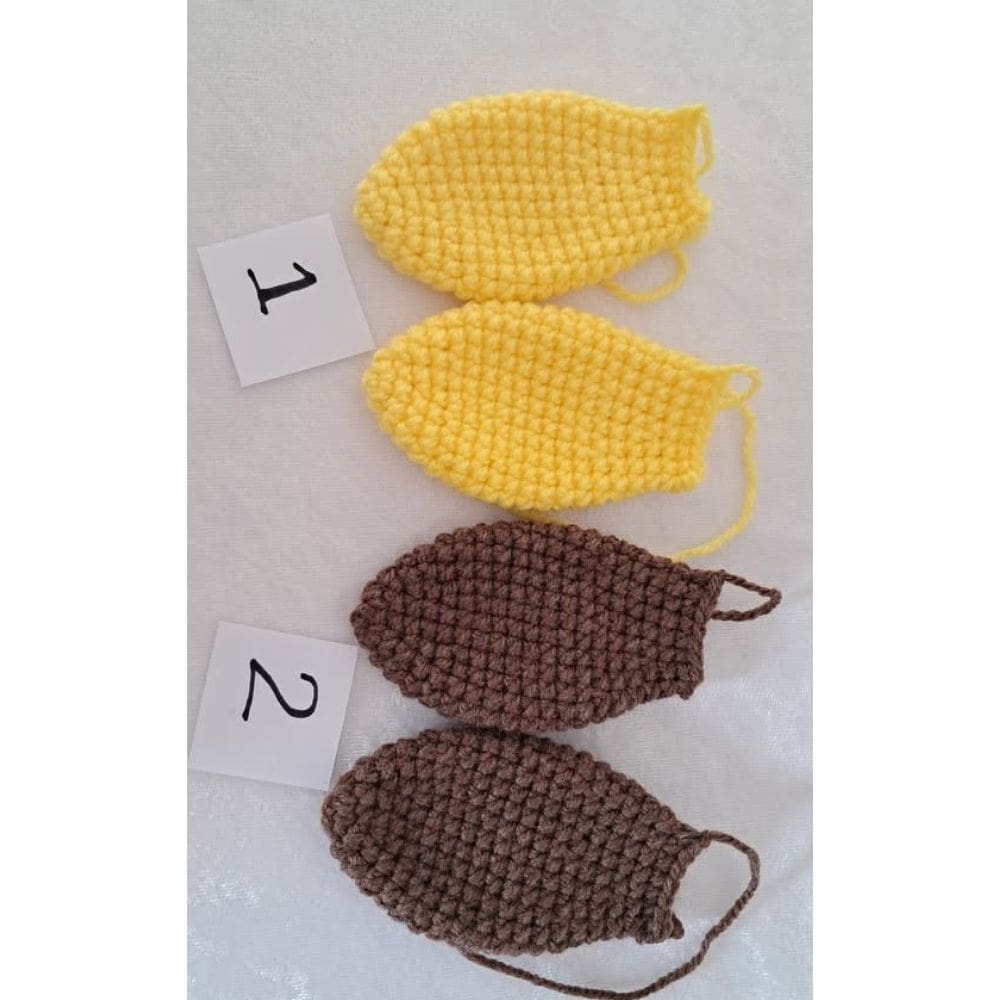
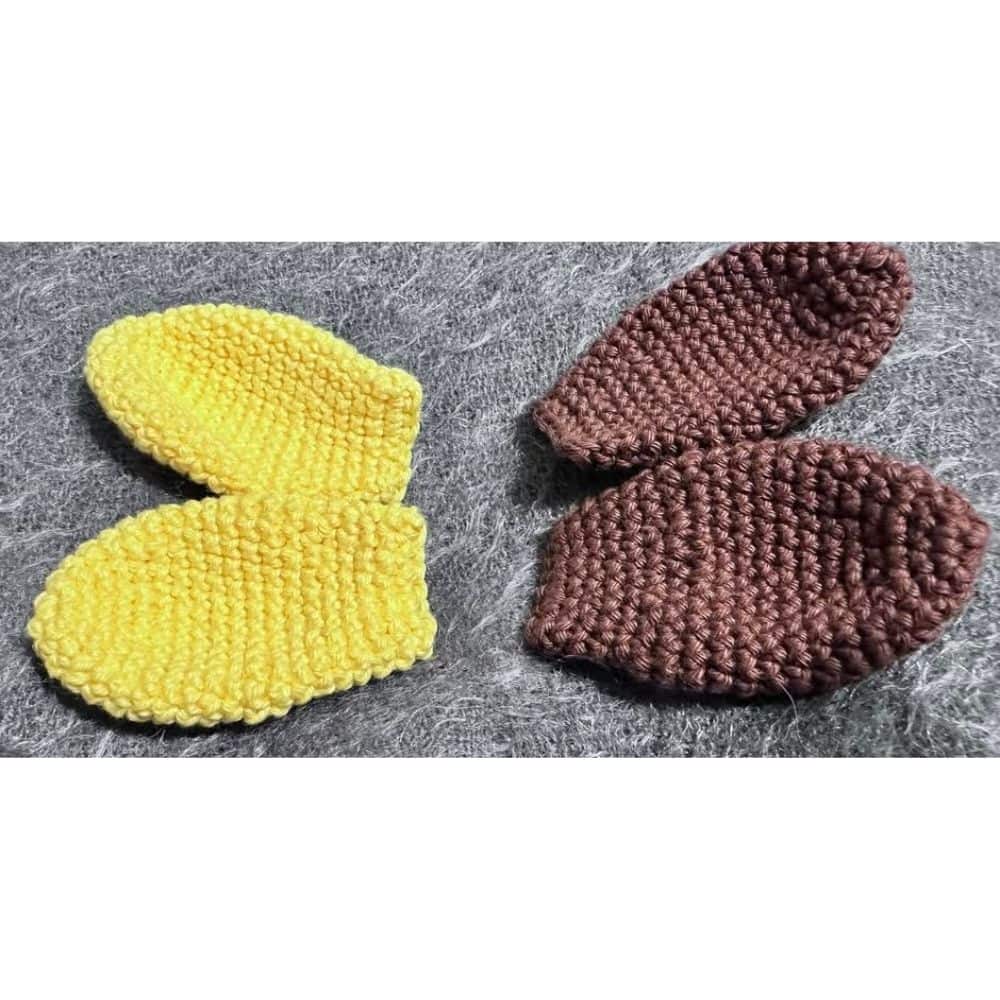
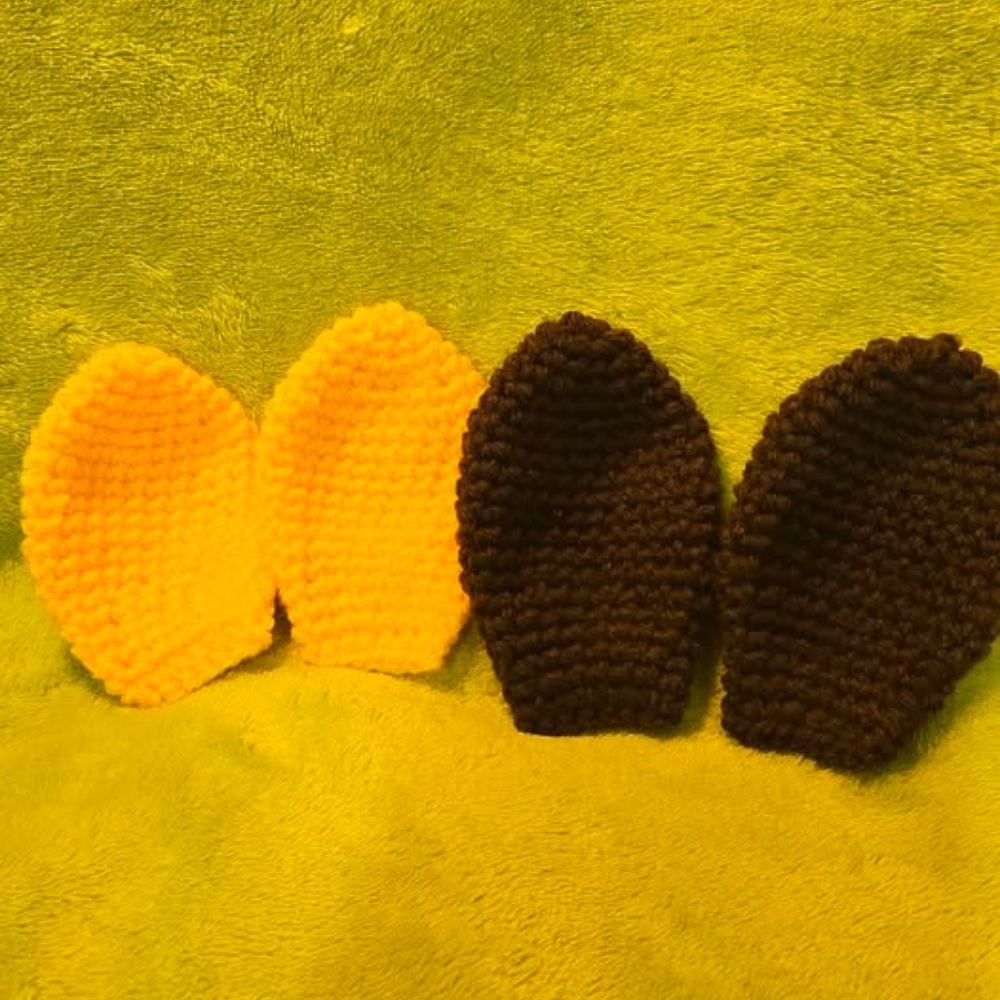
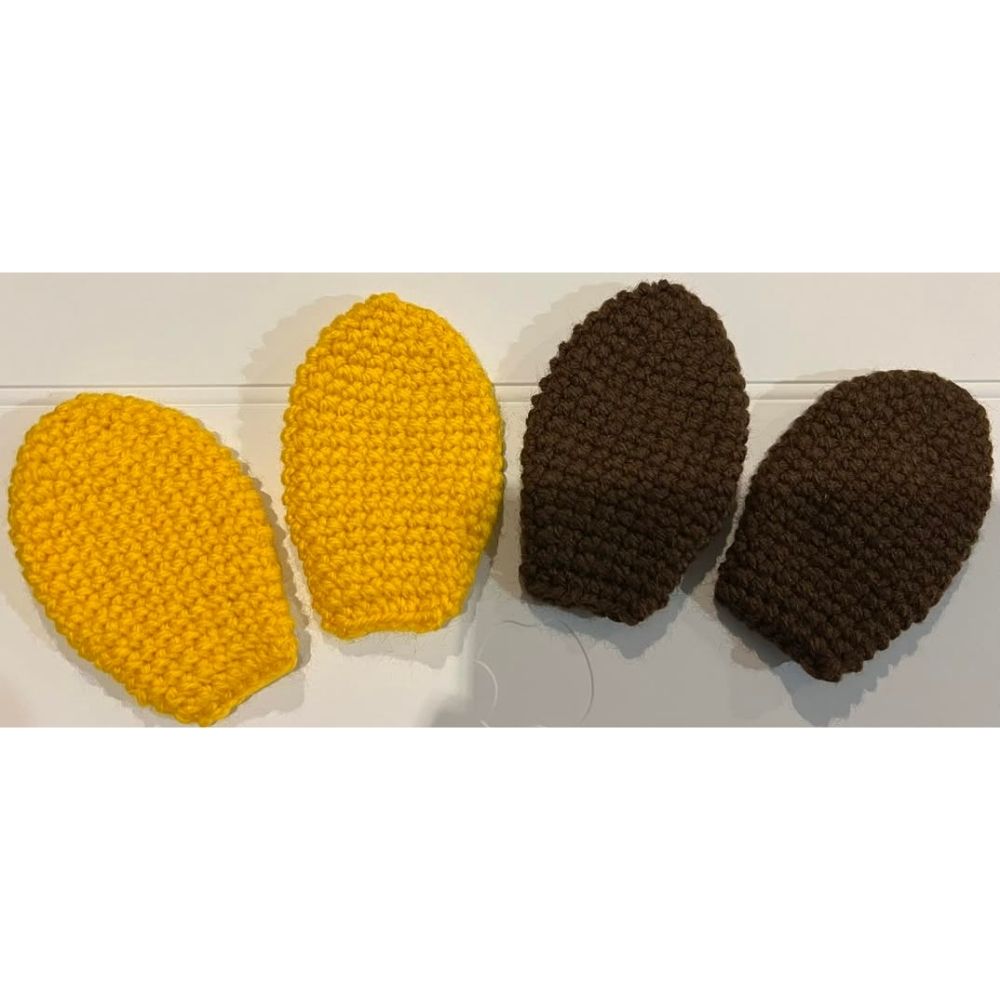
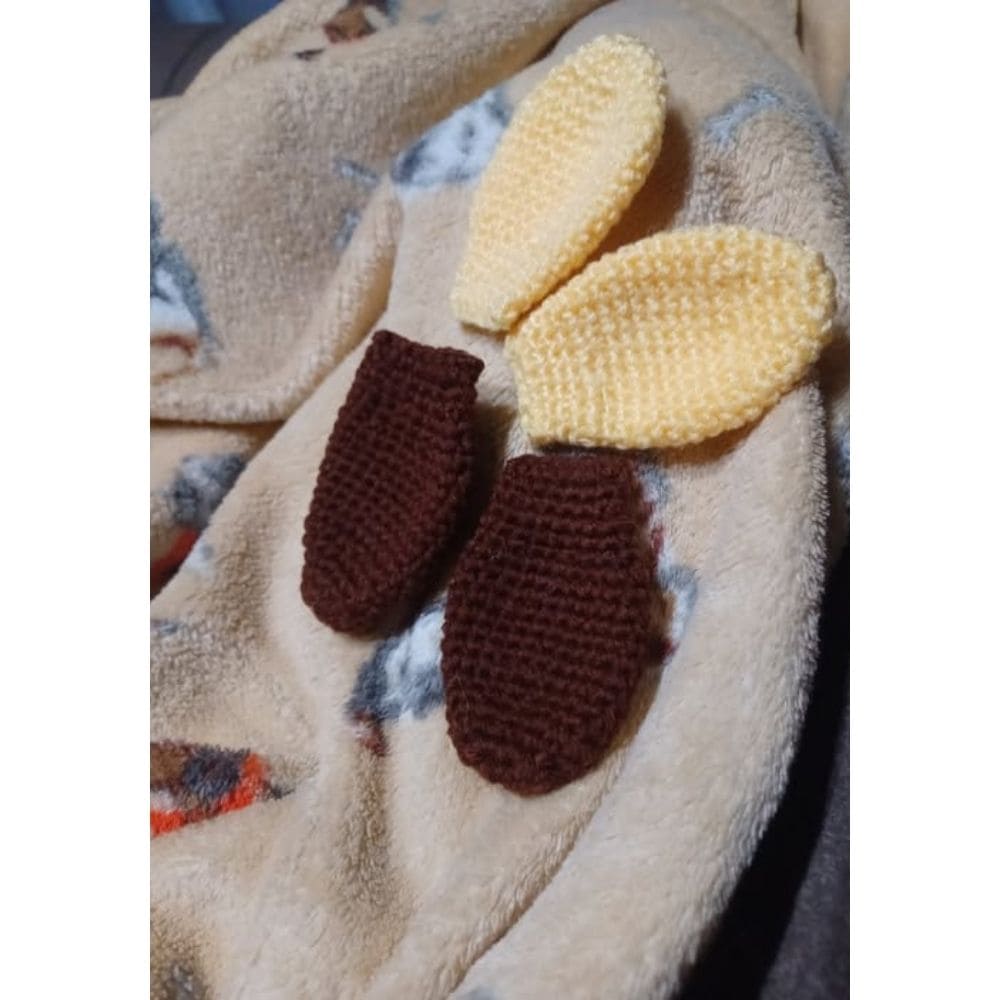
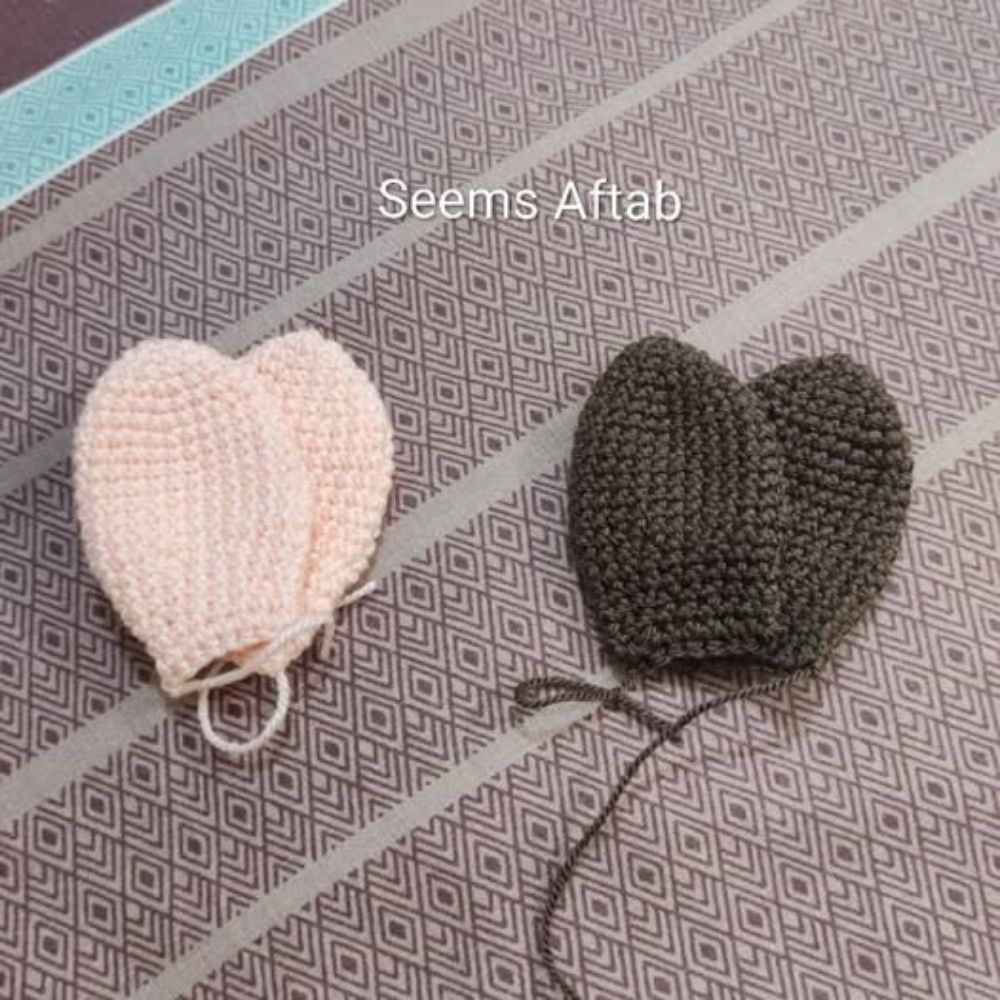
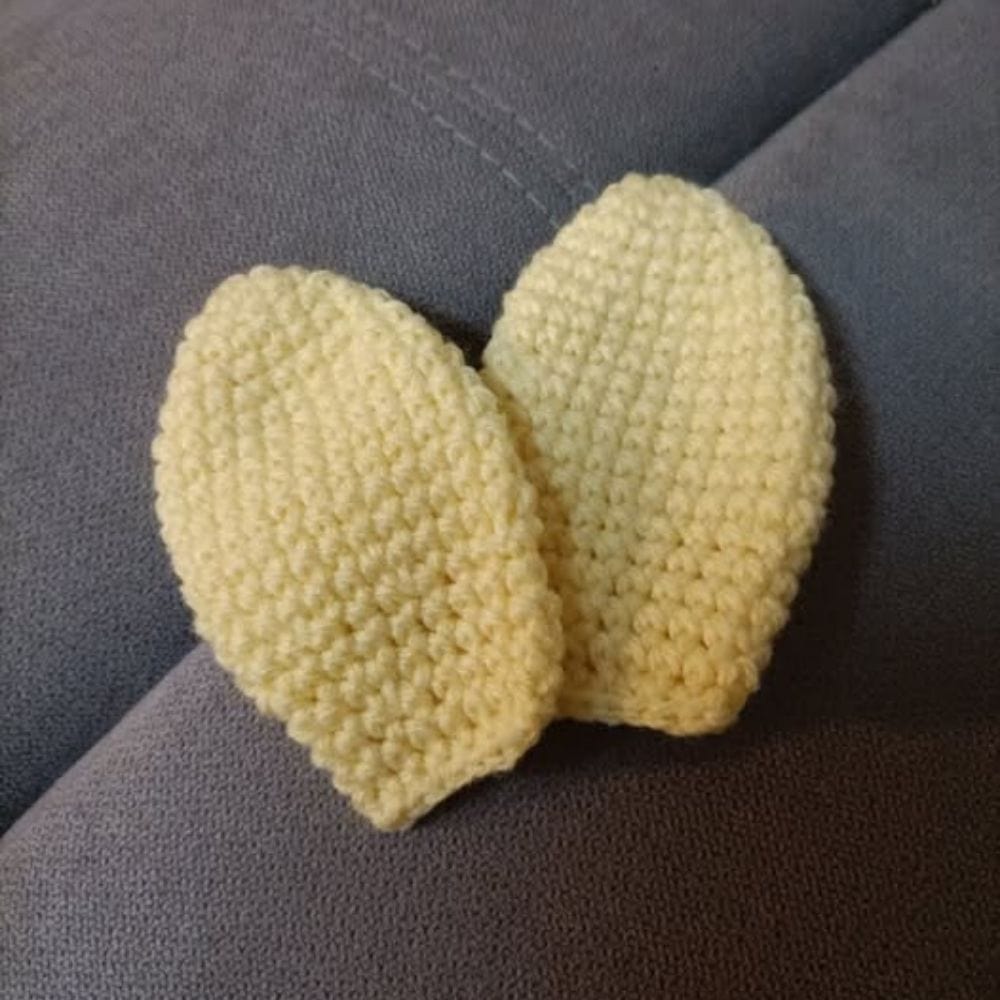
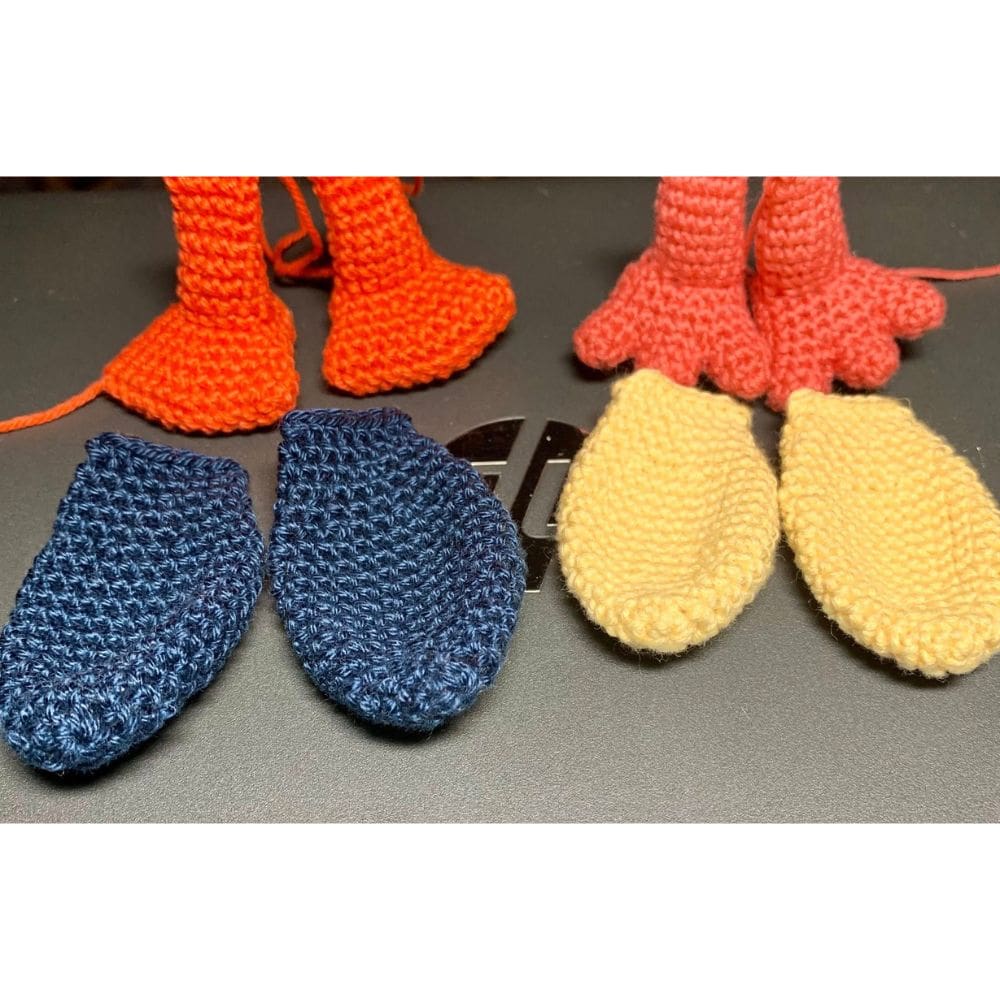
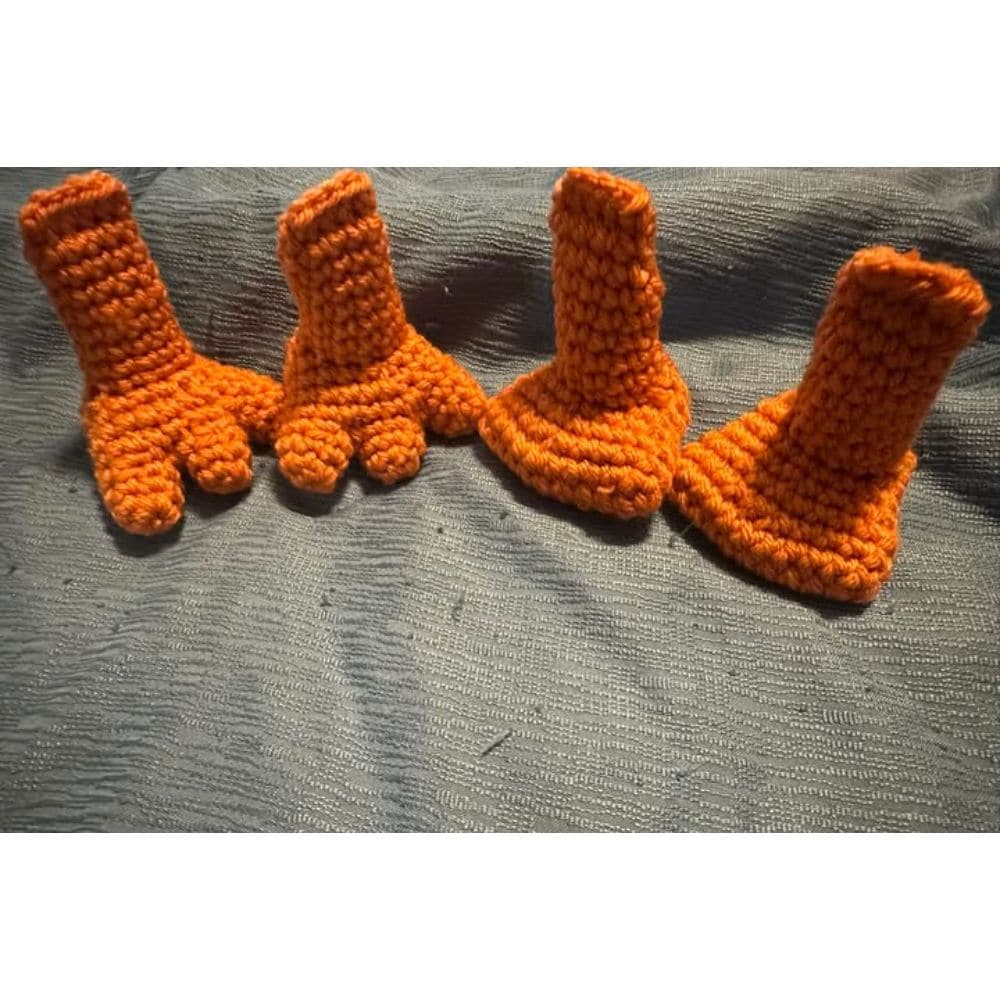
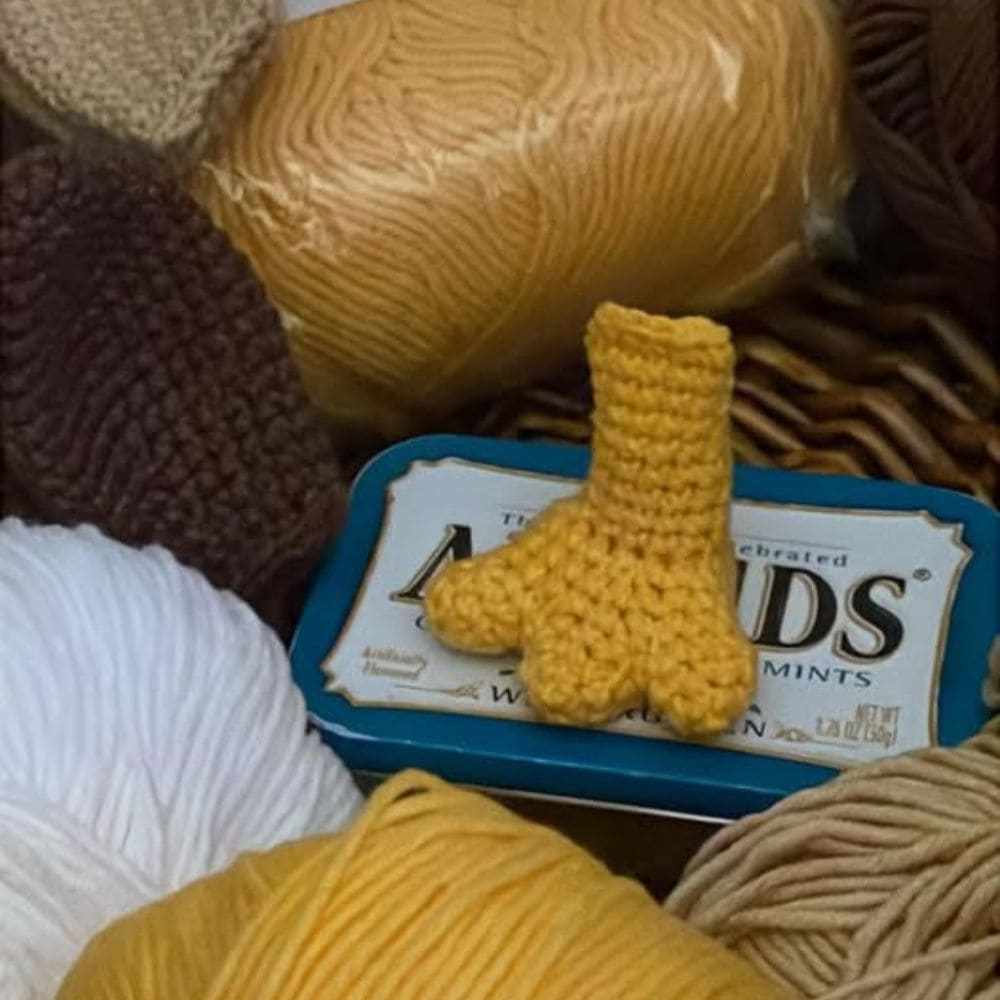
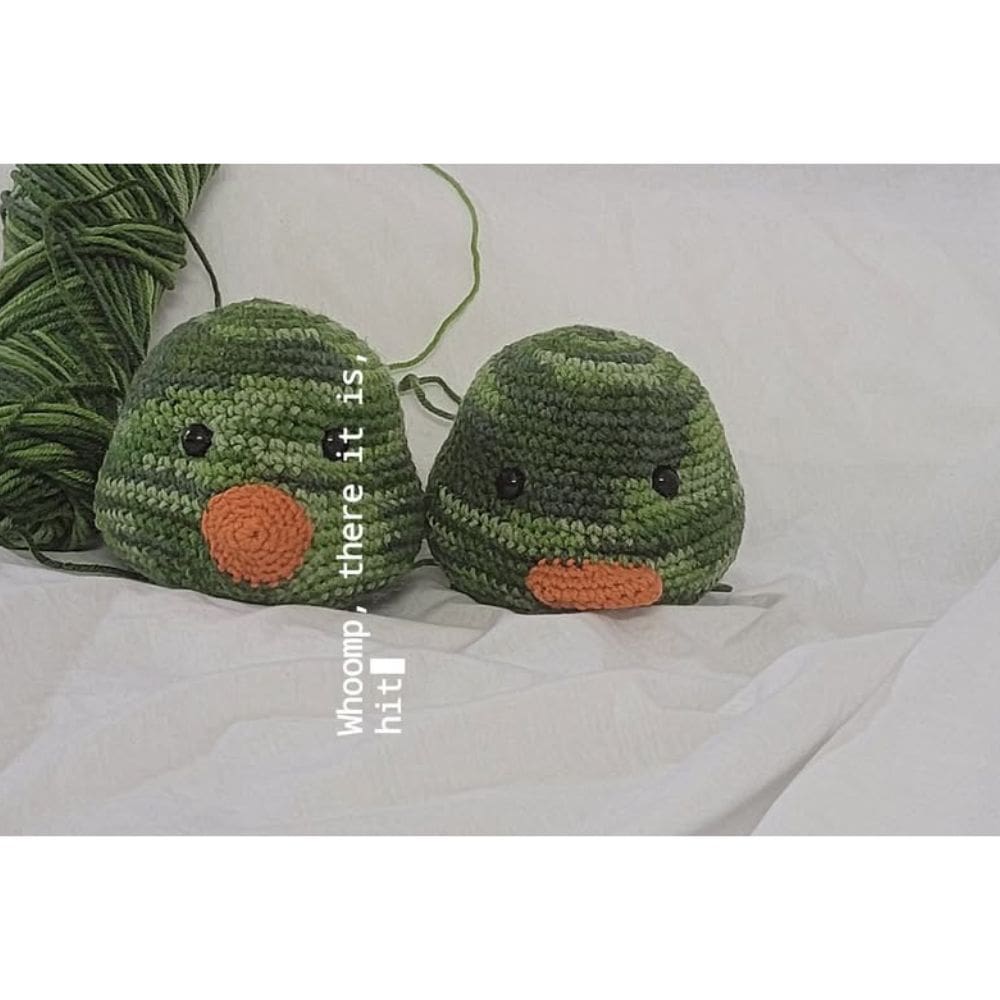
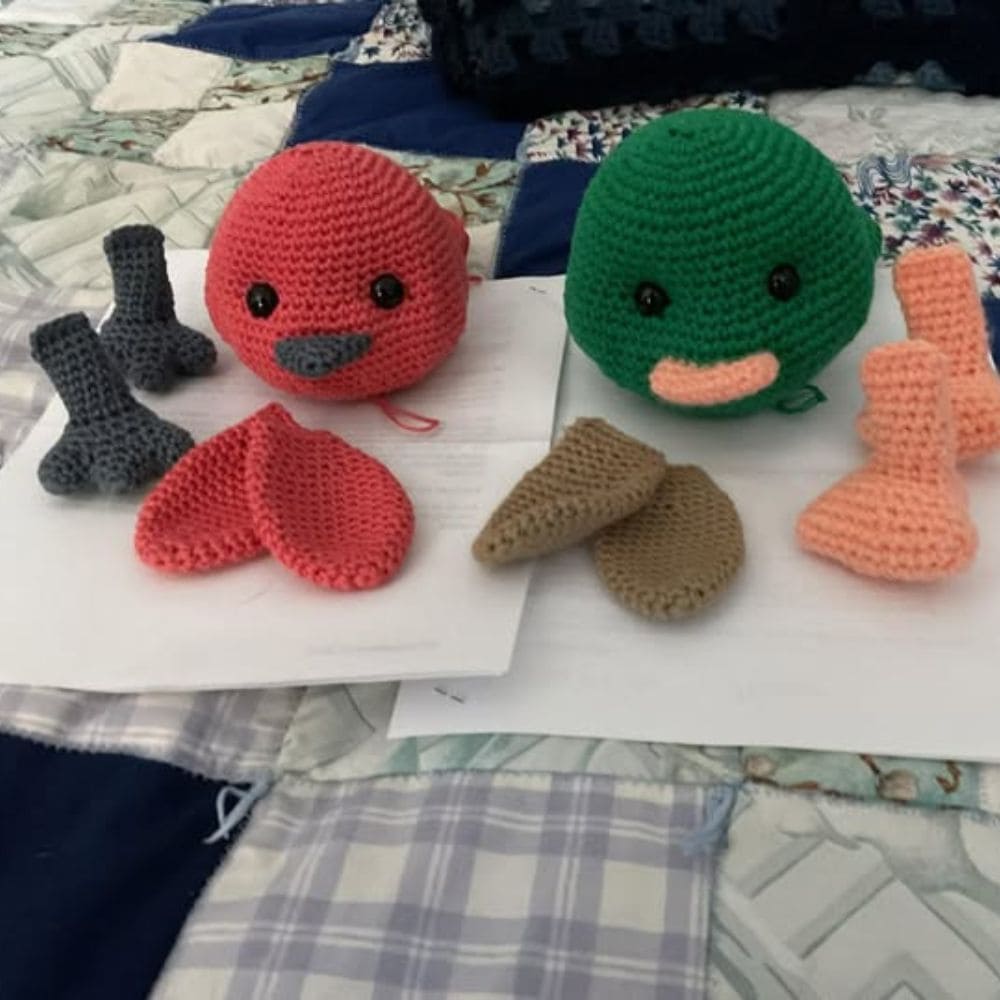
Here is what your Part 1 should look like.
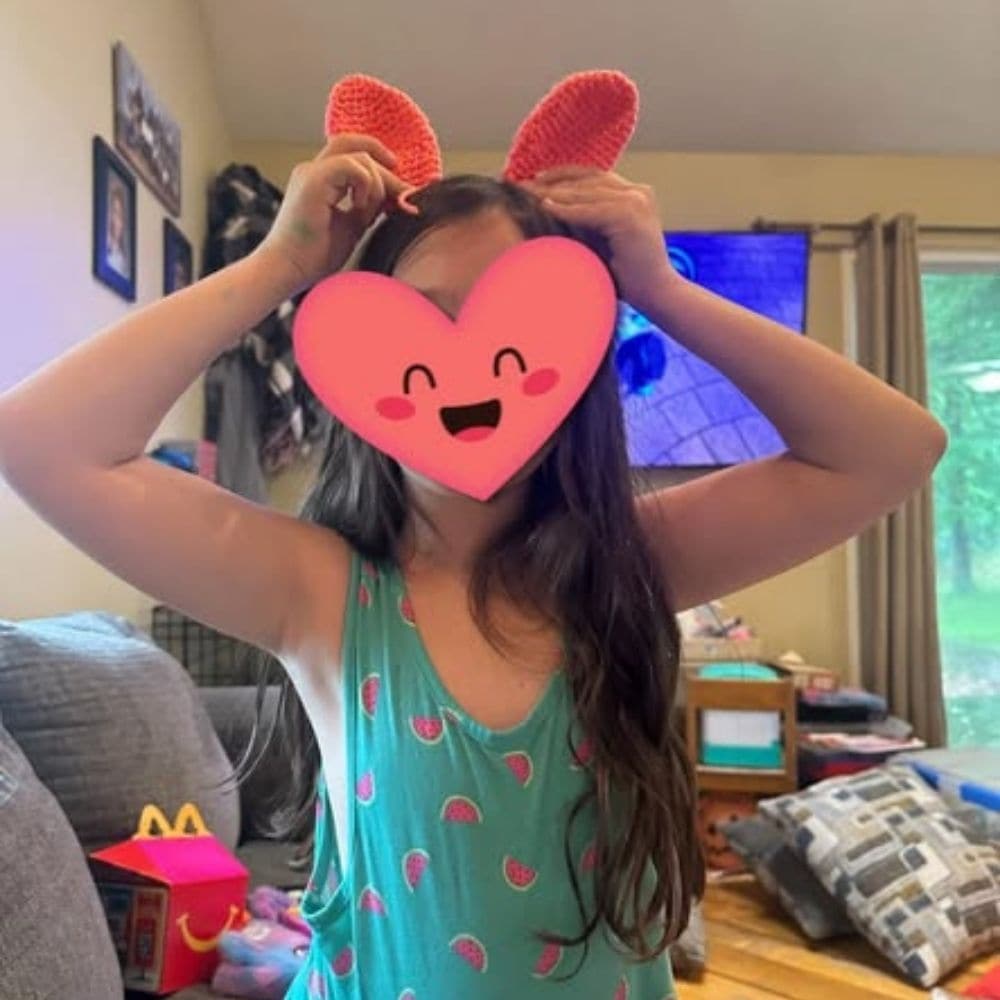
Have a look at the amazing photos shared by our Community. Simply scroll to the side to view them all.


Pattern Part 2 – Now Available
We’ve had such a fantastic start to this crochet along and I couldn’t be more excited to have so many of you joining in. The photos you’ve been sharing are amazing so keep them coming – I love seeing every single one of them! 🙂
Part 2 is a little more challenging, but I promise it’s the only tricky bit of the project. Once you’ve completed this part, the rest will be plain sailing! 🙂
Also, Part 2 is different for each toy so please pay attention to which pattern is for which toy. 🙂
Toy #1 Pattern
Toy #1 Pattern – consists of 3 sections:
- Section 1 – make 3 pieces
- Section 2 – join the 3 pieces together
- Section 3 – build upwards from section 2
Yarn color for all 3 sections: color B
Toy #1 Pattern – Section 1
Make 3 pieces
1st piece:
R1: MR – 6 x SC into the ring {6}
R2: (SC in next 2 STs, INC) x 2 {8}
R3: SC in each ST around {8}
INV FO and leave a yarn tail for sewing – watch this video tutorial on How to crochet an invisible fasten off
Insert a stitch marker in the first stitch of R3 as you will need to refer to it later, do not stuff at this stage.
2nd piece:
R1: MR – 6 x SC into the ring {6}
R2: (SC in next 2 STs, INC) x 2 {8}
R3: SC in each ST around {8}
INV FO and leave a yarn tail for sewing.
Insert a stitch marker in the first stitch of R3 as you will need to refer to it later, do not stuff at this stage.
3rd piece:
R1: MR – 6 x SC into the ring {6}
R2: (SC in next 2 STs, INC) x 2 {8}
R3: SC in each ST around {8}
Do not FO or cut the yarn off. Leave your hook in after R3.
Do not stuff at this stage
Continue with R4 as described in the Section 2.
Toy #1 Pattern – Section 2
You will now join the 3 pieces together.
Watch this video tutorial on How to join toes in Amigurumi – the final stitch count is different for each toe in this video, so follow the written pattern below. The technique stays the same.
R4: continue from where you finished with R3 in 3rd piece:
- SC in next 4 STs in 3rd toe
- insert your hook into the middle toe – the marked ST and SC, SC in next 3 STs
- insert your hook into the last toe – the marked ST and SC, SC in next 7 STs
- insert your hook back into the middle toe and SC, SC in next 3 STs
- insert your hook back into the original toe – 3rd toe and SC, SC in next 3 STs {24}
- you have now joined the toes into one round and will continue crocheting in continuous rounds from here
R5: SC in next 3 STs, INV DEC, SC in next 2 STs, INV DEC, SC in next 6 STs, INV DEC, SC in next 2 STs, INV DEC, SC in next 3 STs {20}
You will notice you have small gaps in between the toes, you can pull the yarn tails out through these gaps and then will use these tails to sew the holes with a few stitches.
R6: SC in each ST around {20}
R7: SC in next 4 STs, INV DEC, SC in next 8 STs, INV DEC, SC in next 4 STs {18}
Start stuffing
R8: SC in next 2 STs, SC in next 5 STs – BLO, SC in next 11 STs {18}
R9: SC in next ST, SC in next ST – BLO, INV DEC, SC in next 3 STs, SC in next ST – BLO, INV DEC, SC in next 4 STs, INV DEC, SC in next 2 STs {15}
R10: SC in next ST, SC in next ST – BLO, SC in next ST, INV DEC, SC in next ST, SC in next ST – BLO, SC in next ST, INV DEC, SC in next 3 STs, INV DEC {12}
R11: SC in next 2 STs, SC in next 3 STs – BLO, SC in next 7 STs {12}
Stuff well, close the hole using a tapestry needle and weave the yarn tail in.
Watch this video tutorial on How to Close Amigurumi: Ultimate Finish Tutorial
You can now close the small gaps in between the toes using a yarn needle. Three or four stitches should do the trick and you can then weave the yarn ends in.
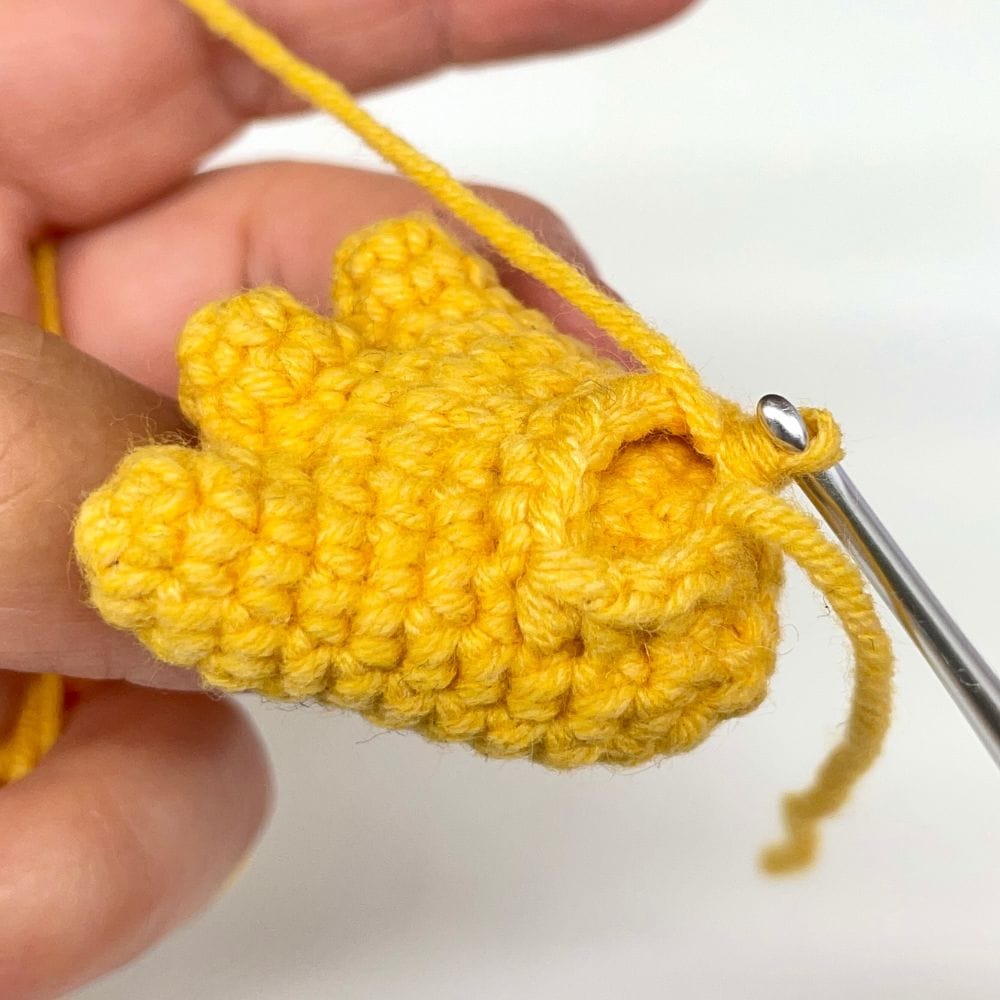
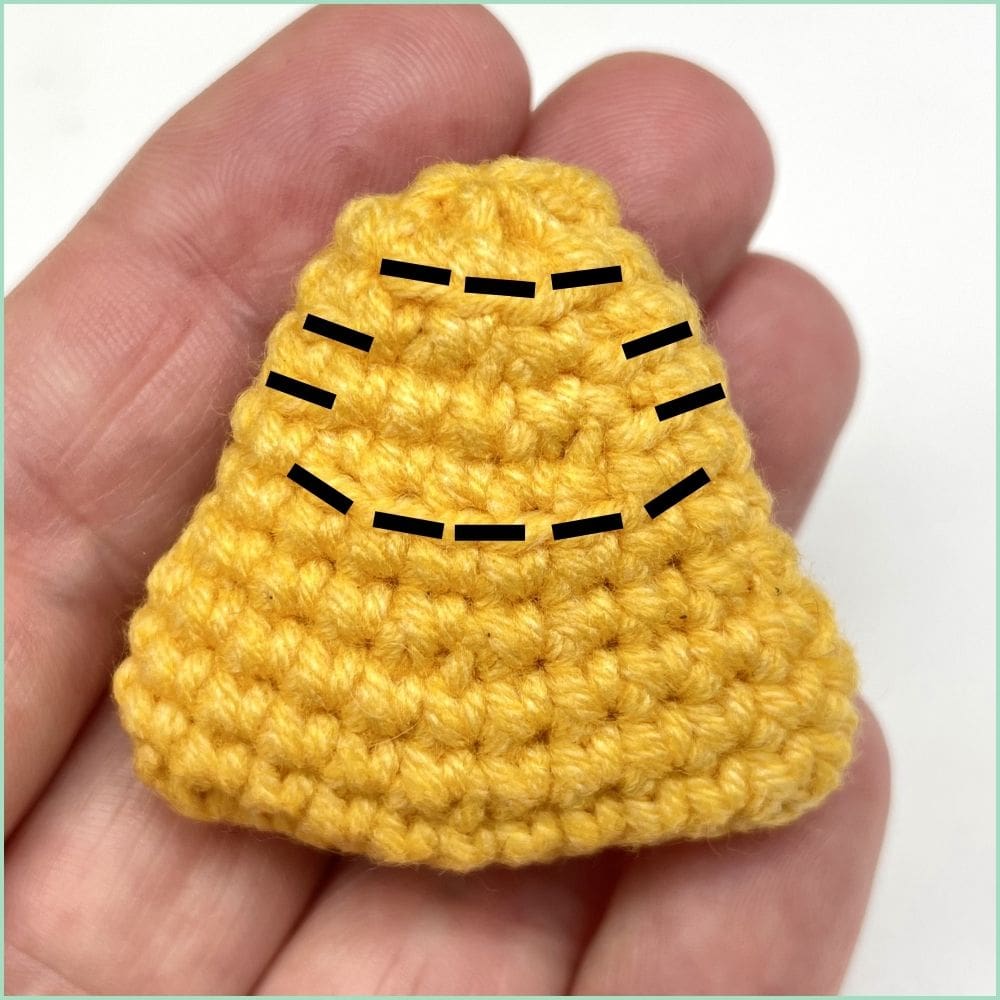
You should have 12 unworked front loop stitches on the top of the piece.
And because this may be a bit challenging for some of you, I will help you out with a photo. 🙂

Toy #1 Pattern – Section 3
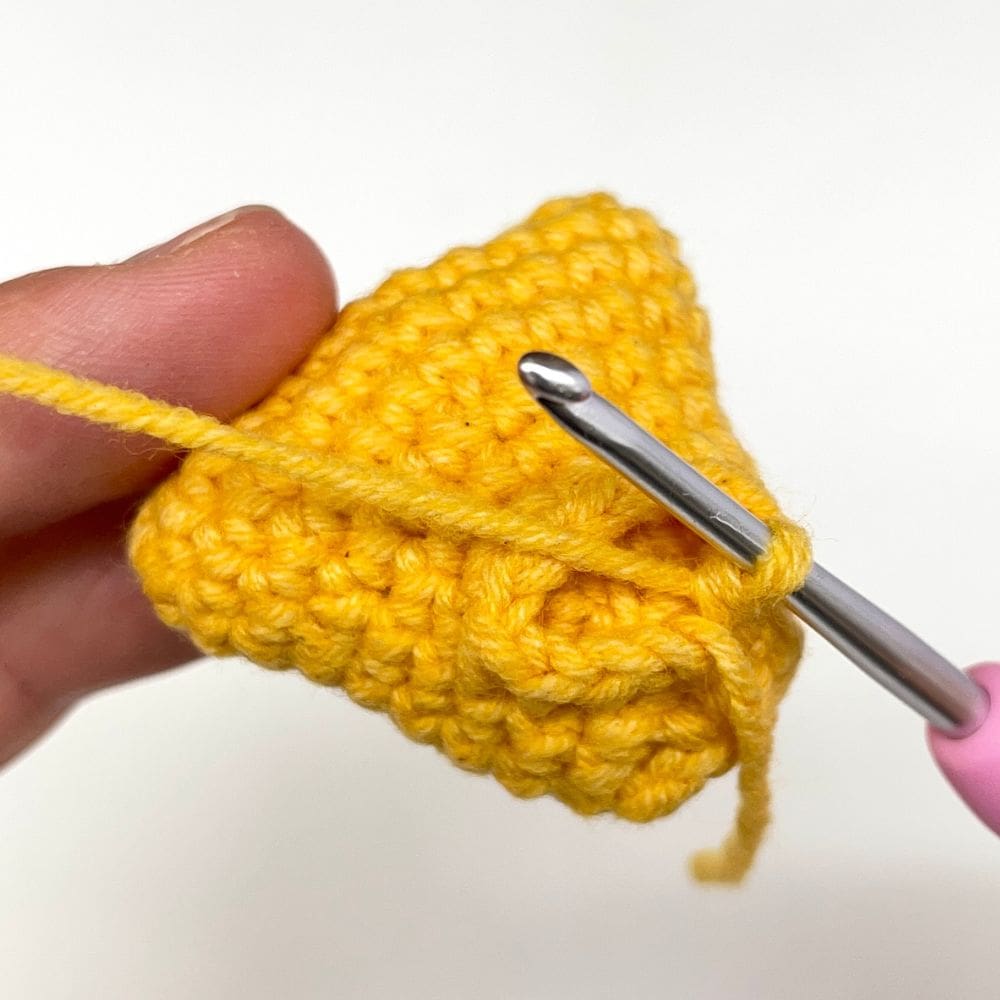
You will now continue to crochet into the 12 unworked front loop stitches.
R1: hold the piece so you are facing the back of it
- insert your hook into the middle FL STs in R11, wrap a new strand of yarn around it, pull it through the FL ST and CH 1x. This will count as your first ST in this round.
- continue to SC in each of the unworked FL STs on the top of the piece to create a round {12}
And here is another image to show you what your work should look like at this stage.
R2-R3: (2 rounds): SC in each ST around {12}
You can now weave the starting yarn tail in
R4: INV DEC, SC in next 10 STs {11}
R5-R6: (2 rounds): SC in each ST around {11}
R7: INV DEC, SC in next 9 STs {10}
R8: SC in each ST around {10}
Stuff the piece half way up
R9: SC in next 4 STs and then SC the opening together to close the piece {4}
FO and weave the yarn tail in
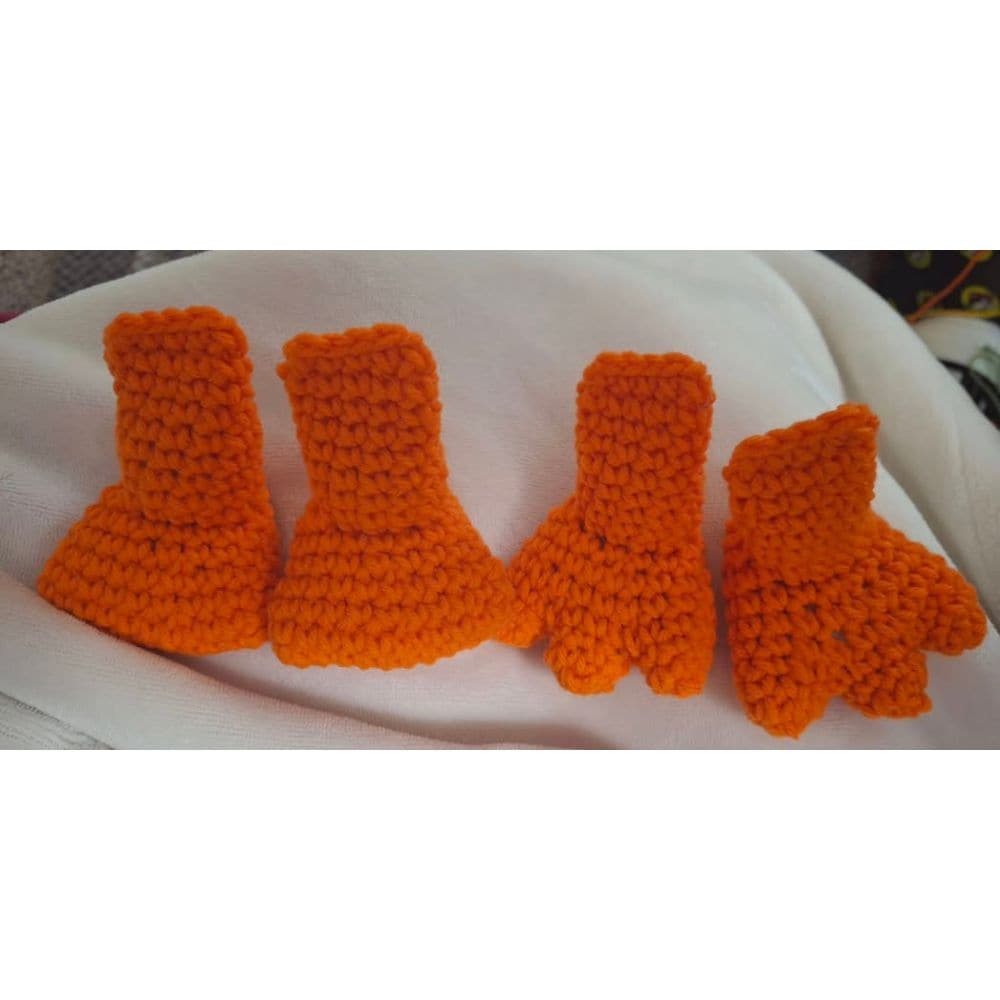
And that’s it, you have done it! And now you need to make another leg as our animal needs two of them. 🙂
Toy #2 Pattern
Toy #2 Pattern – consists of 2 sections:
- Section 1 – make one piece
- Section 2 – build upwards from section 1
Yarn color for all 2 sections: color D
Toy #2 Pattern – Section 1
R1: Chain 12 STs {12} – watch this video on How to crochet Amigurumi around a foundation chain to help out with R1 to R2 – the video starts with a different number of chains but the technique is the same
R2: SC in next 11 STs starting from 2nd CH from the hook; go through back bump of each CH as well, now work on the opposite side of the chain, INC in next ST, SC in next 9 STs, INC in last ST {24}
R3: SC in each ST around {24}
R4: SC in next 5 STs, INV DEC, SC in next 10 STs, INV DEC, SC in next 5 STs {22}
R5: SC in each ST around {22}
R6: INV DEC, SC in next 3 STs, INV DEC, SC in next 3 STs, INV DEC, SC in next 4 STs, INV DEC, SC in next 4 STs {18}
R7: SC in each ST around {18}
R8: SC in next 2 STs, SC in next 5 STs – BLO, SC in next 11 STs {18}
R9: SC in next ST, SC in next ST – BLO, INV DEC, SC in next 3 STs, SC in next ST – BLO, INV DEC, SC in next 4 STs, INV DEC, SC in next 2 STs {15}
R10: SC in next ST, SC in next ST – BLO, SC in next ST, INV DEC, SC in next ST, SC in next ST – BLO, SC in next ST, INV DEC, SC in next 3 STs, INV DEC {12}
R11: SC in next 2 STs, SC in next 3 STs – BLO, SC in next 7 STs {12}
Stuff a little so the piece still stays relatively flat. Close the hole using a tapestry needle and weave the yarn tail in.
Watch this video tutorial on How to Close Amigurumi: Ultimate Finish Tutorial
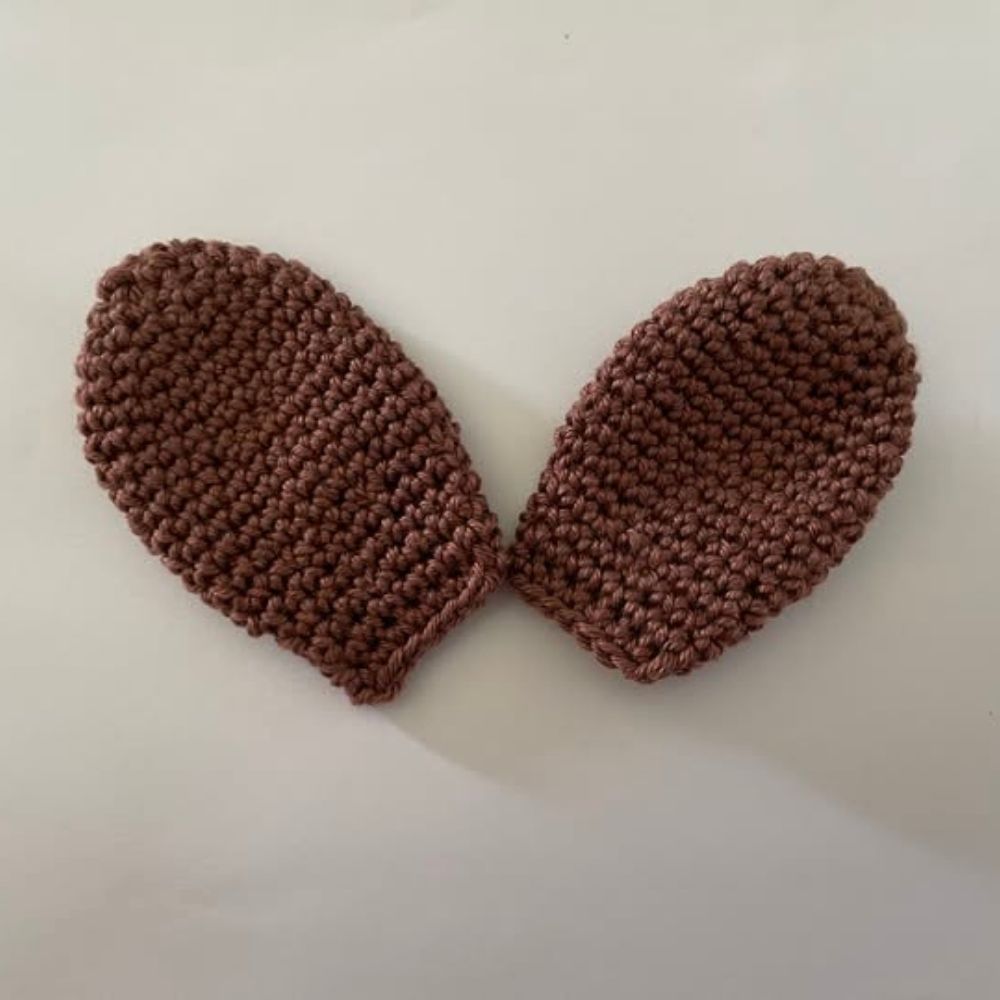
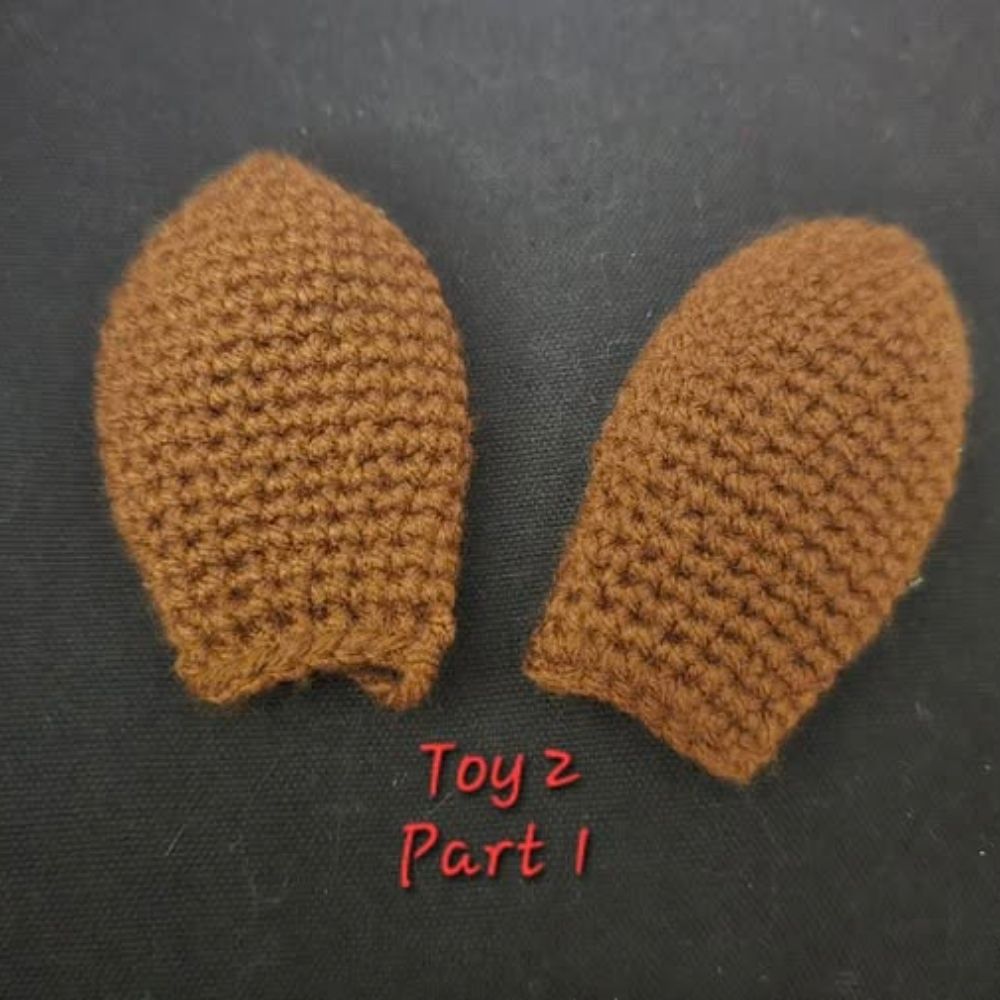
You should have 12 unworked front loop stitches on the top of the piece and here is an image to show you what your work should look like at this stage.
Toy #2 Pattern – Section 2
You will now continue to crochet into the 12 unworked front loop stitches.
R1: hold the piece so you are facing the back of it
- insert your hook into the middle FL STs in R11, wrap a new strand of yarn around it, pull it through the FL ST and CH 1x. This will count as your first ST in this round.
- continue to SC in each of the unworked FL STs on the top of the piece to create a round {12}
And here is another image to show you what your work should look like at this stage.
R2-R3: (2 rounds): SC in each ST around {12}
You can now weave the starting yarn tail in
R4: INV DEC, SC in next 10 STs {11}
R5-R6: (2 rounds): SC in each ST around {11}
R7: INV DEC, SC in next 9 STs {10}
R8: SC in each ST around {10}
Stuff the piece half way up
R9: SC in next 4 STs and then SC the opening together to close the piece {4}
FO and weave the yarn tail in
And that’s it, you have done it! And now you need to make another leg as our animal needs two of them. 🙂
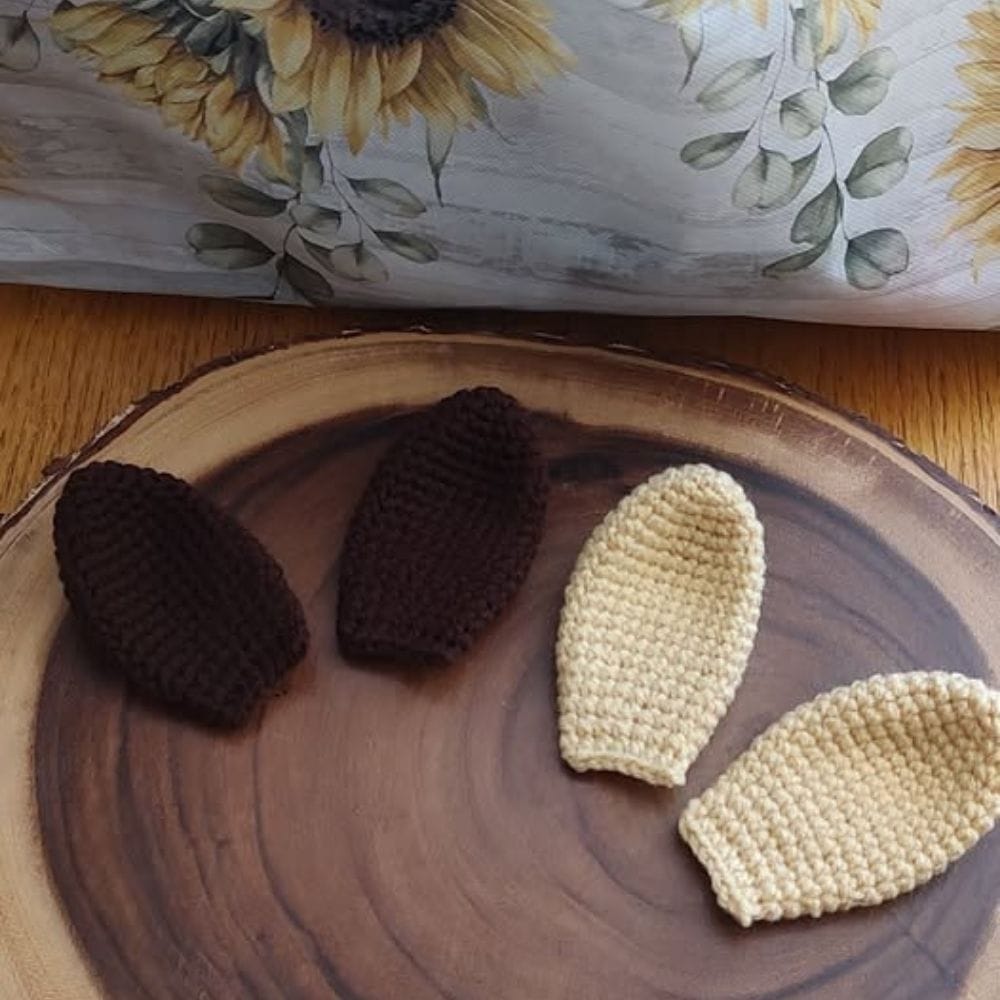
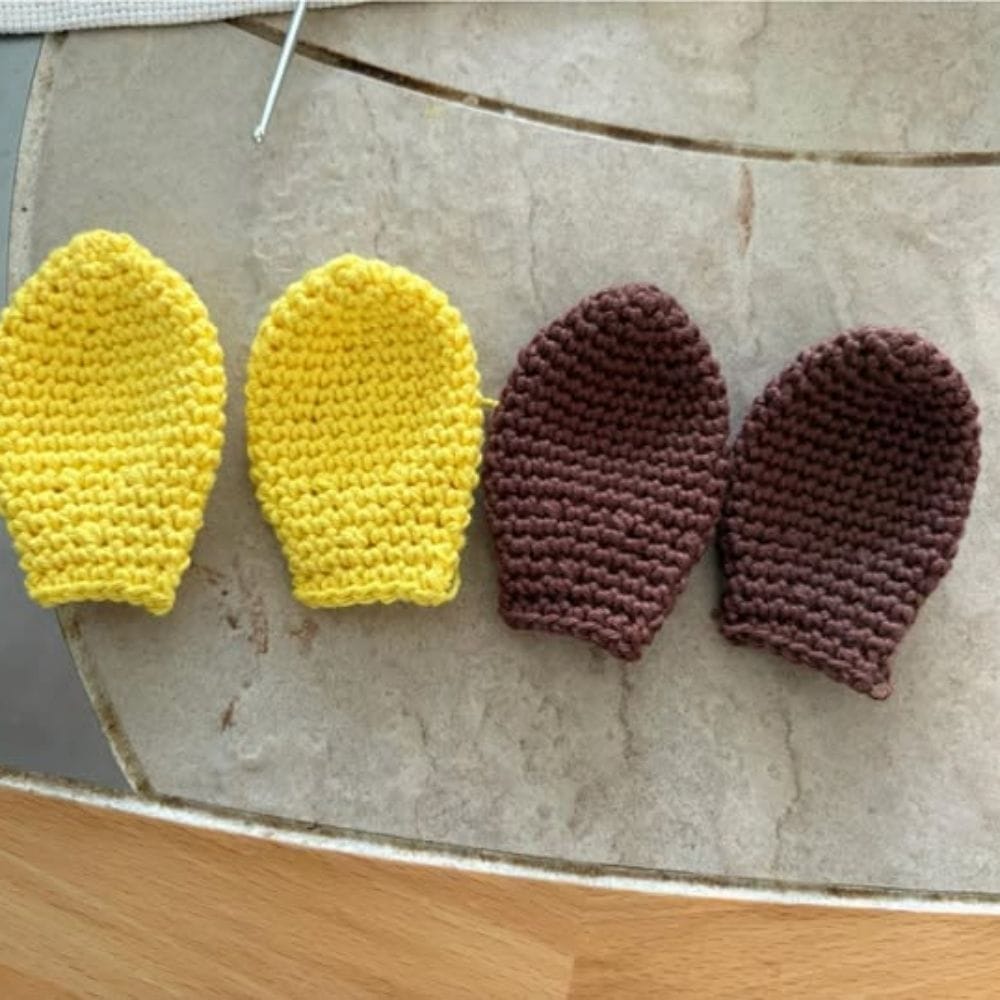
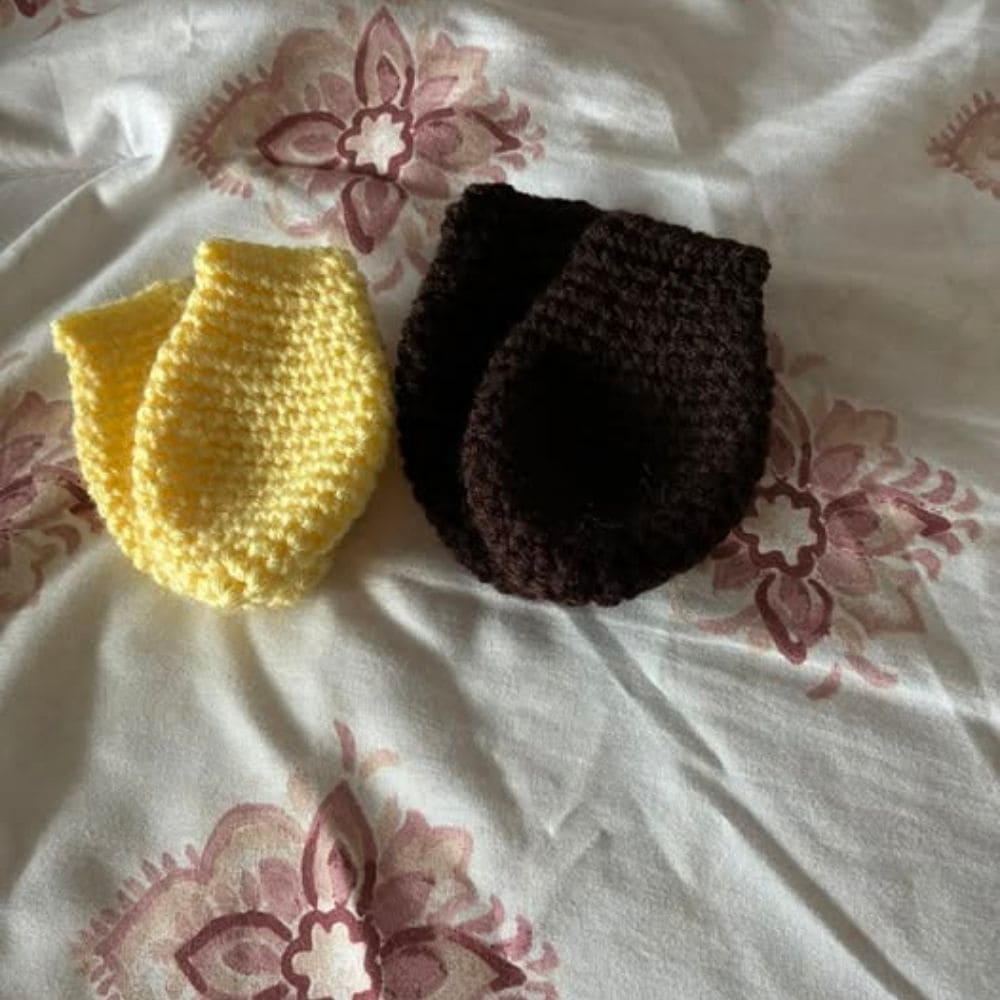
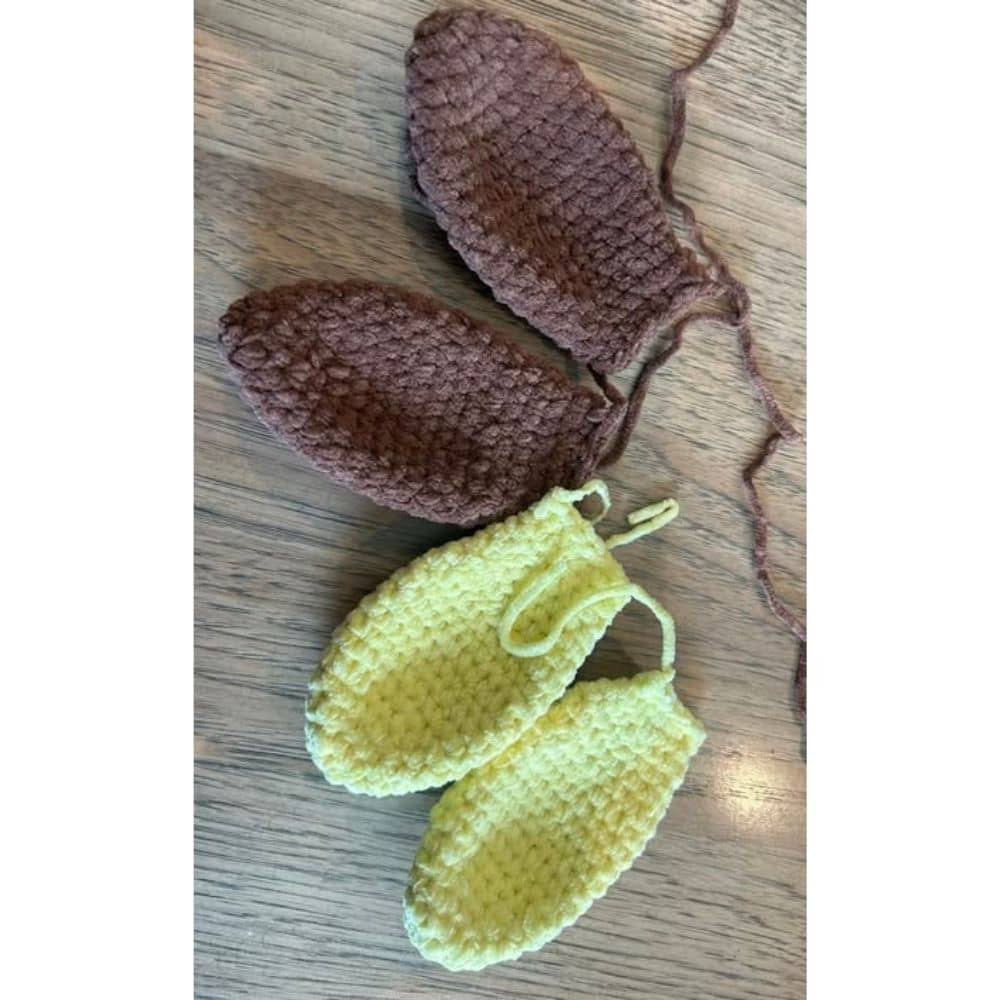
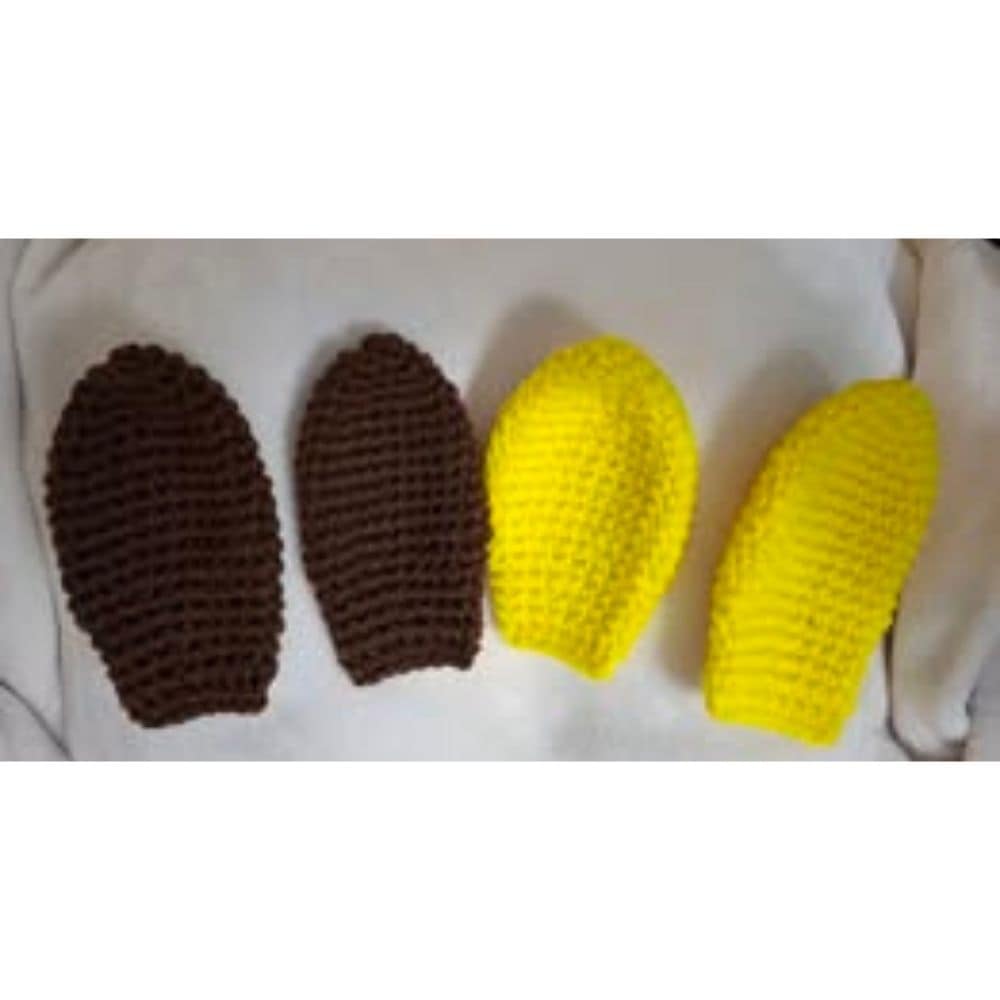
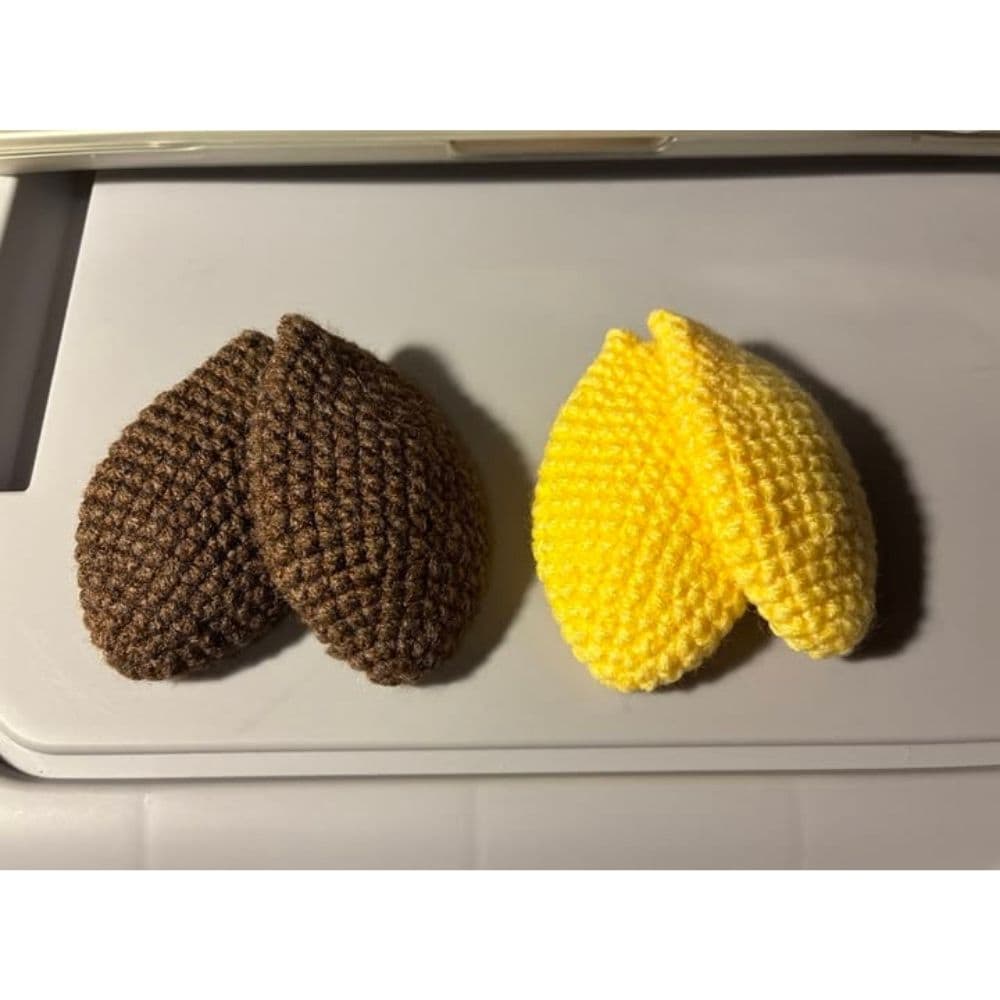
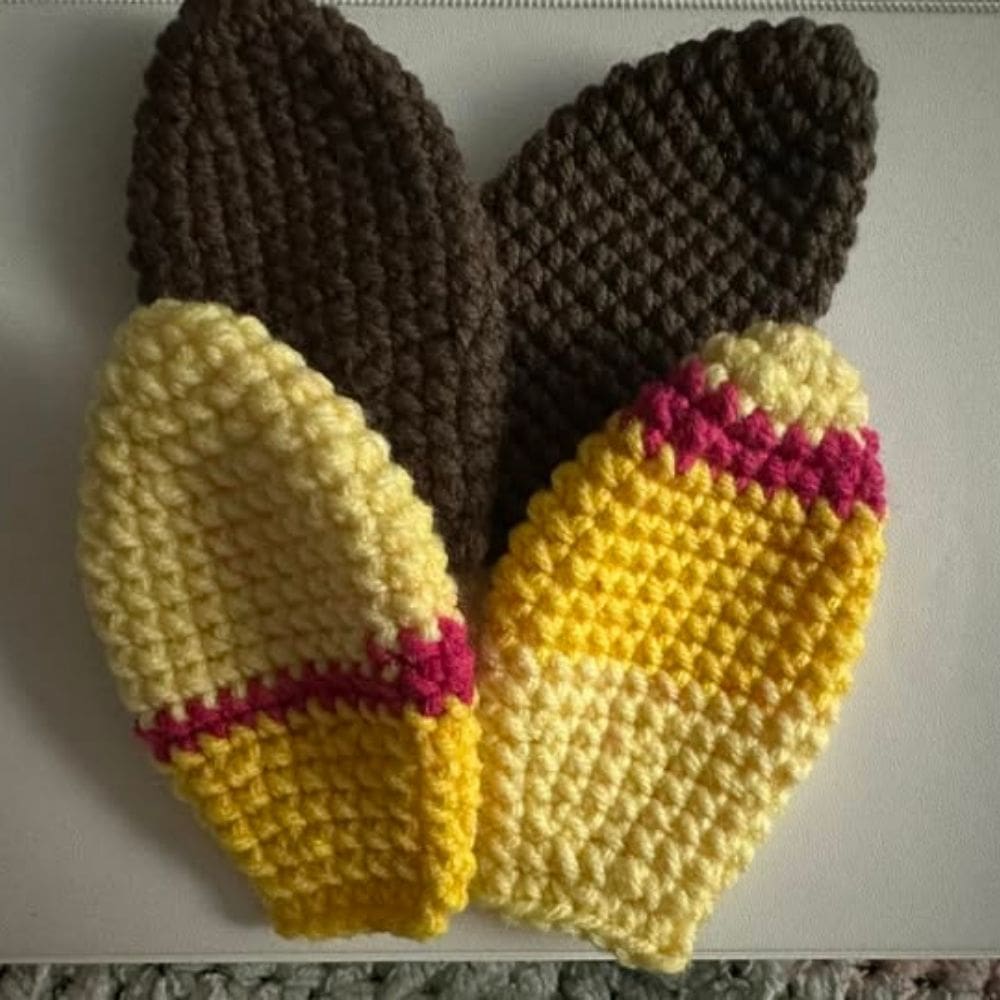
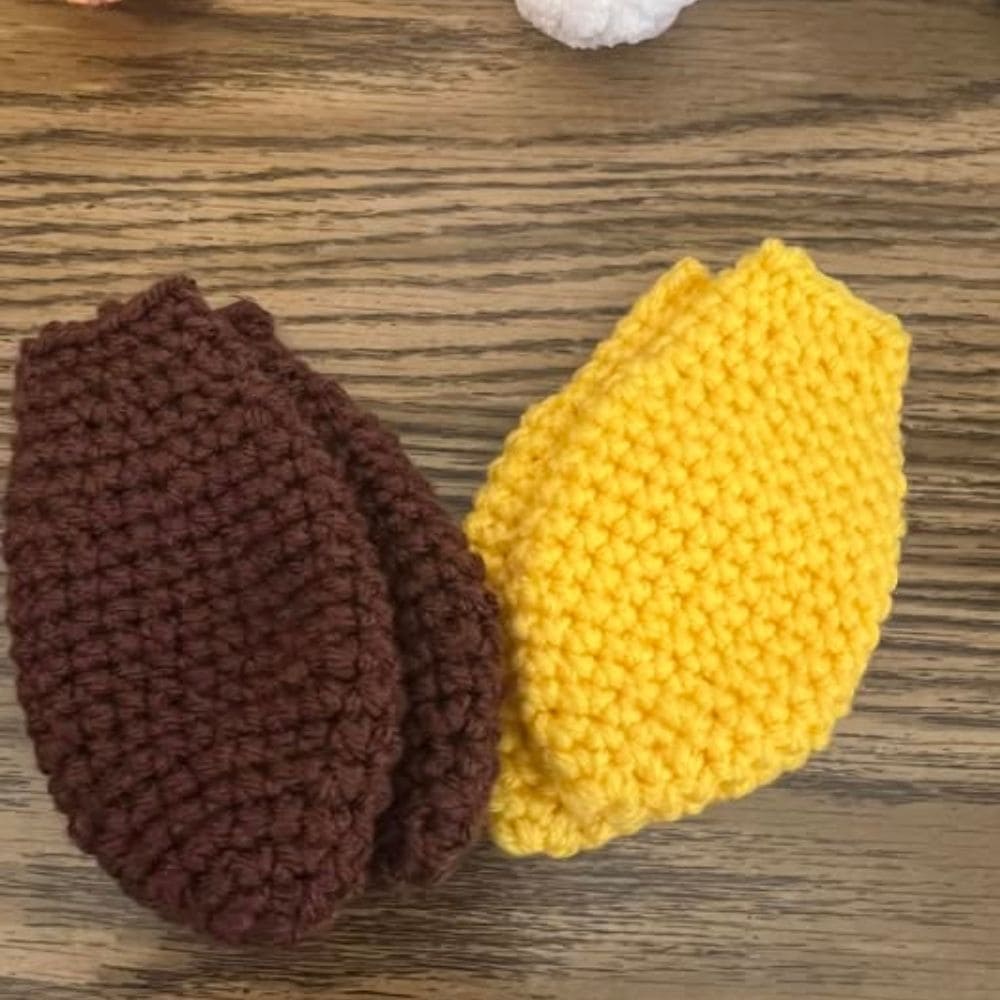
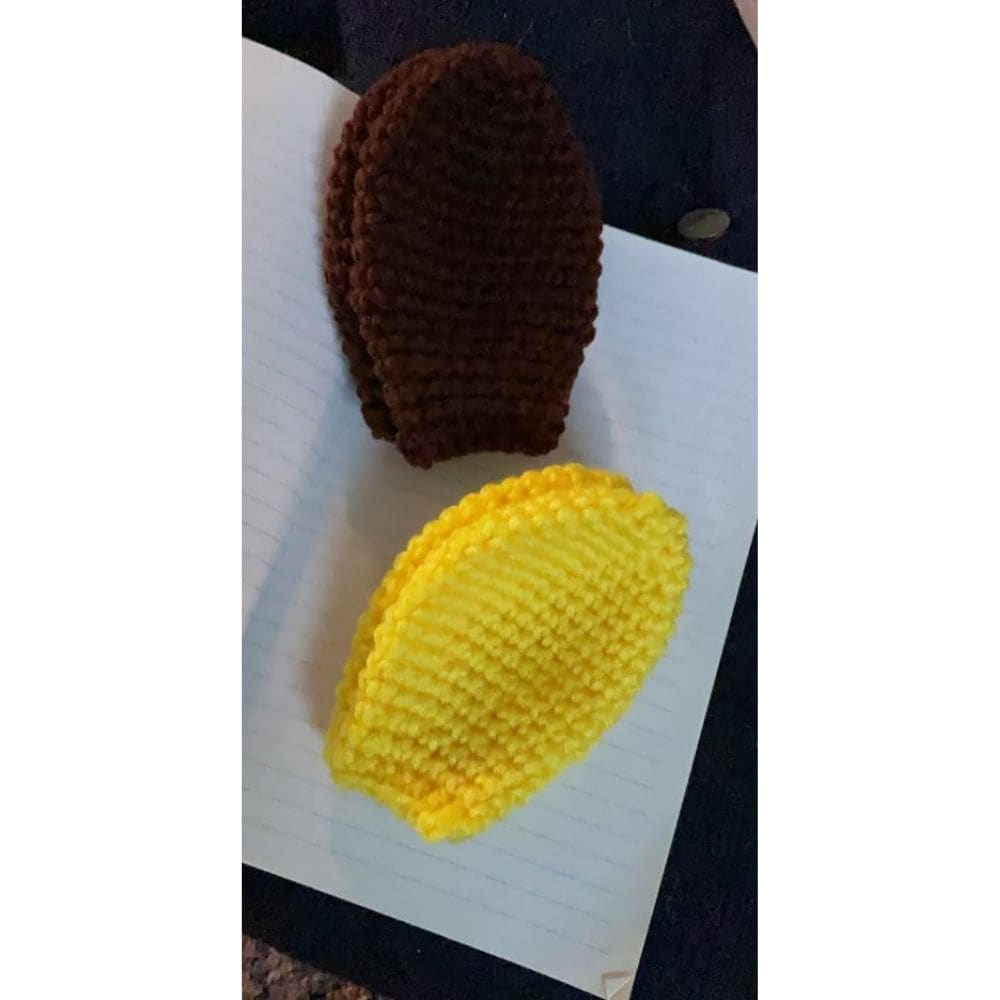
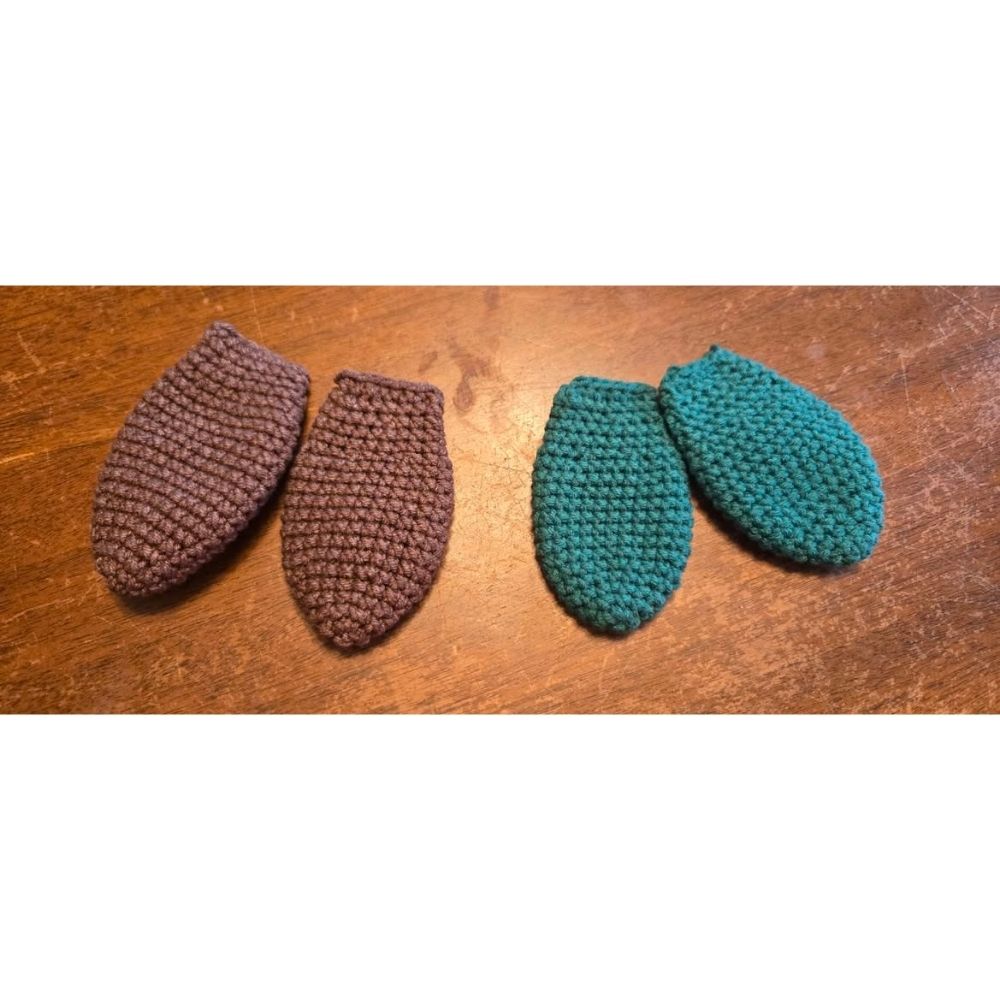
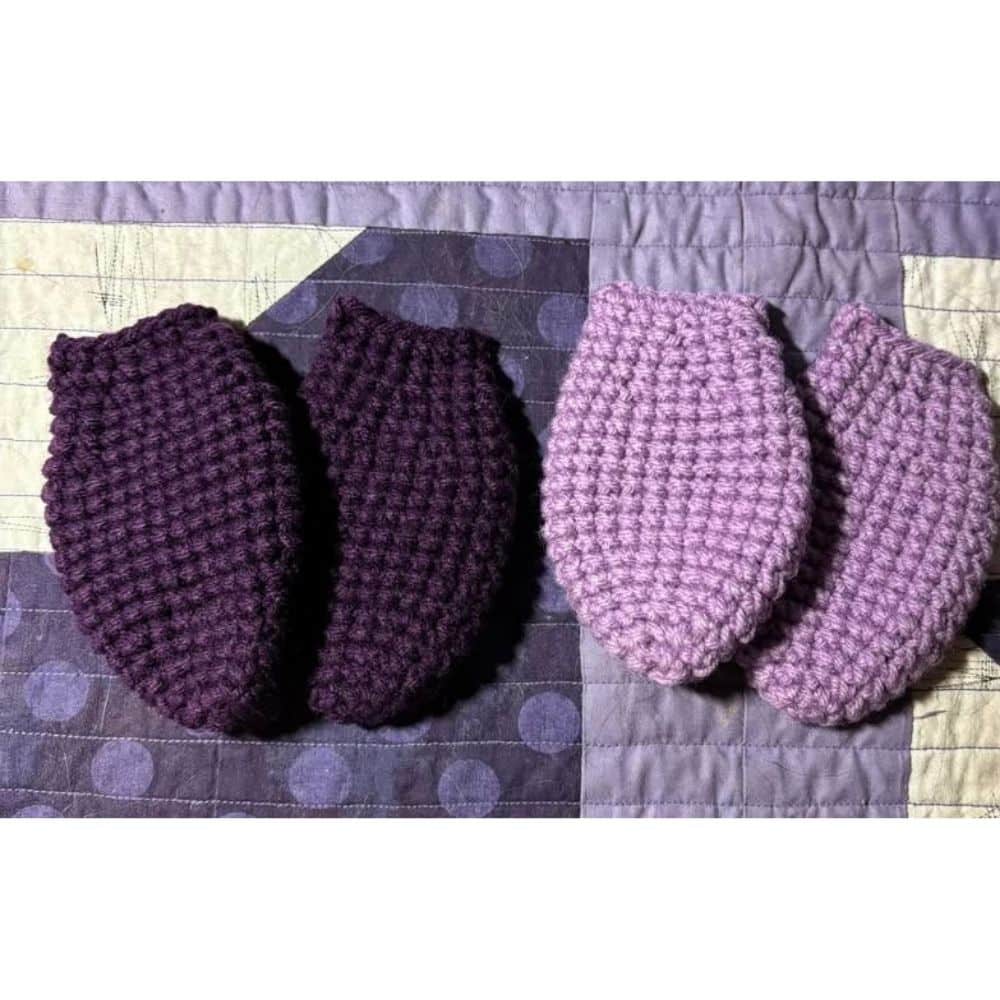
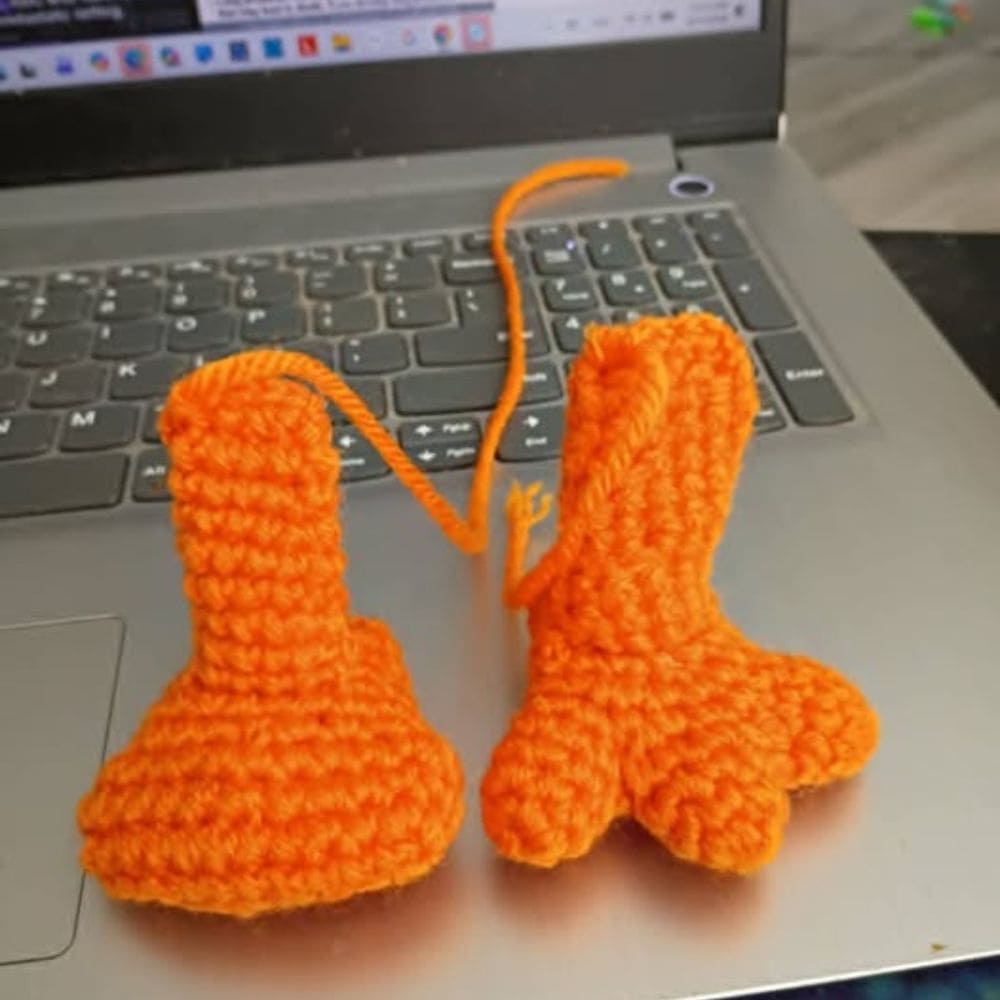
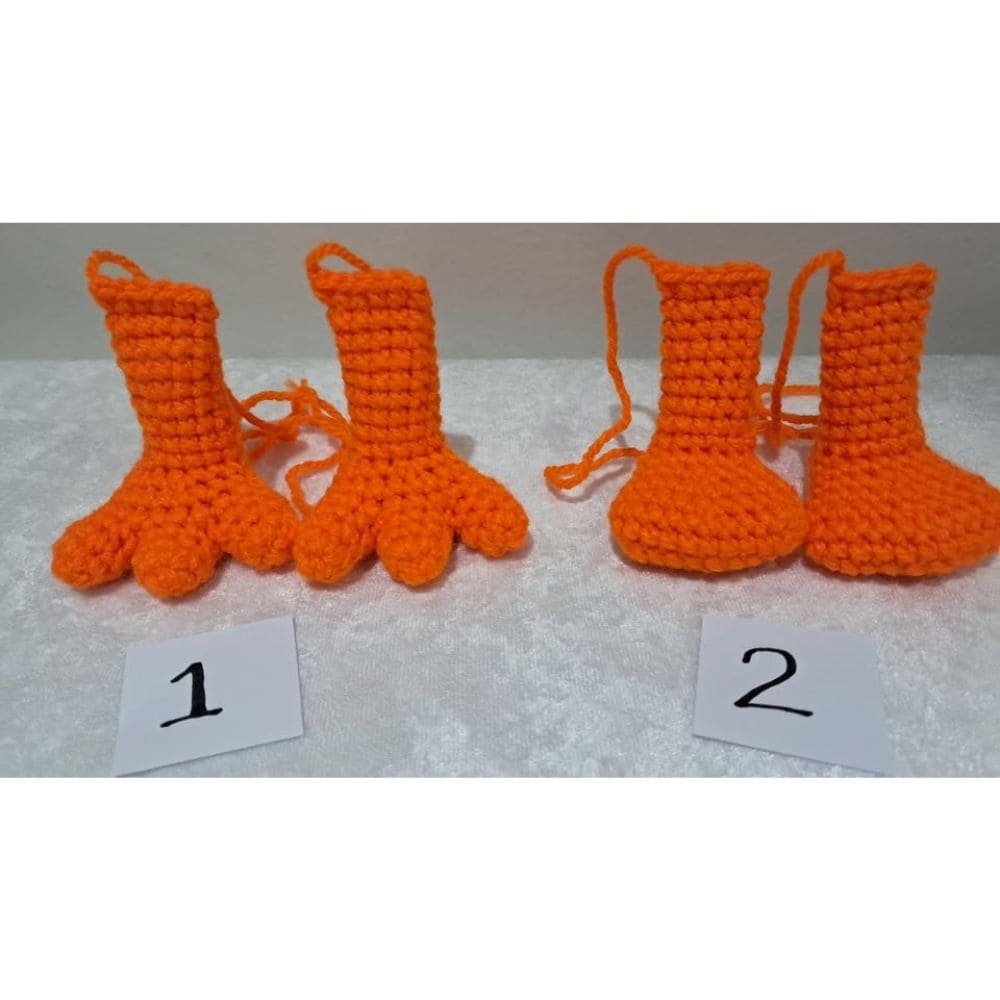
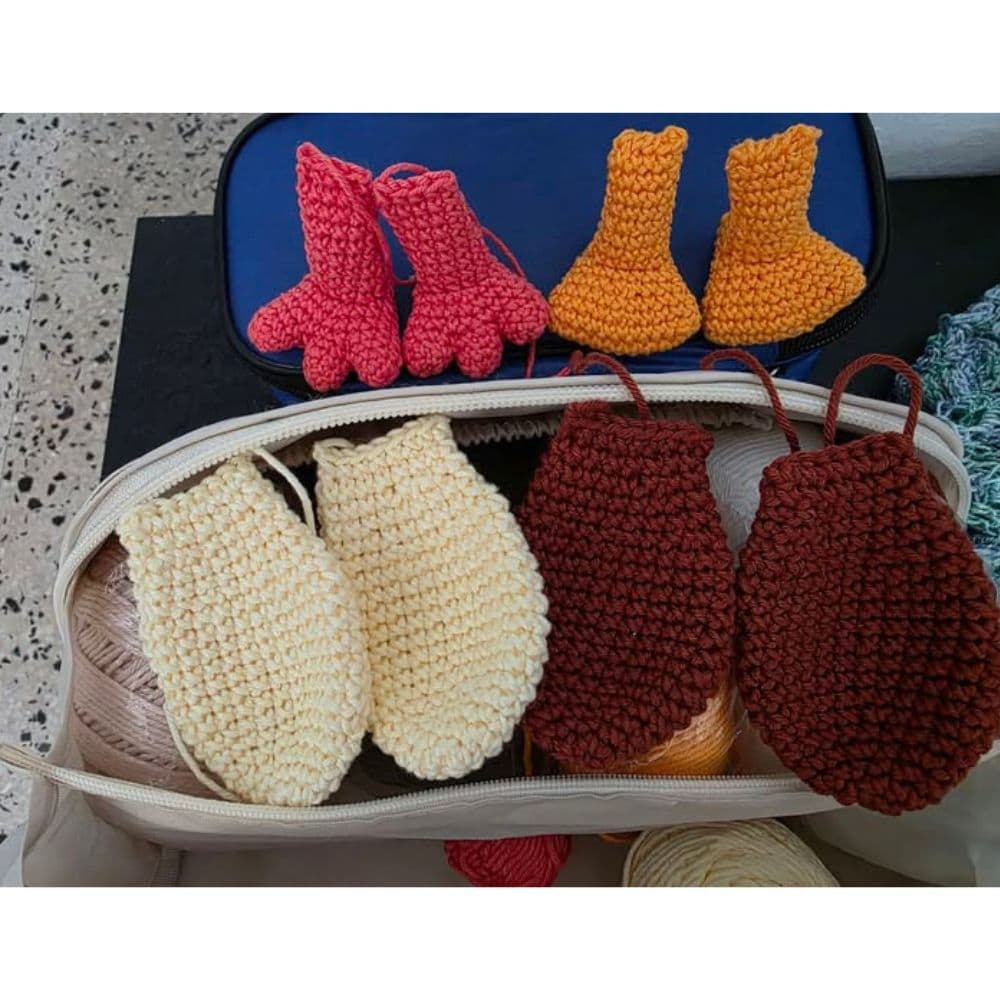
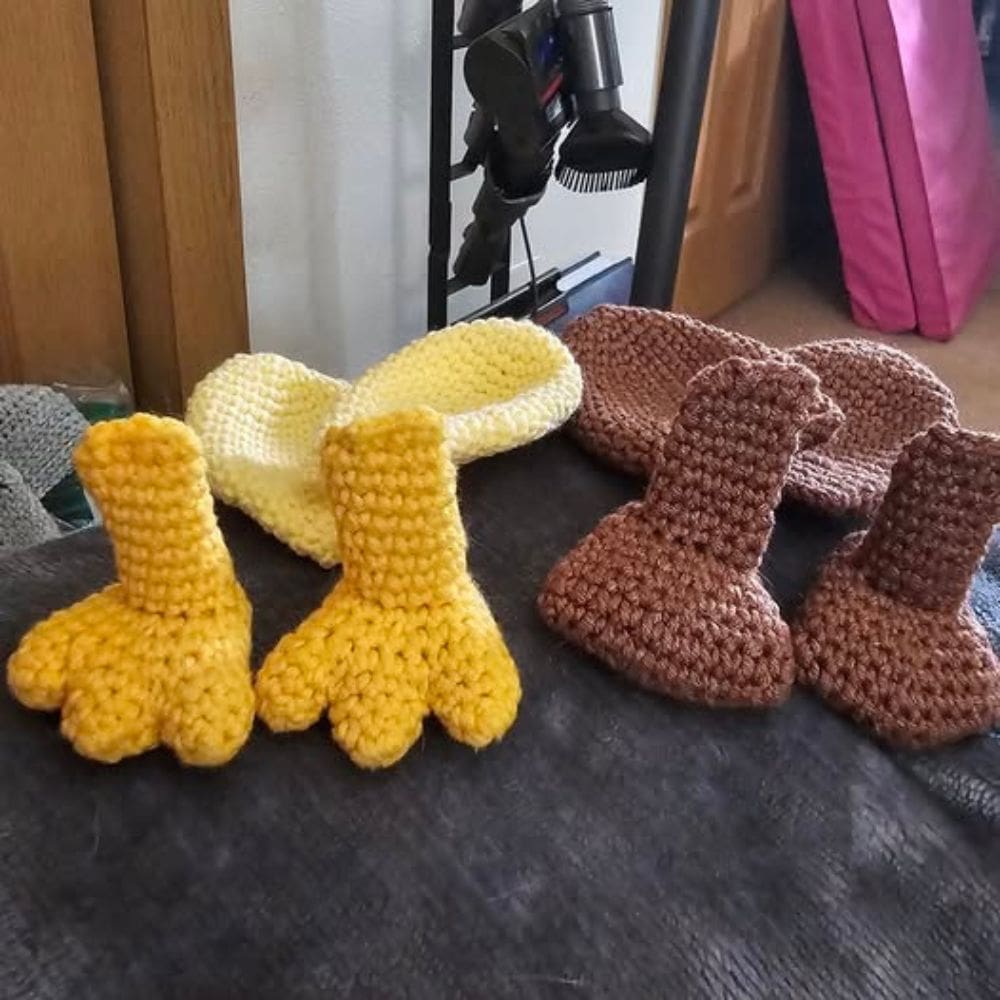
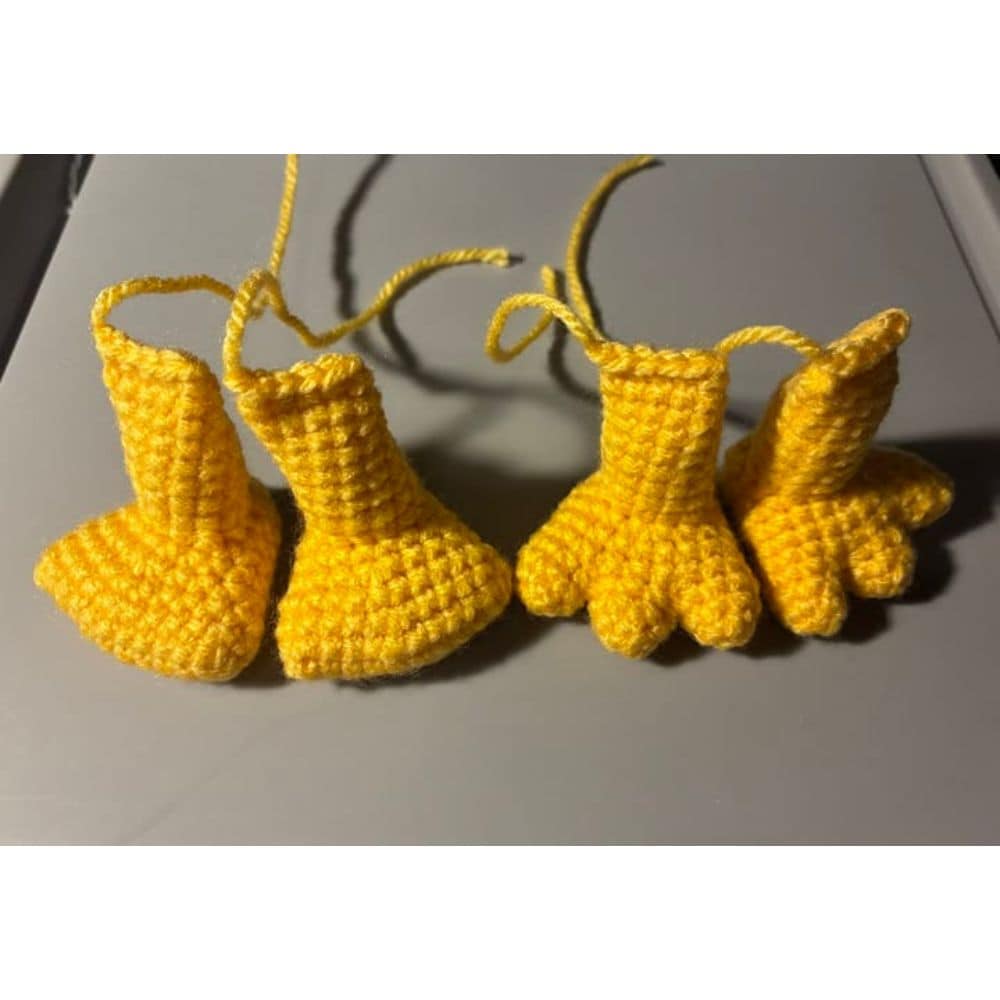
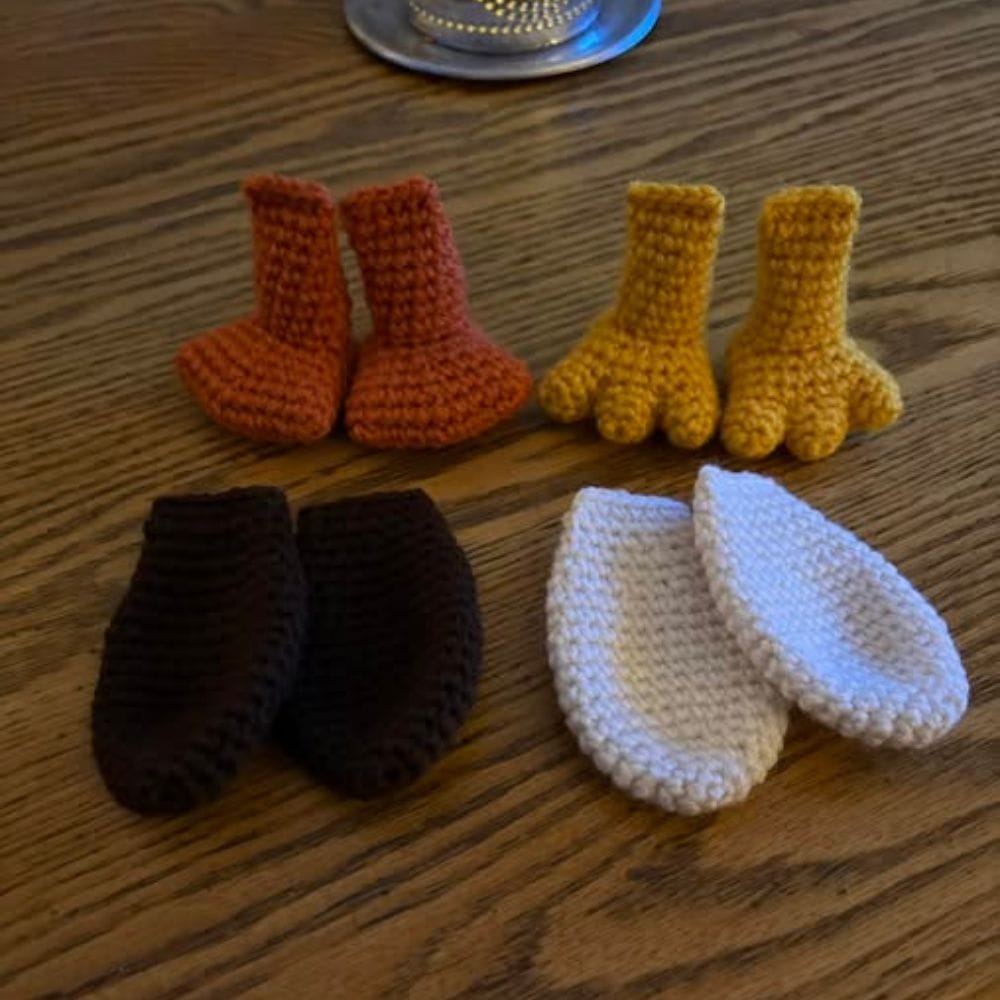
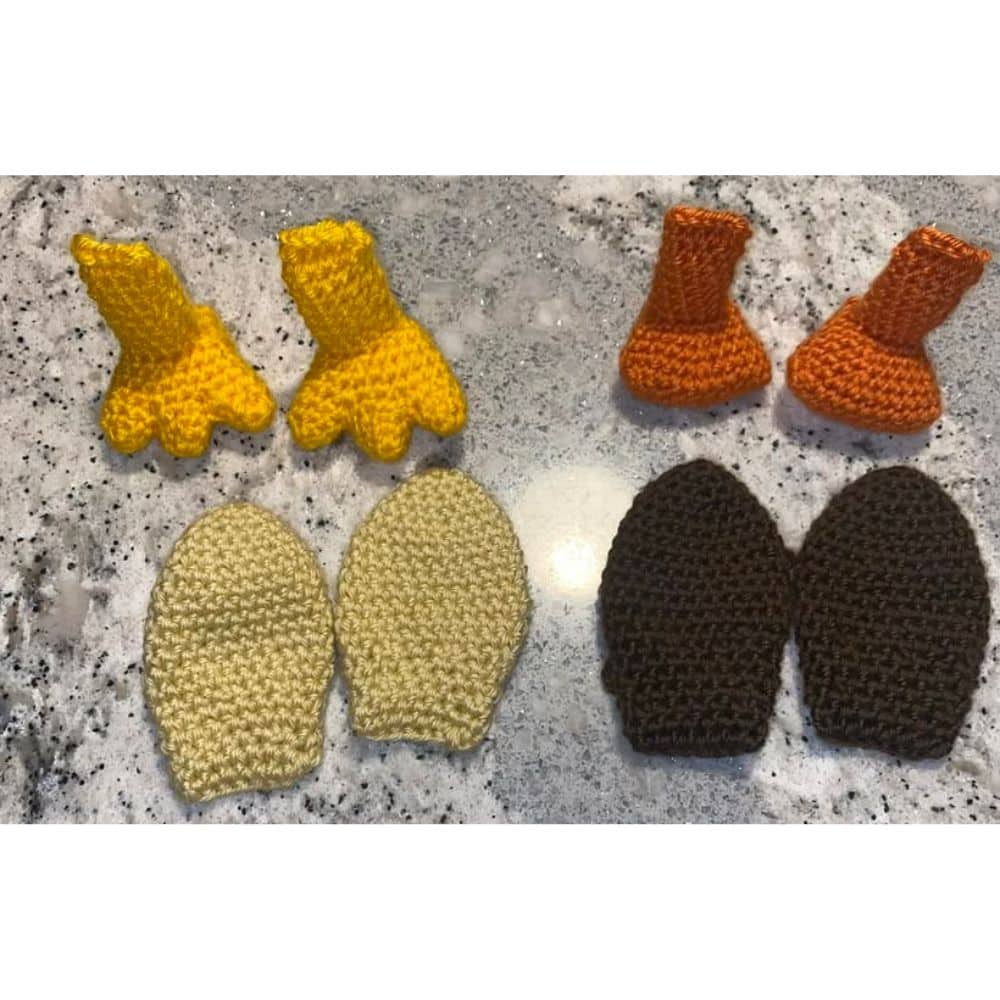
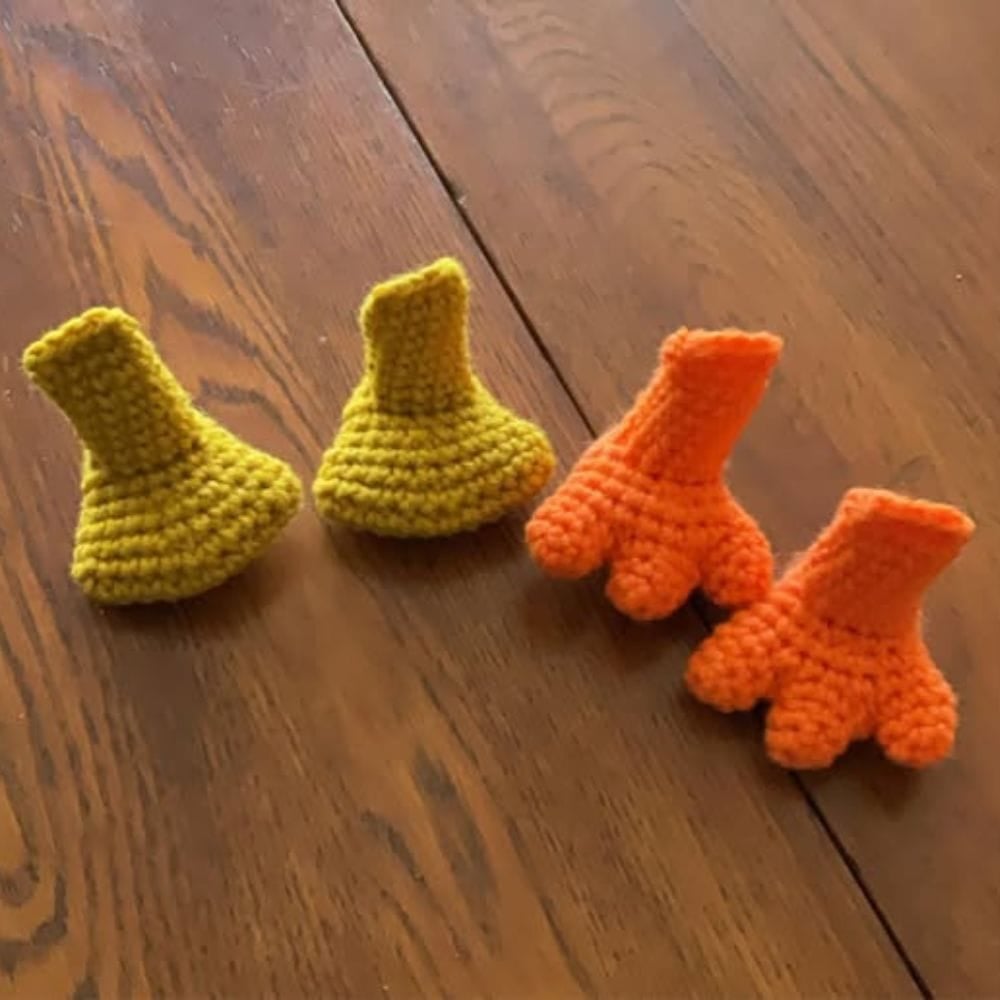
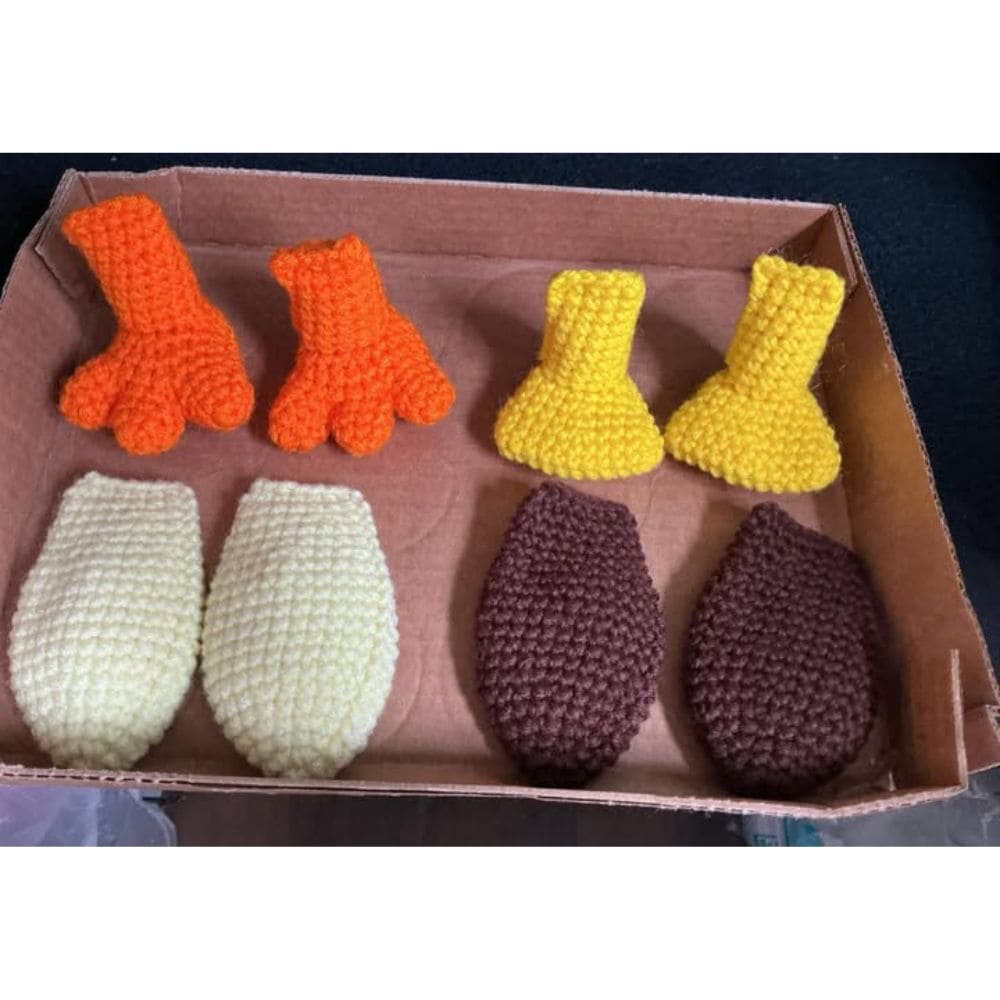
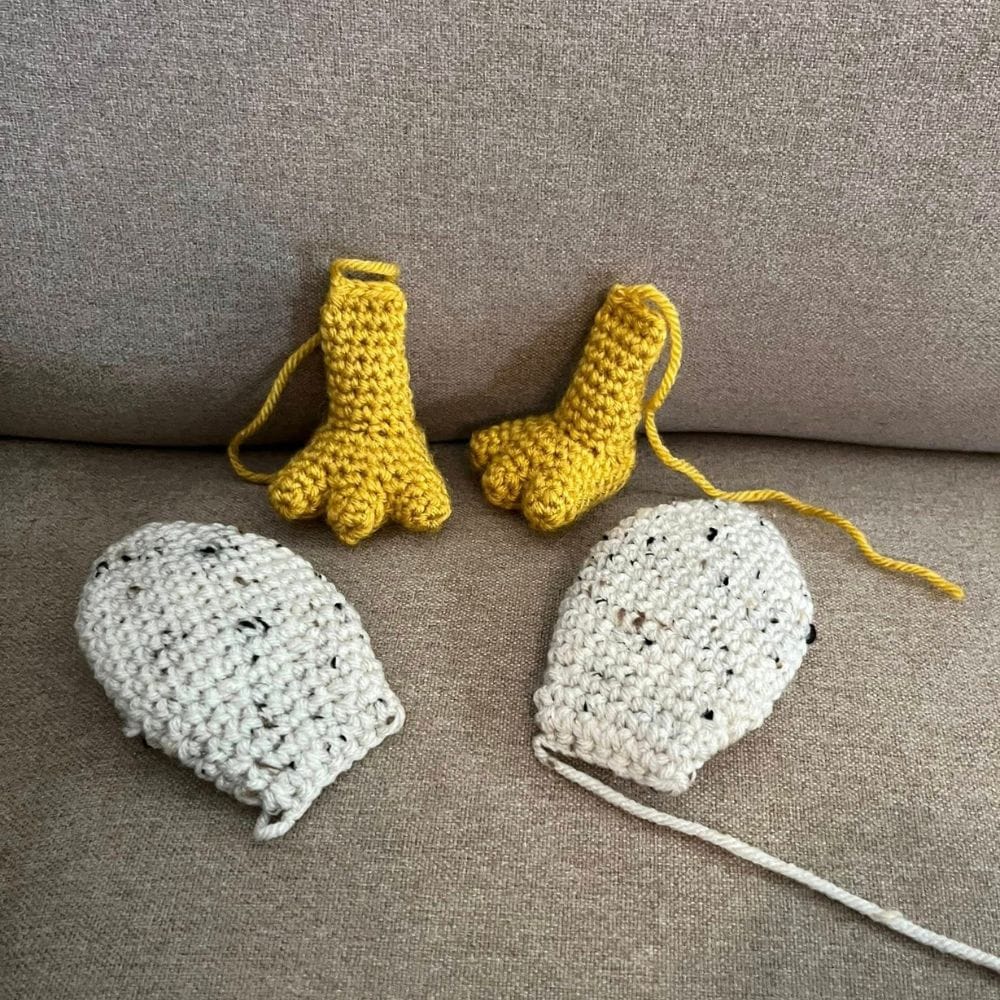
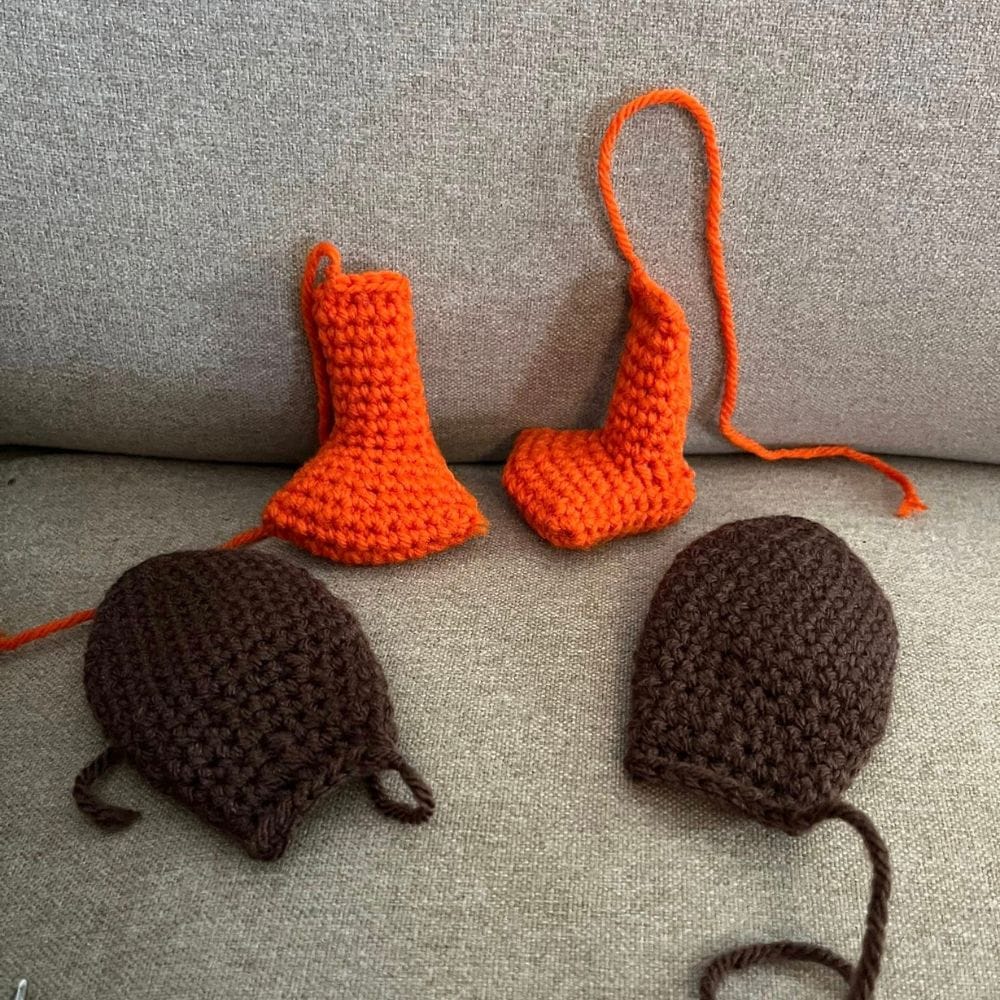
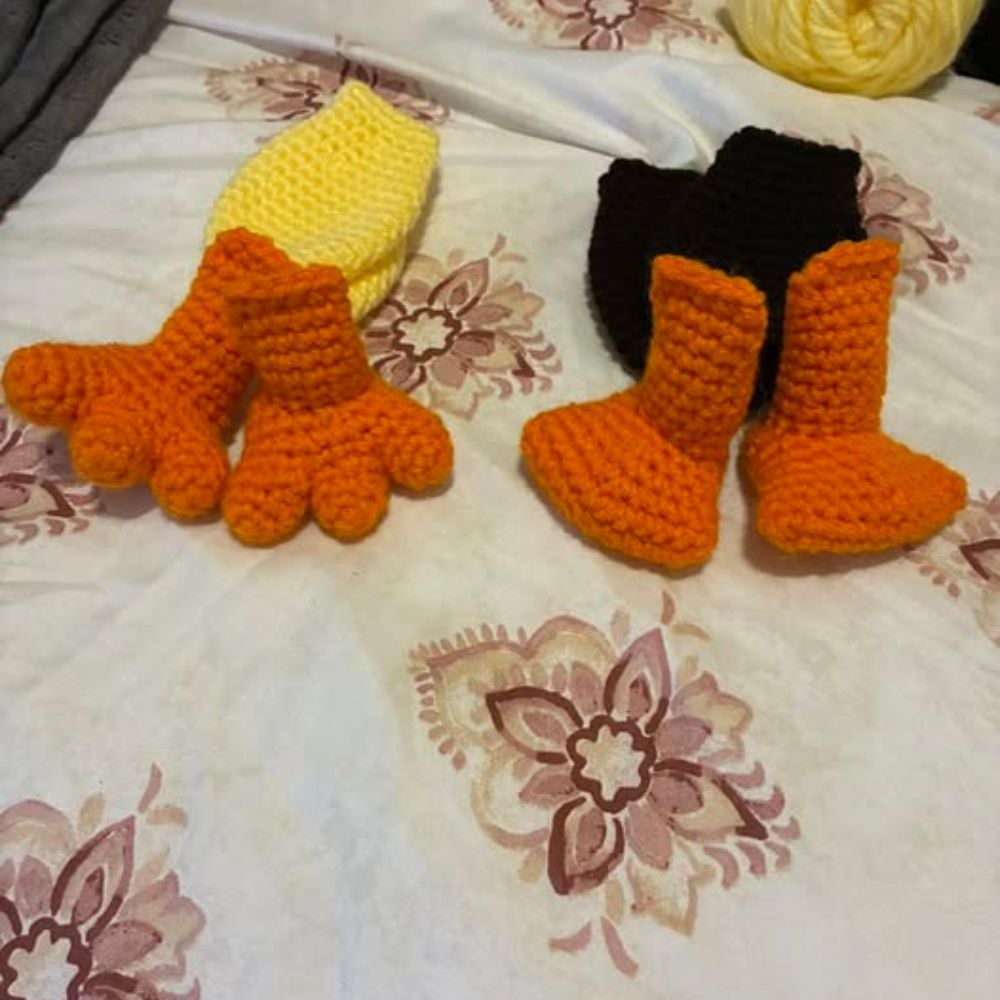
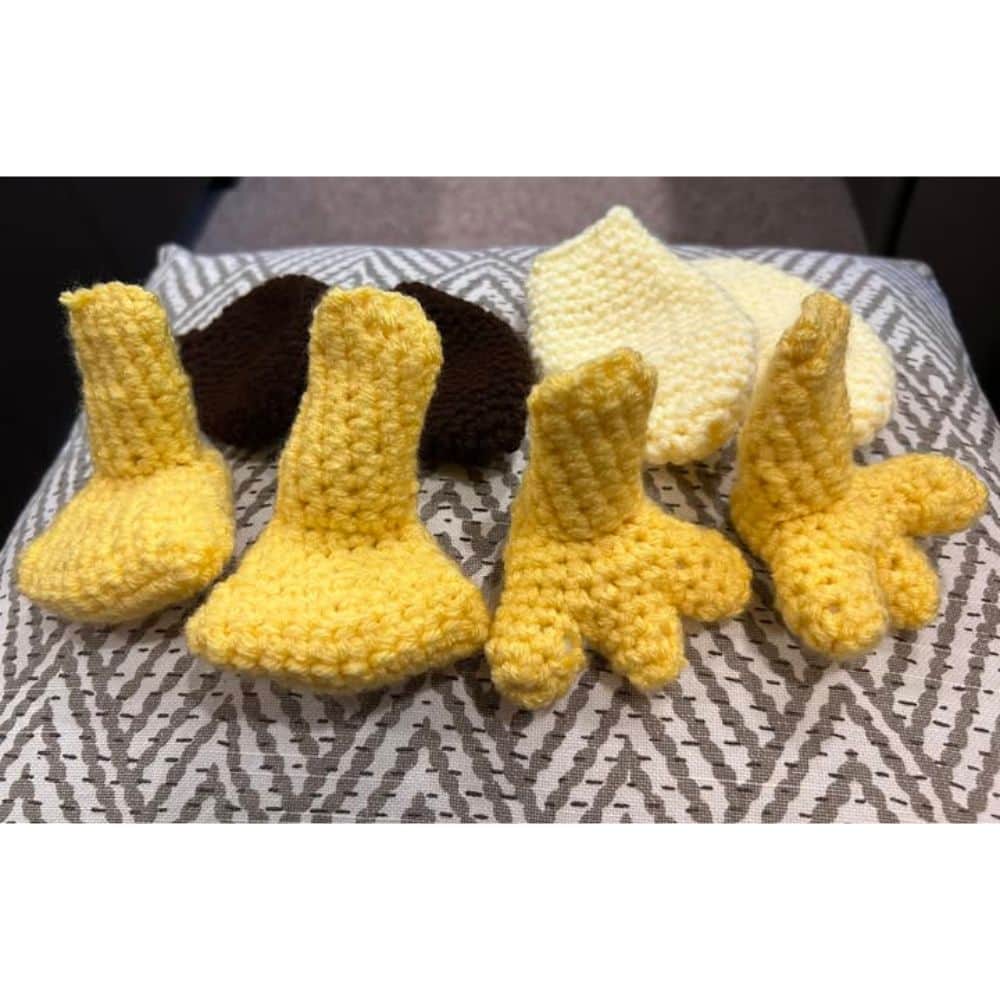
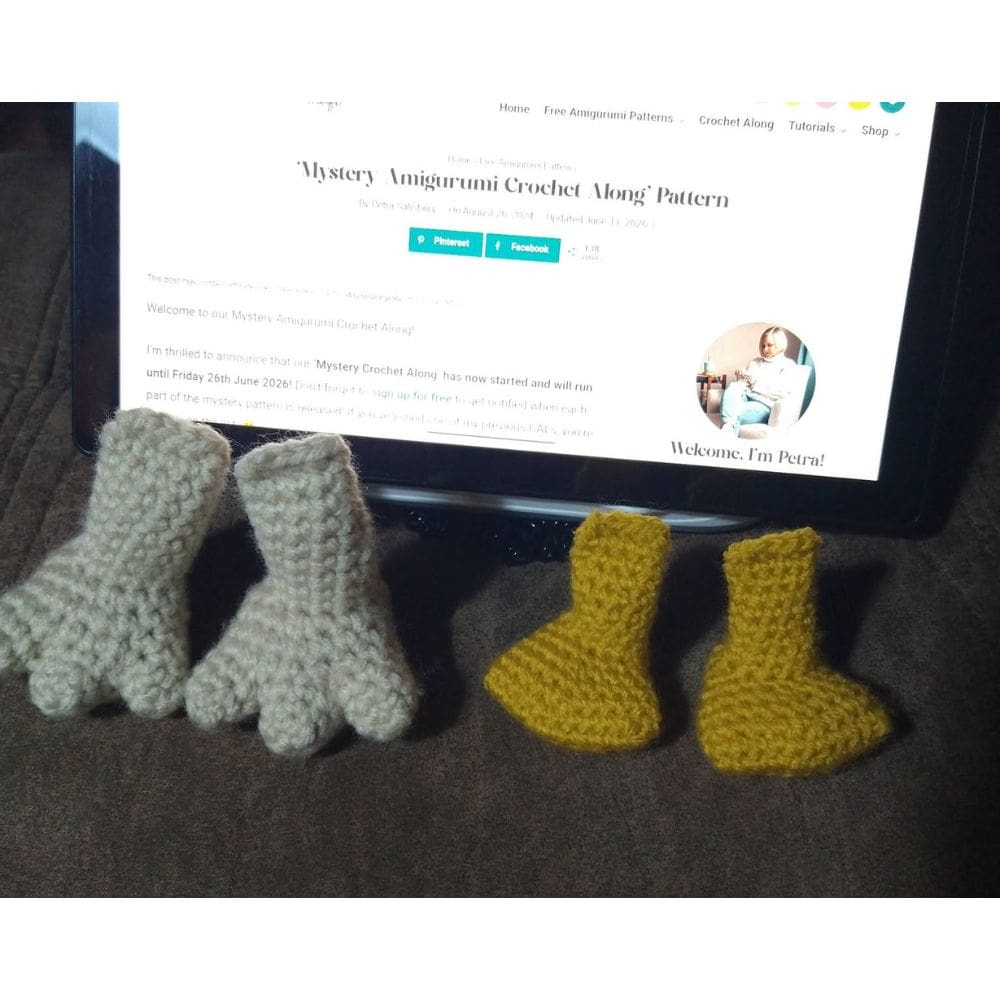
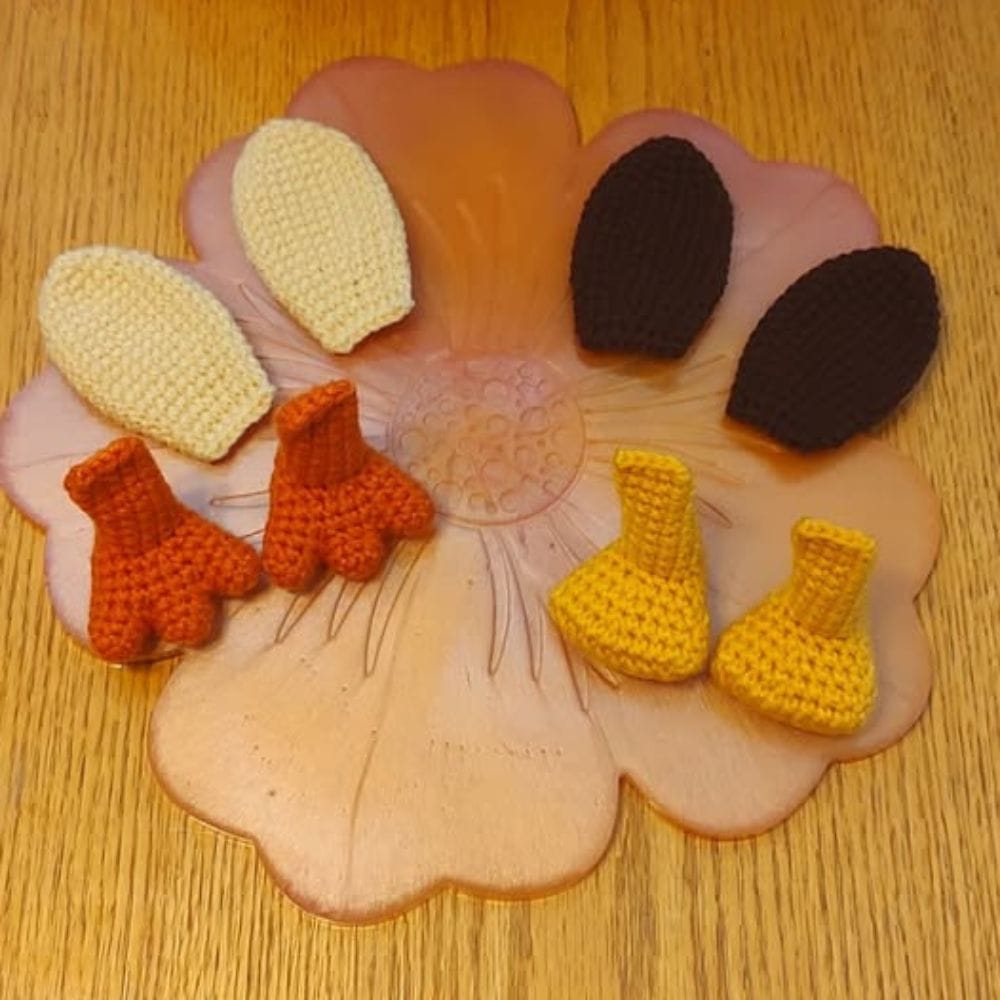
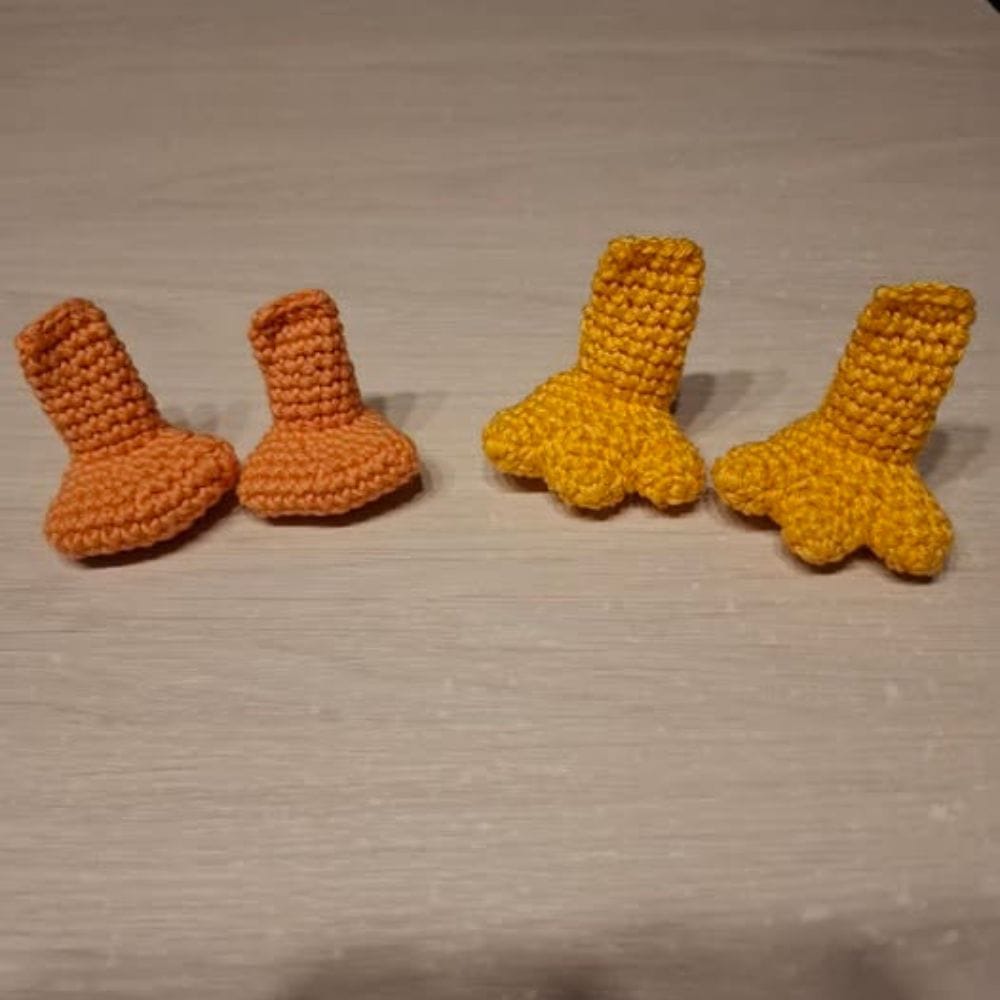
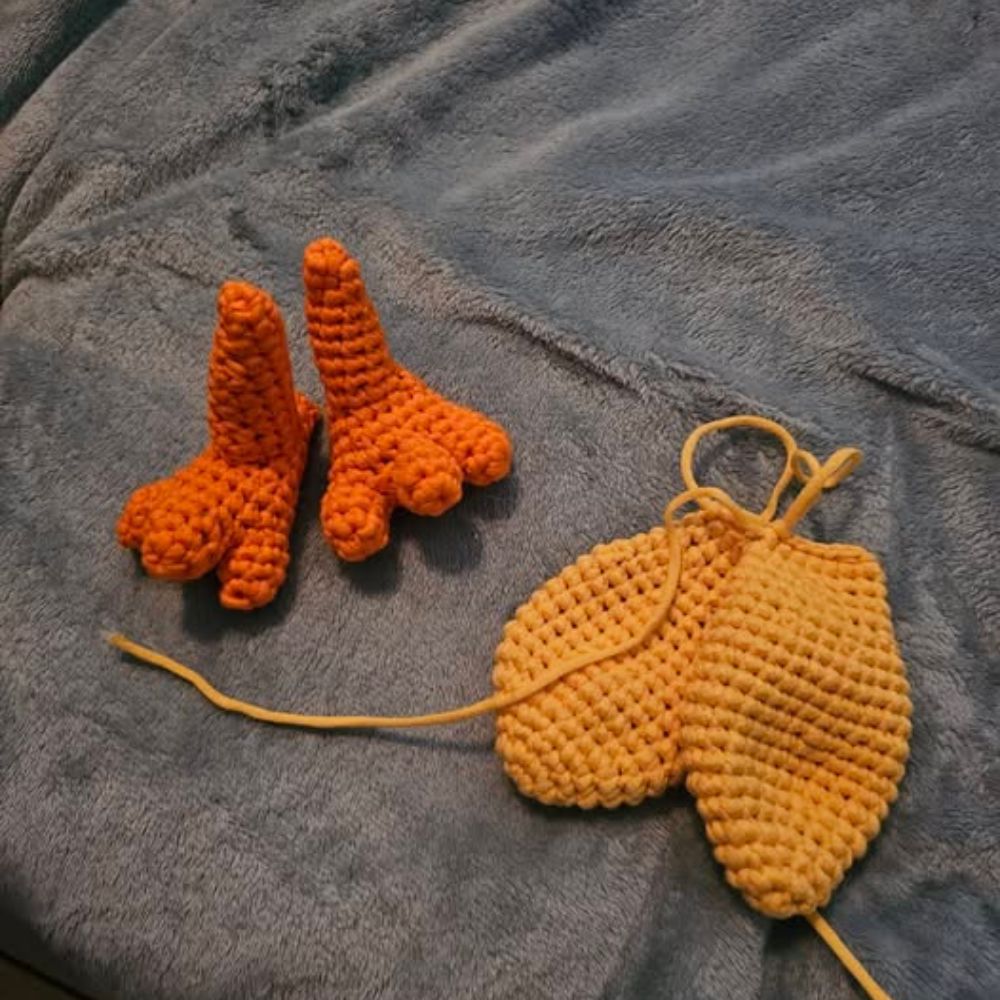
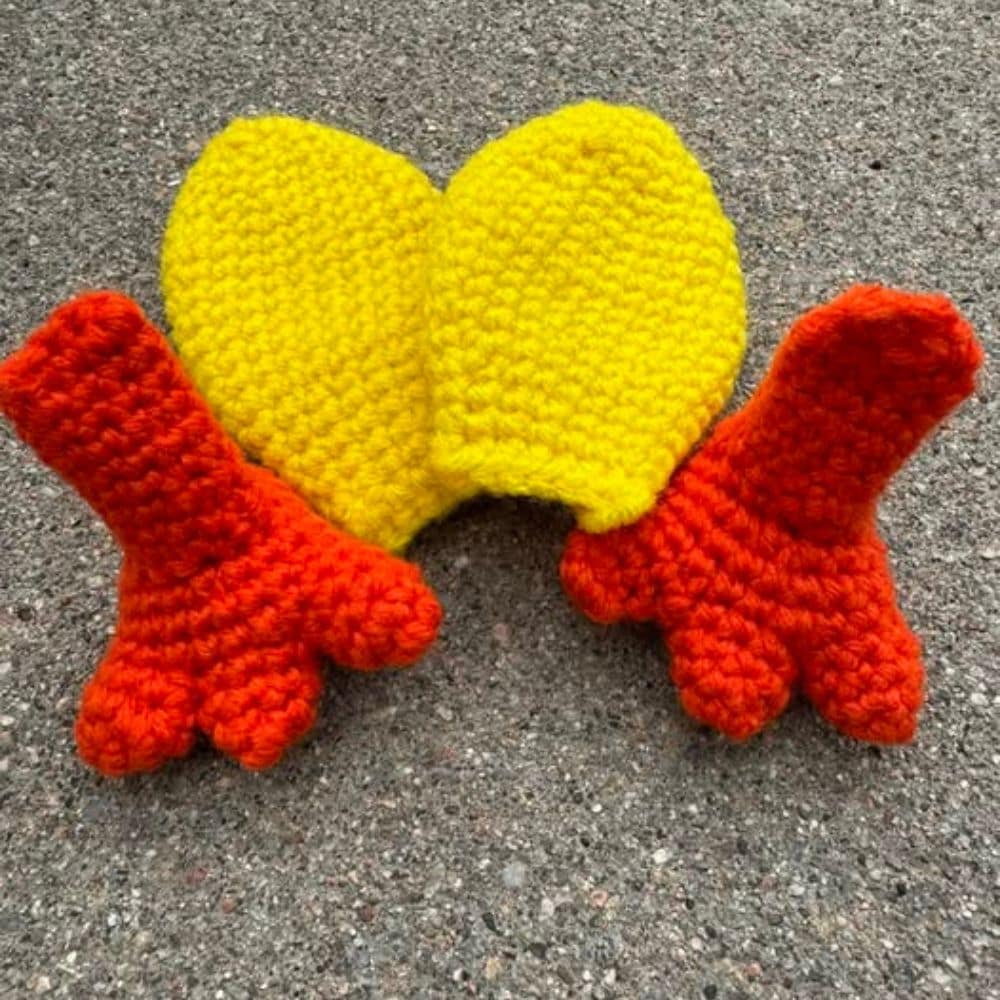
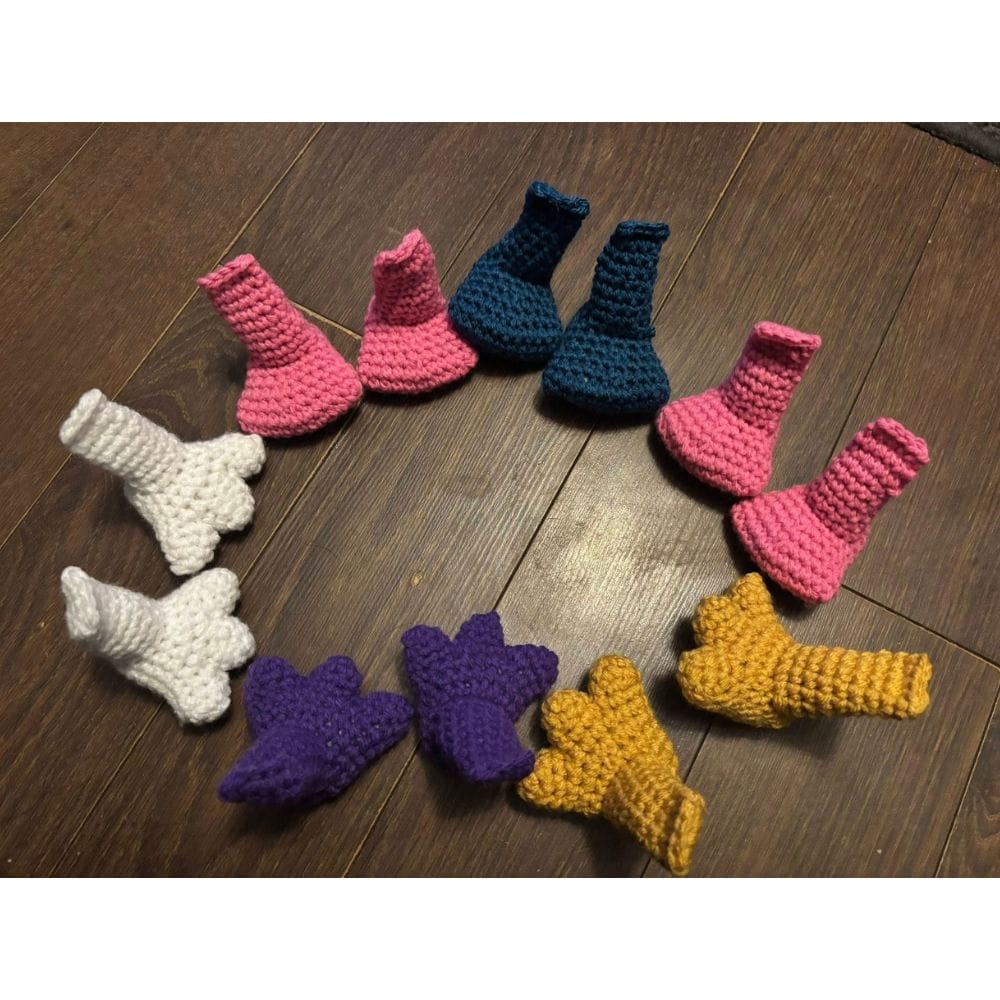
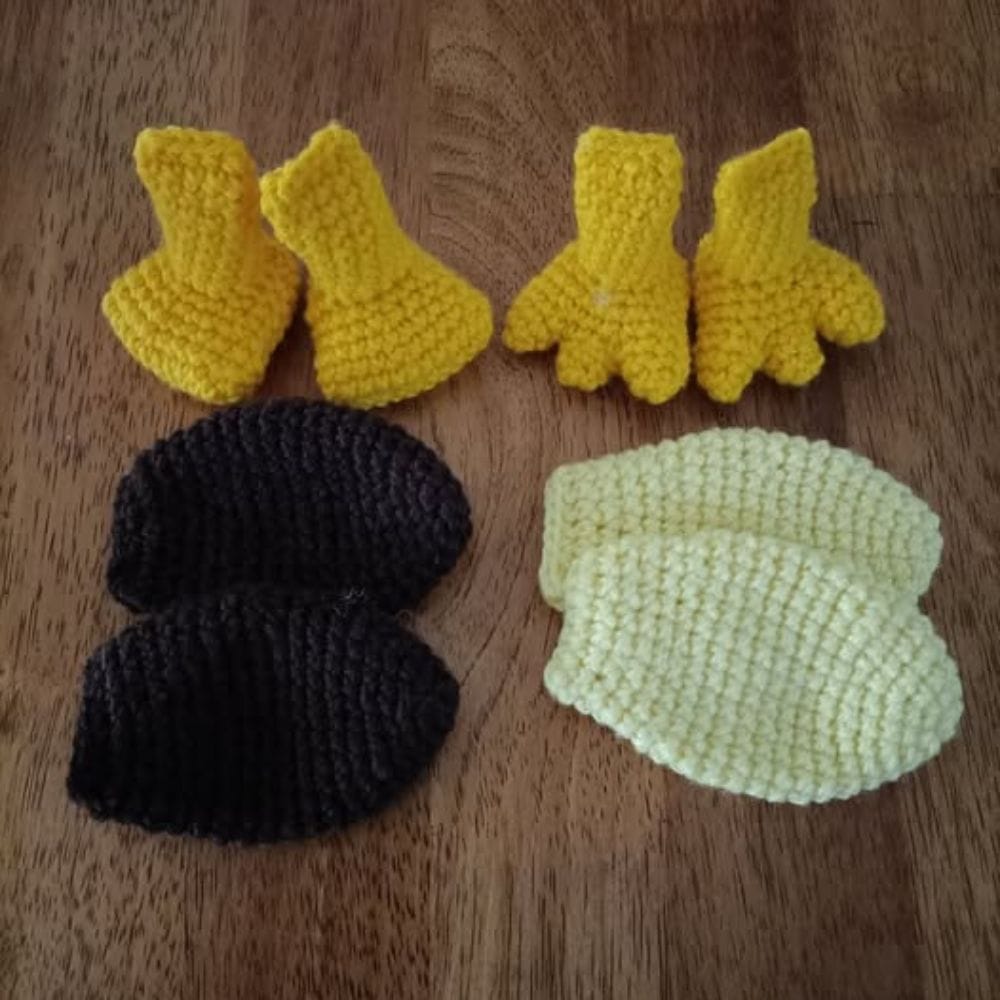
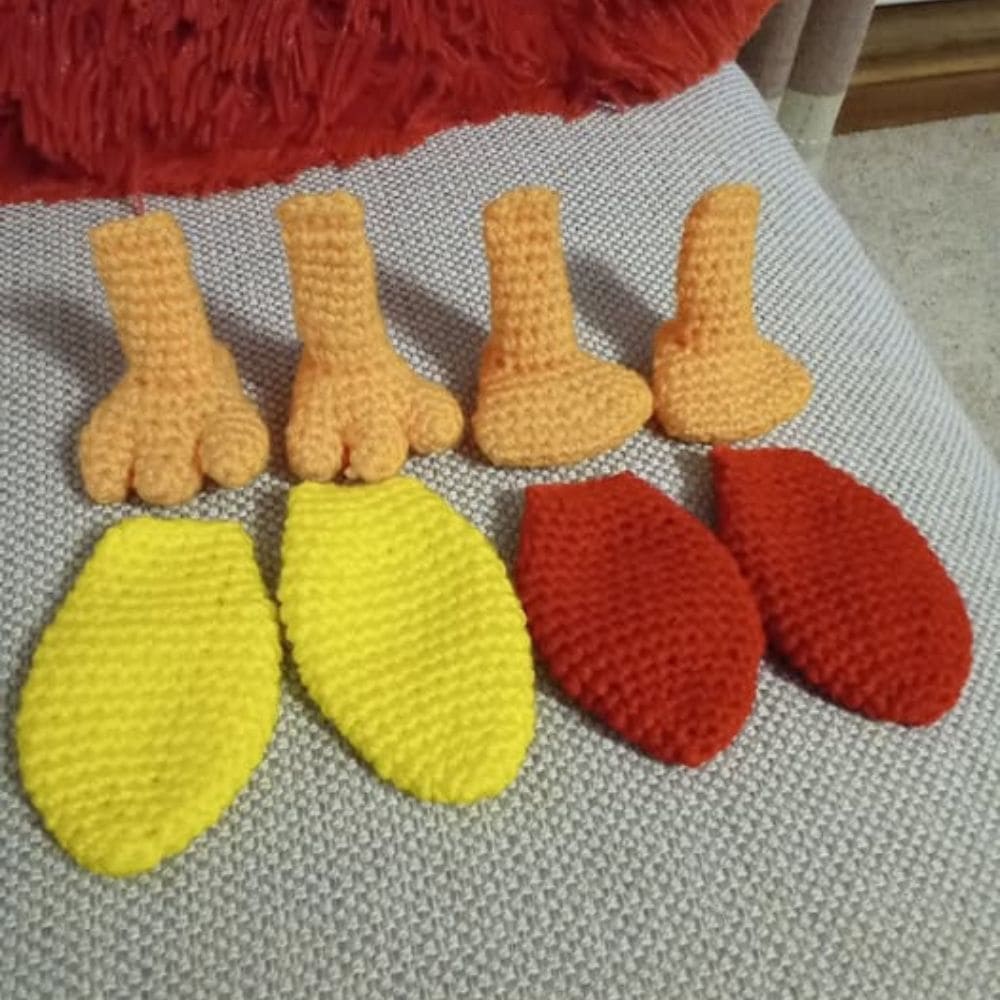
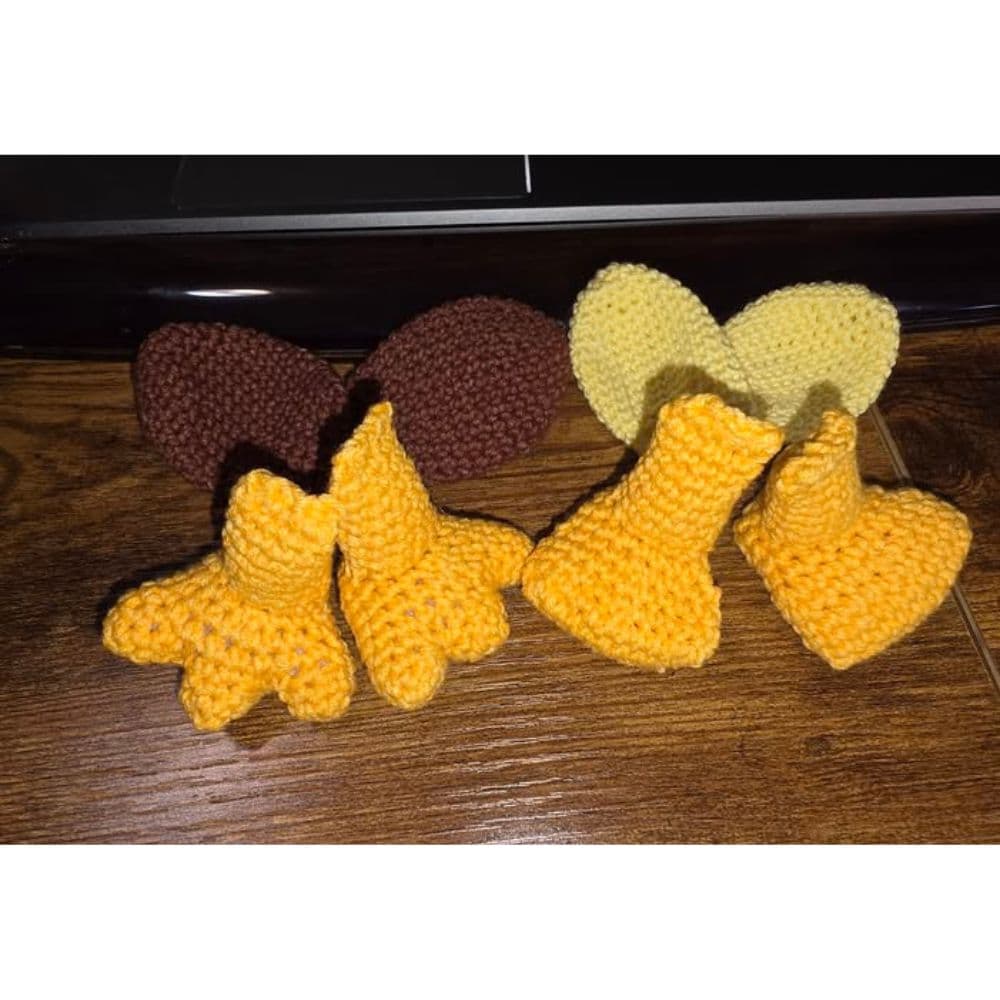
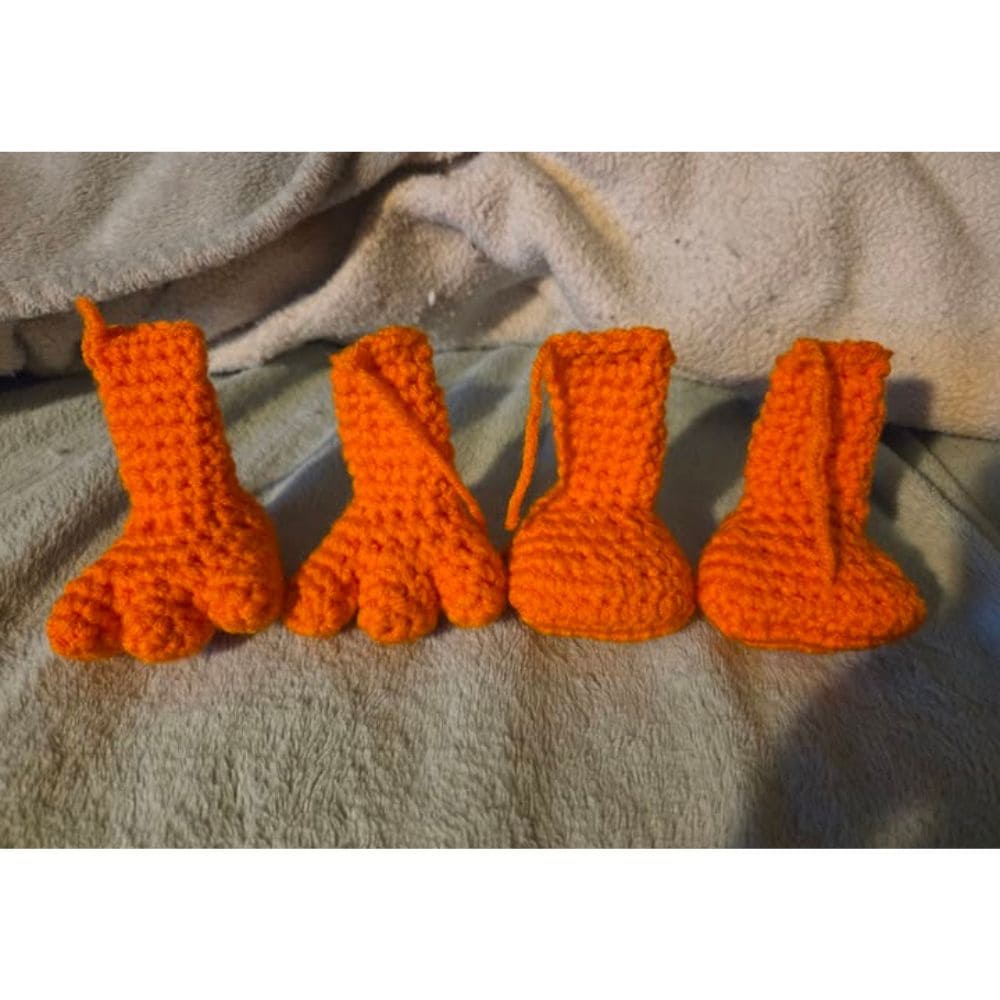
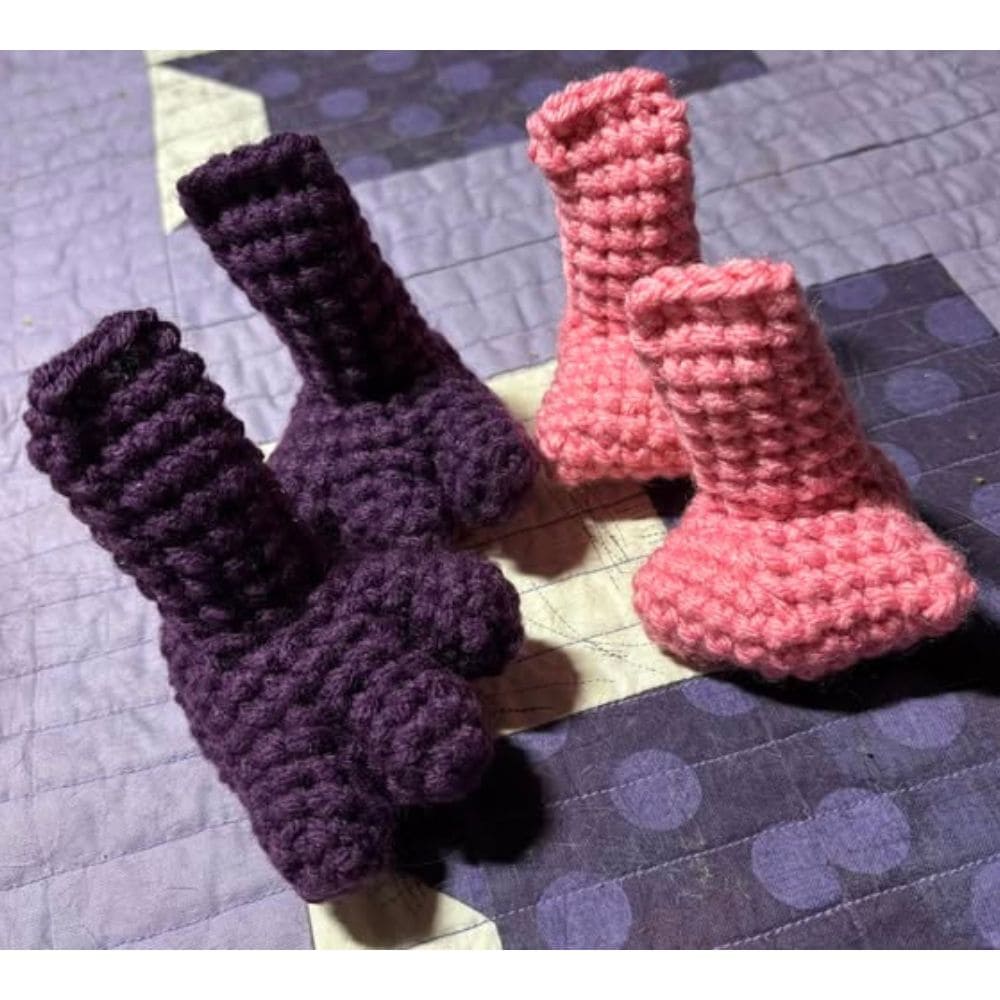
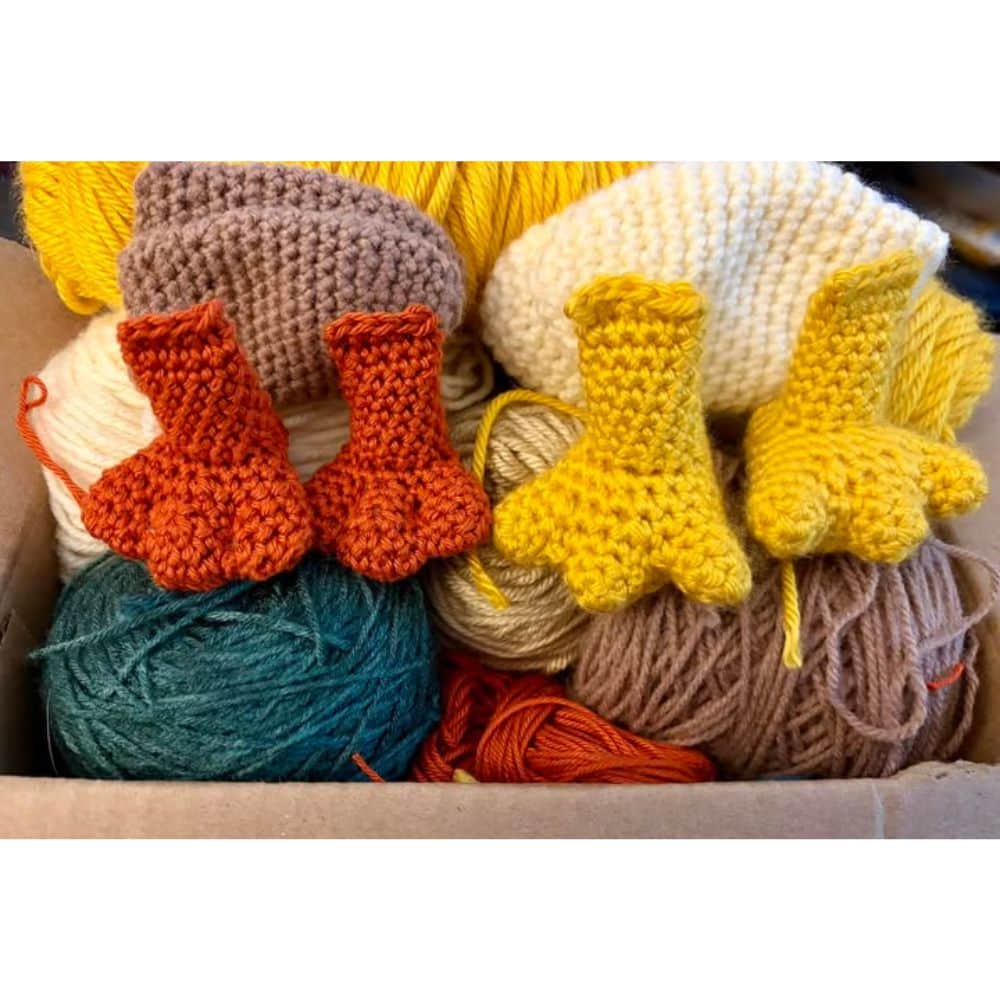
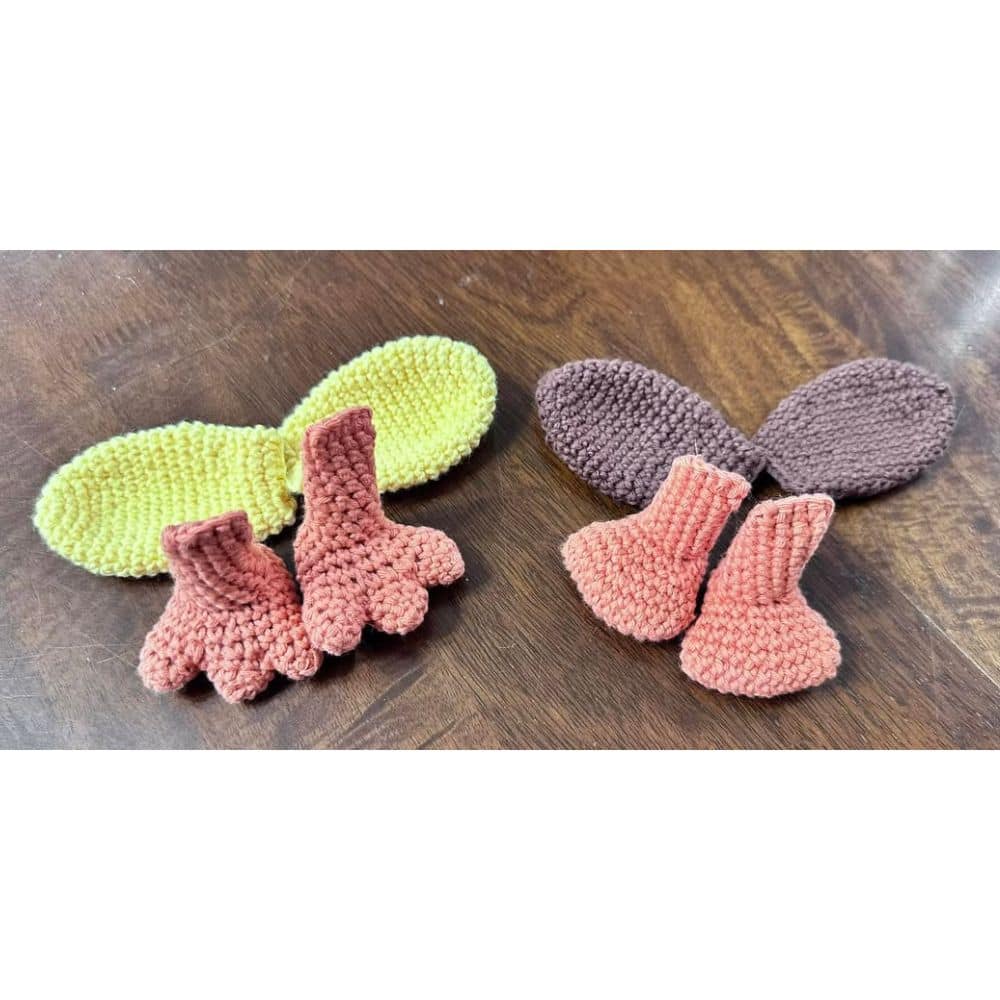
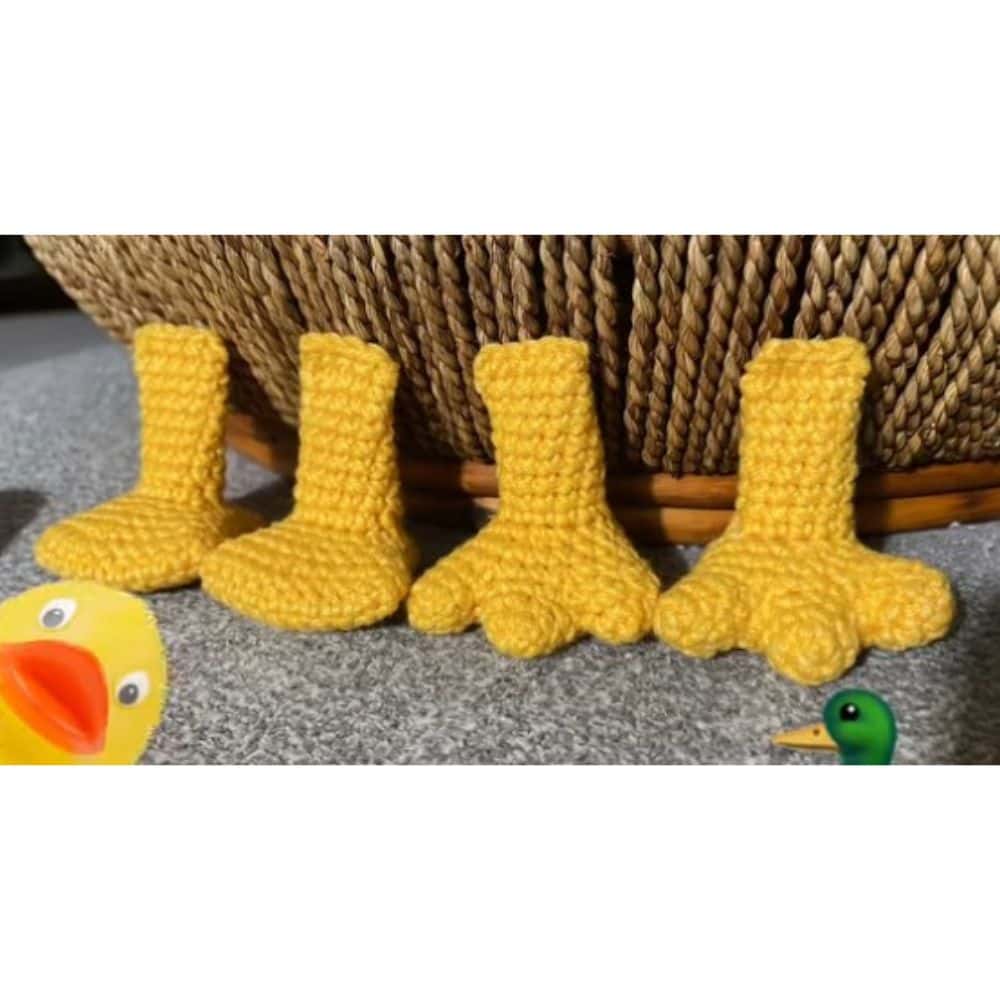
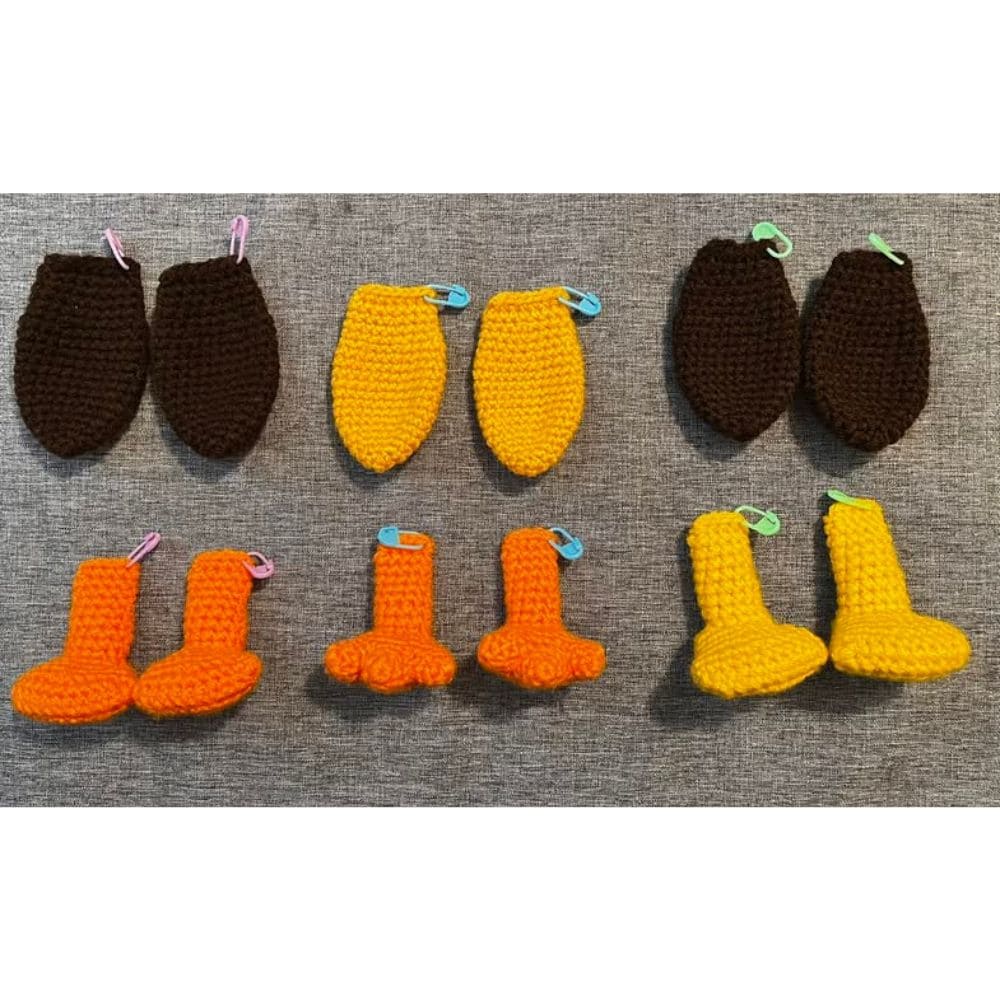
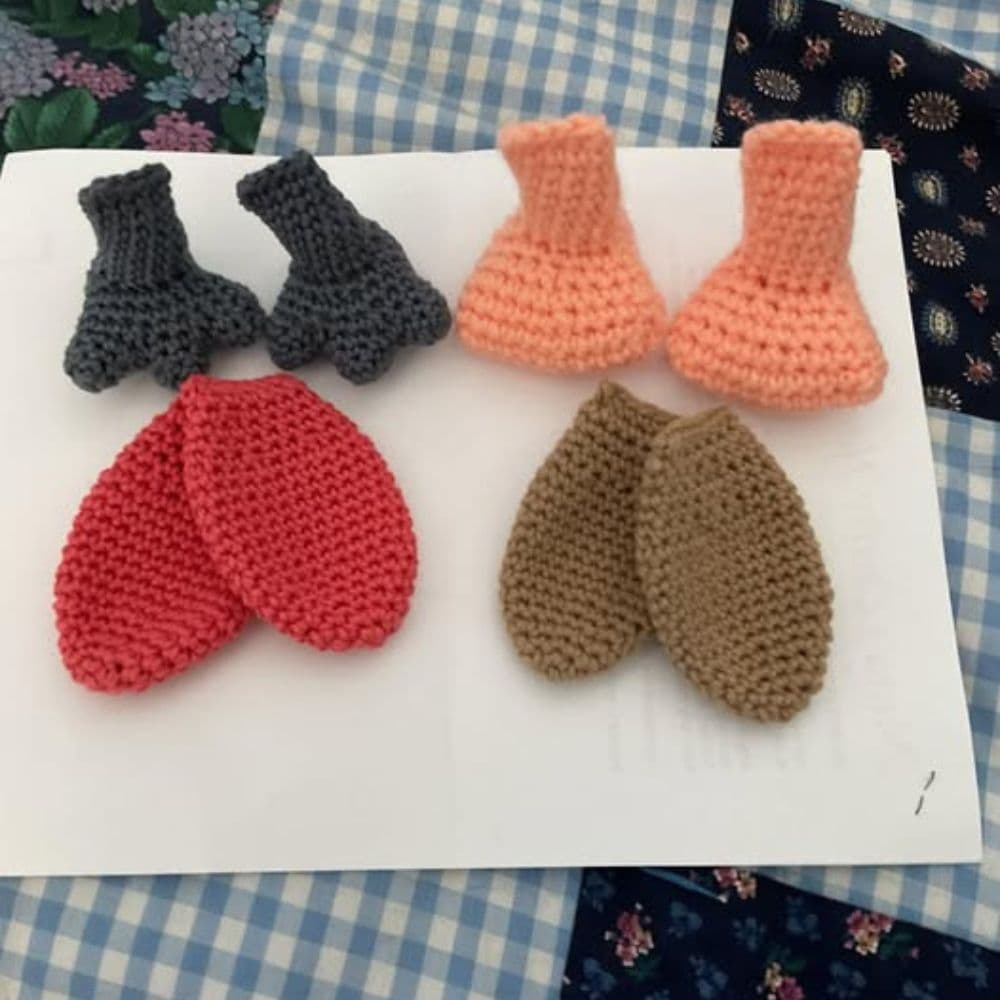
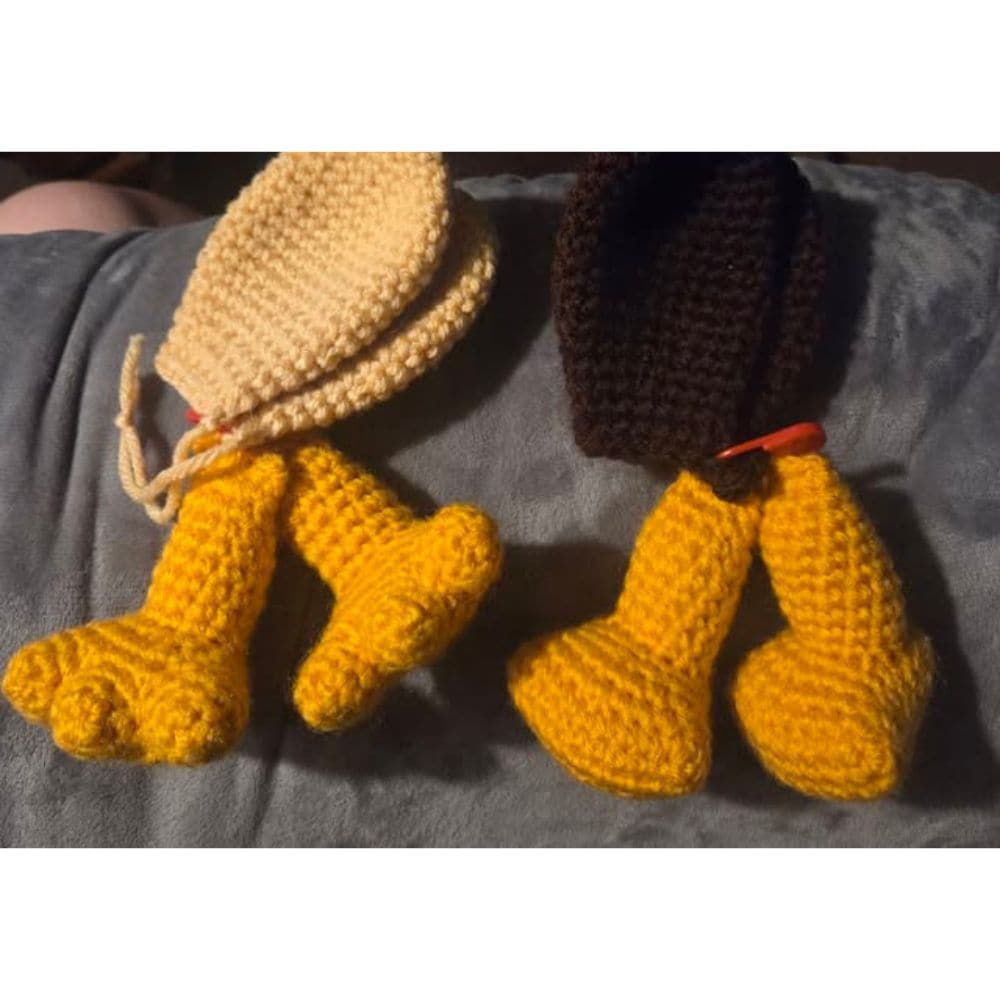
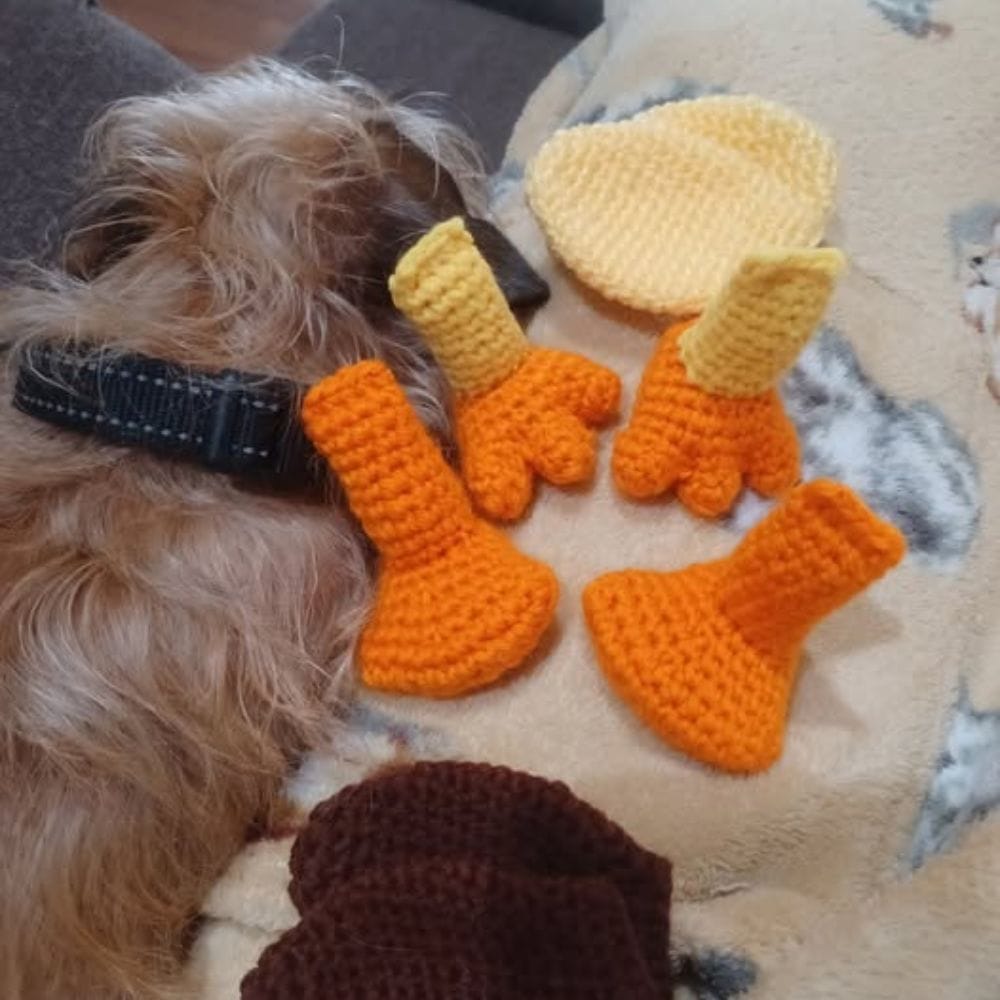
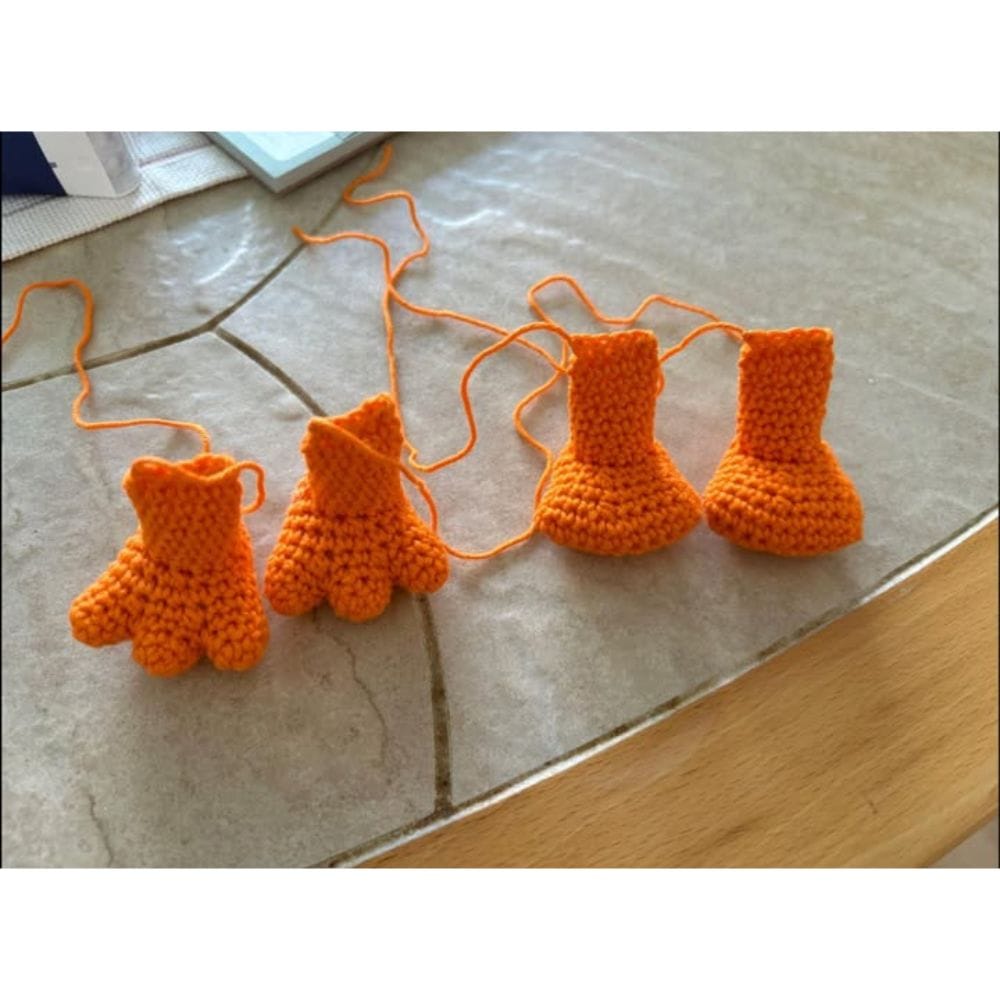
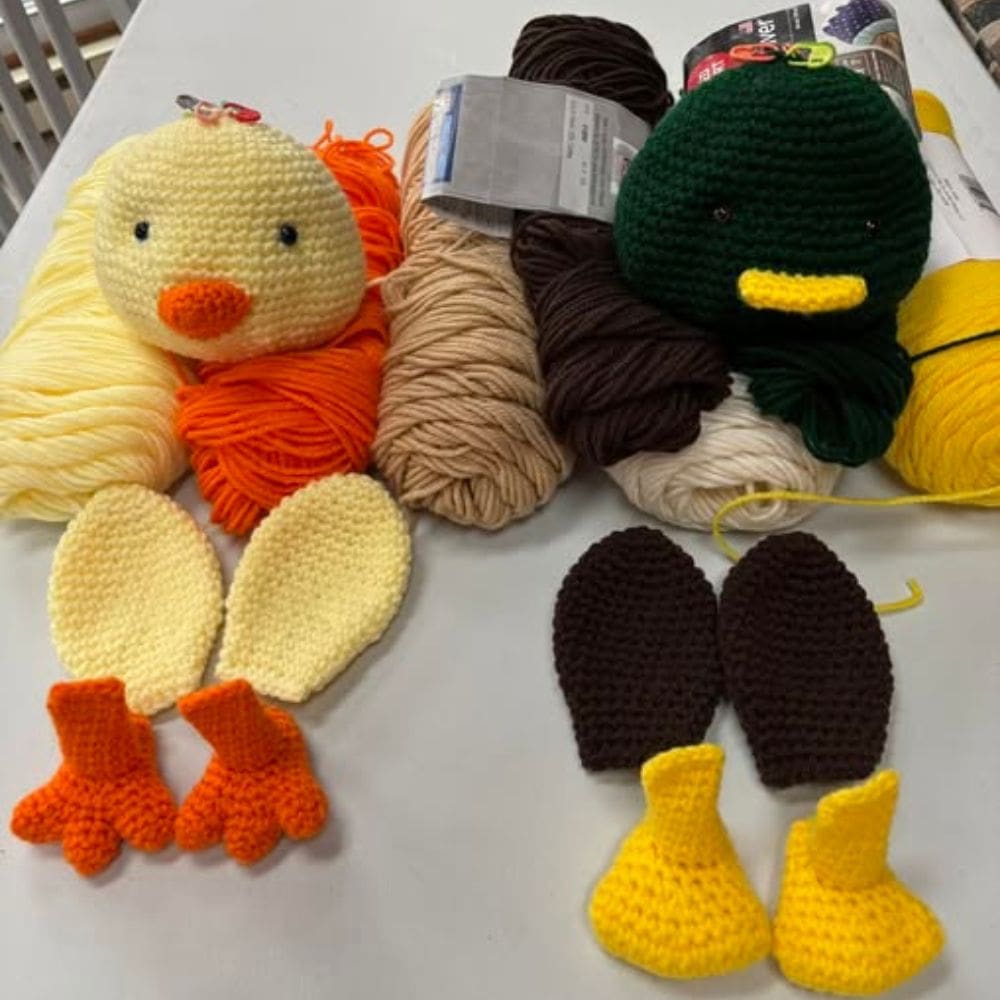
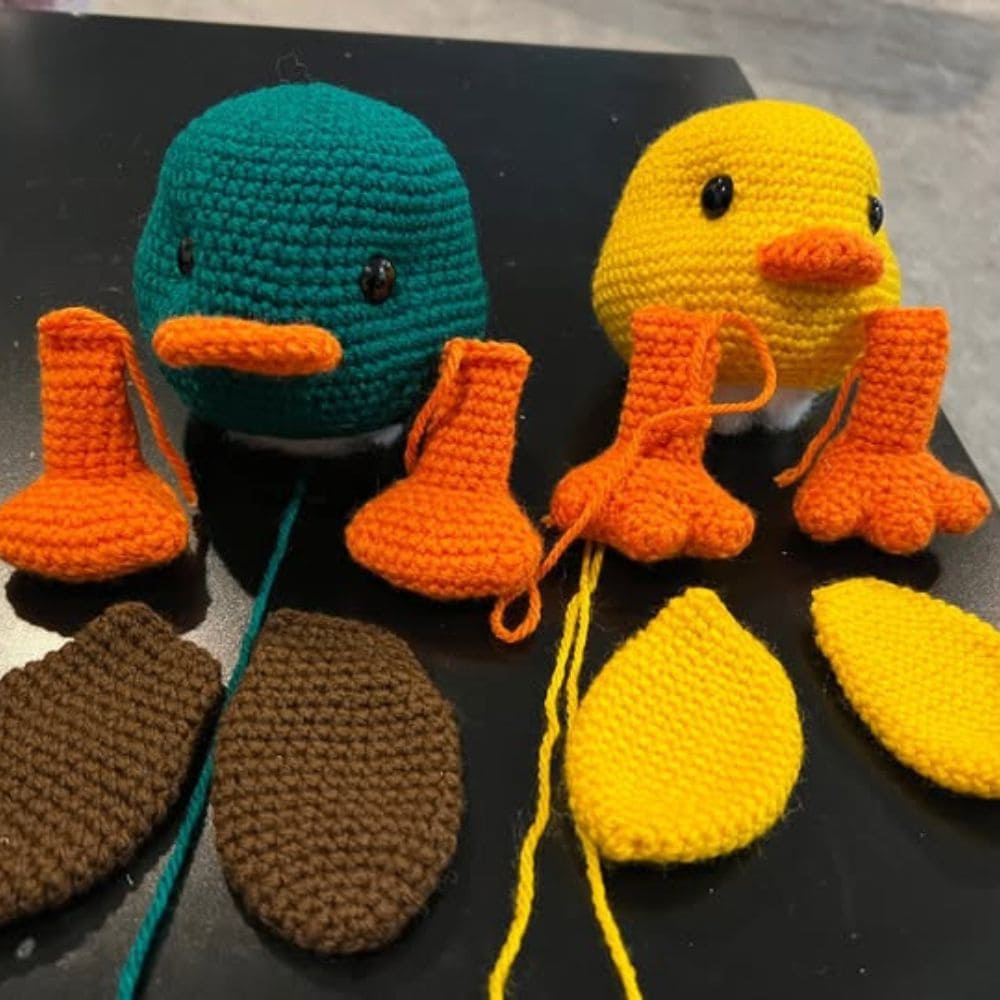
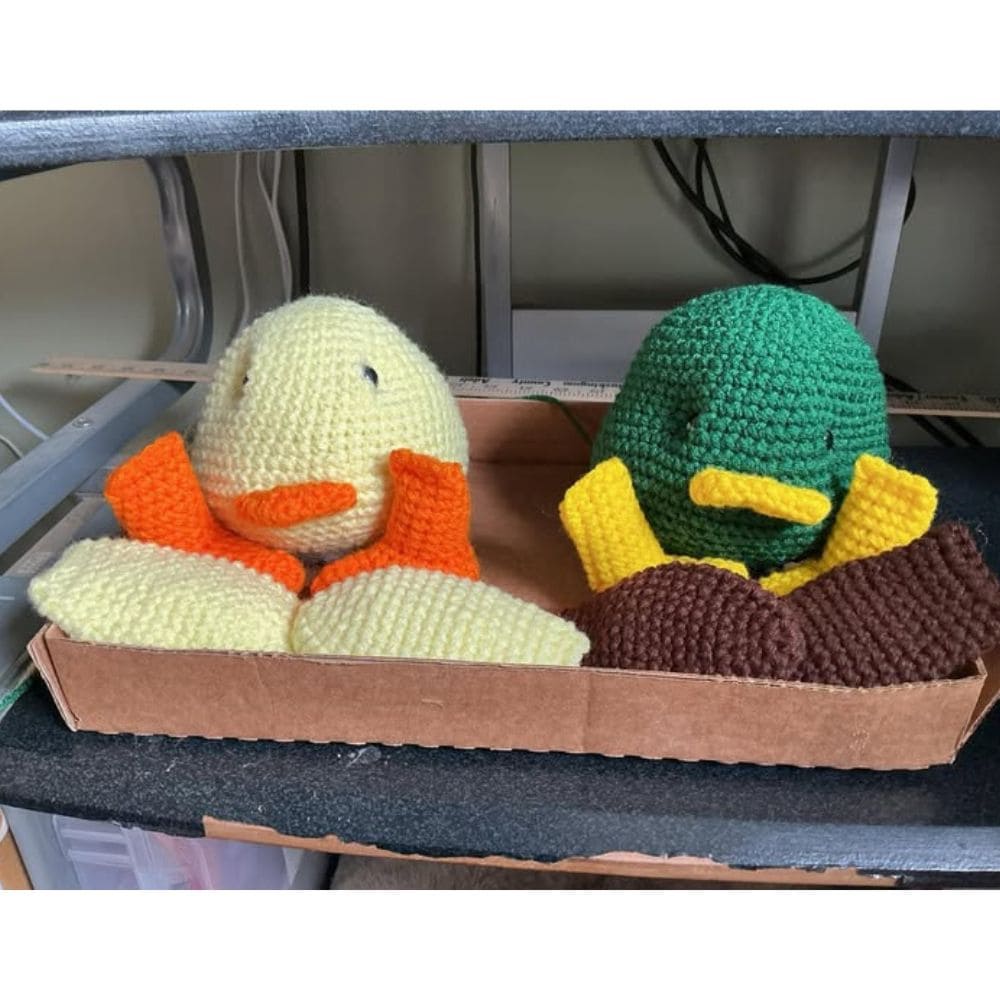
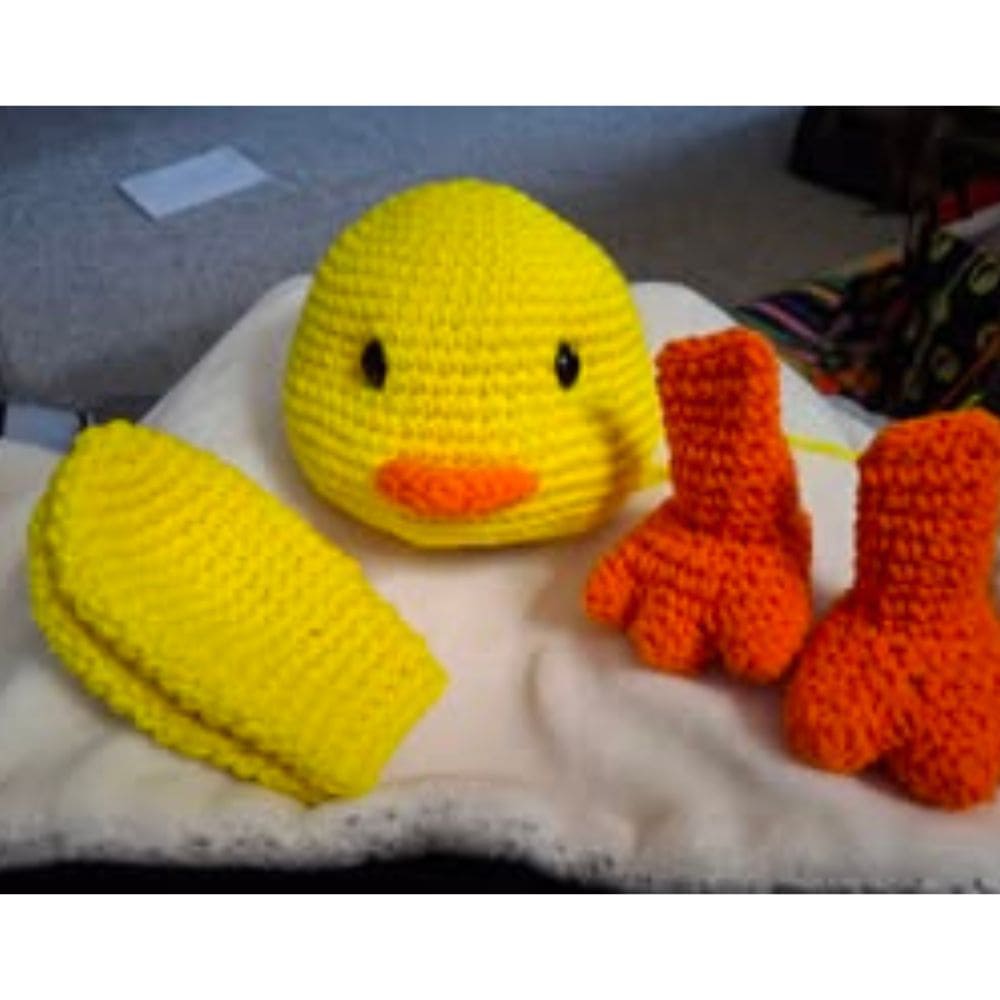
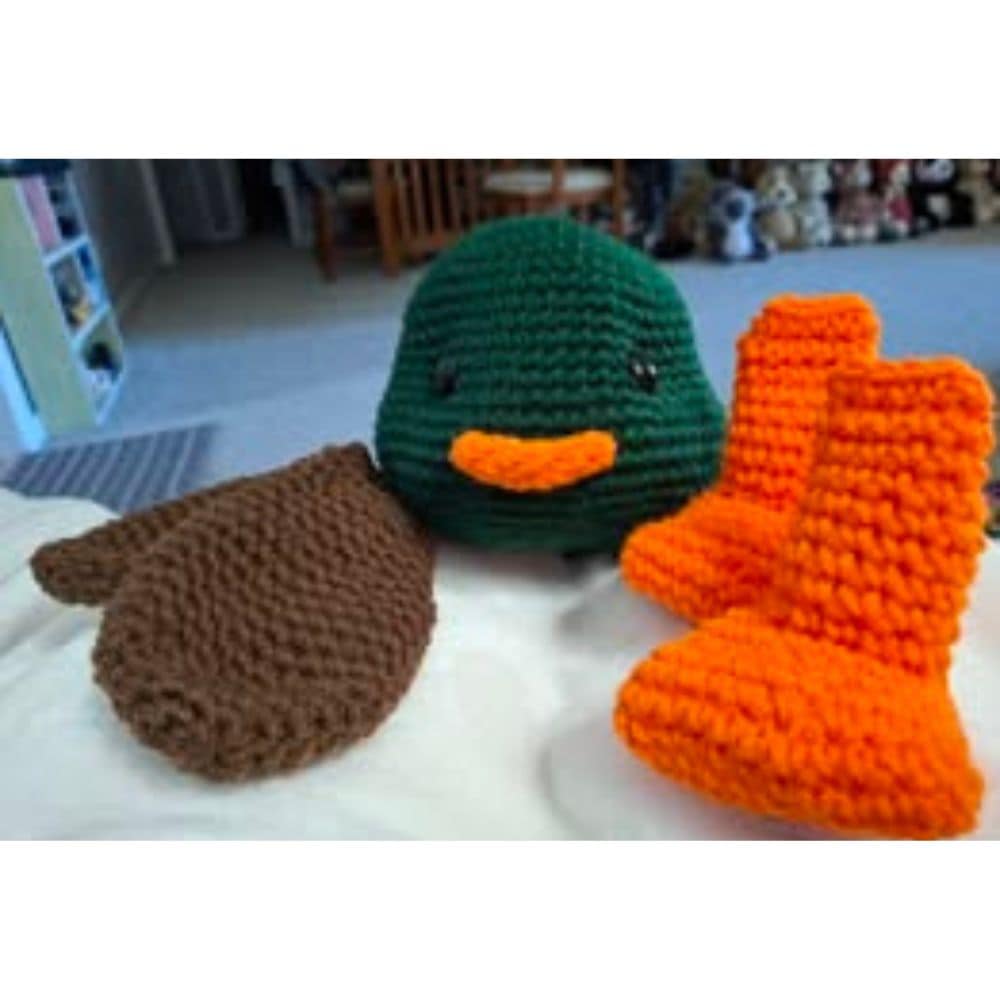
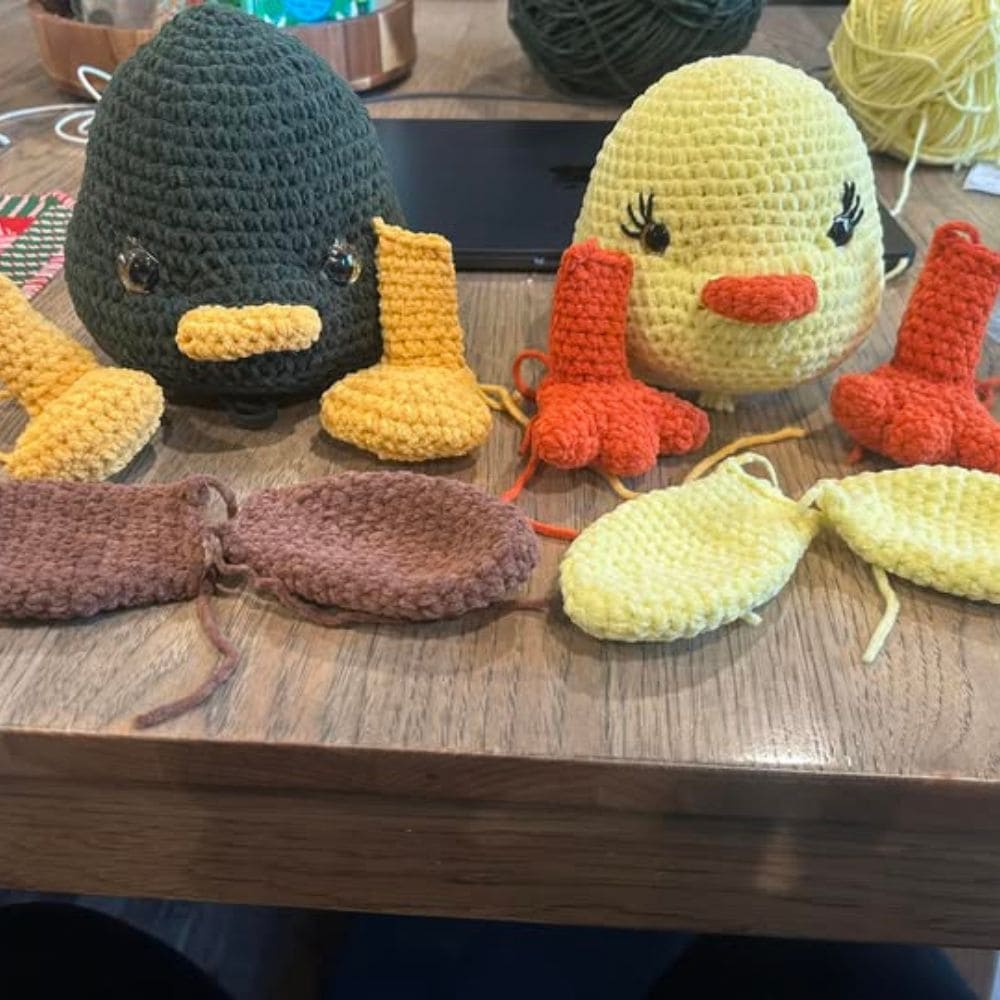
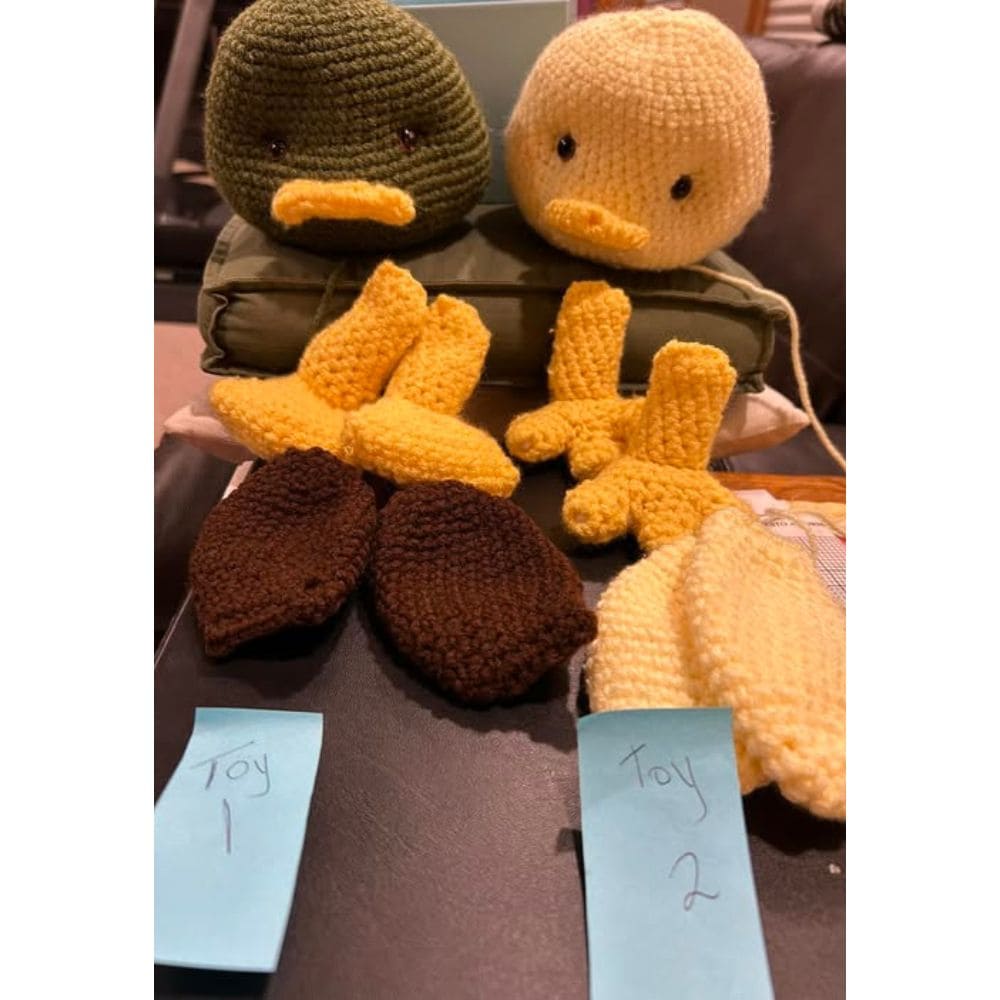
Here is what your Part 2 should look like.
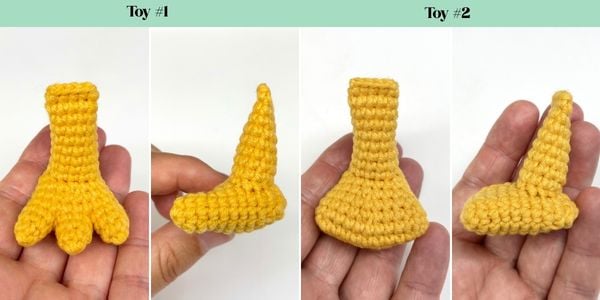
Have a look at the amazing photos shared by our Community. Simply scroll to the side to view them all.


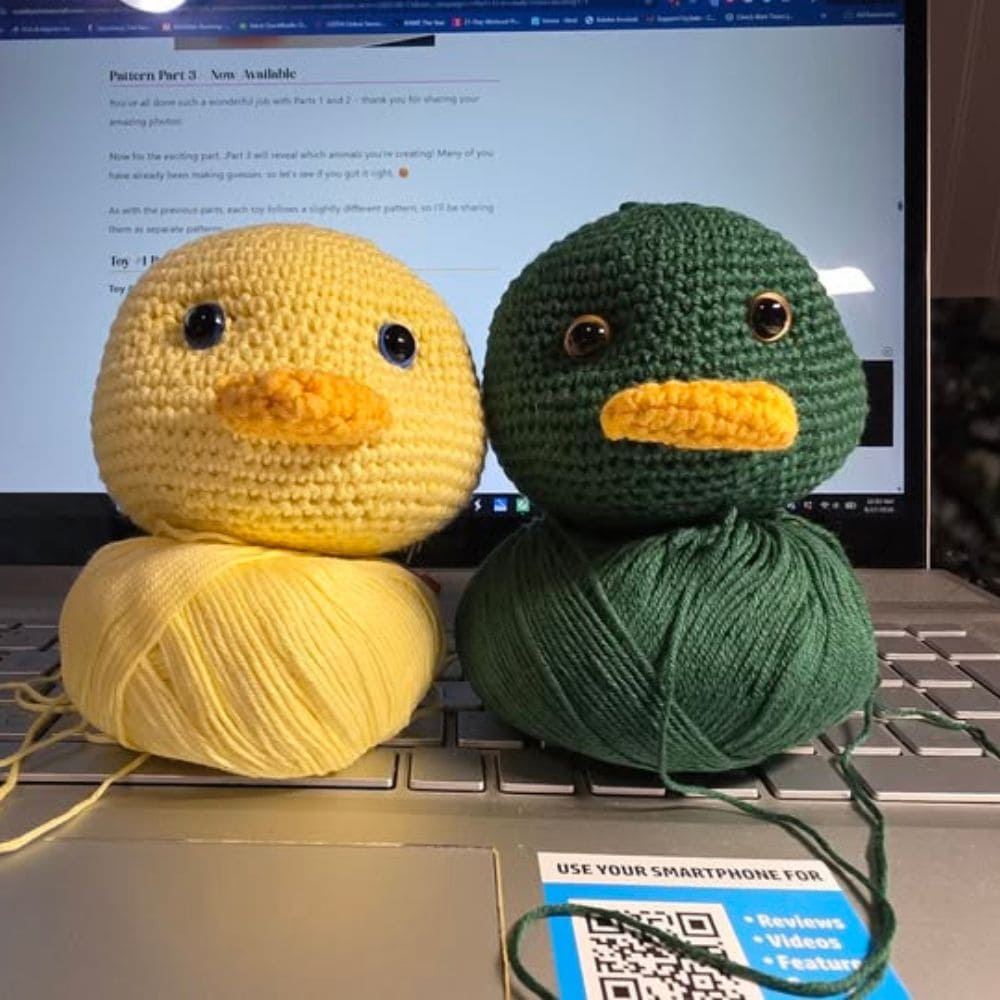
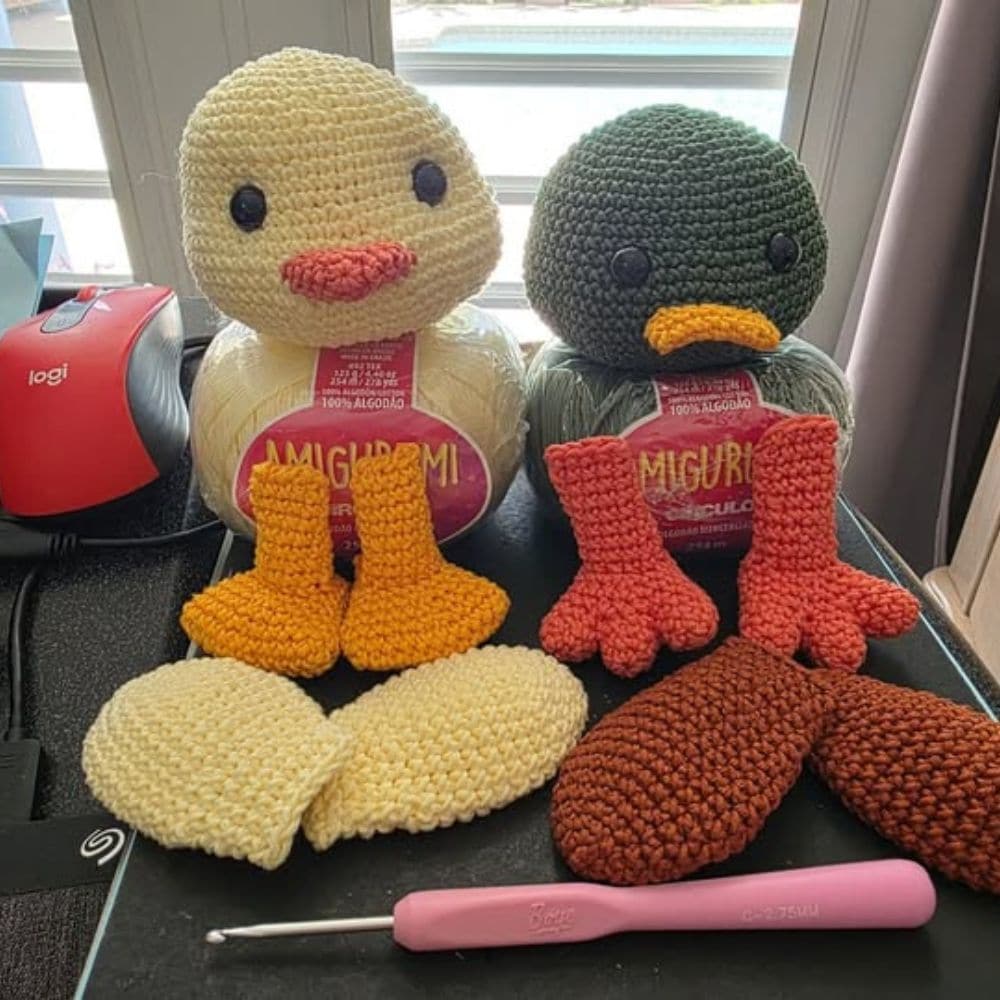
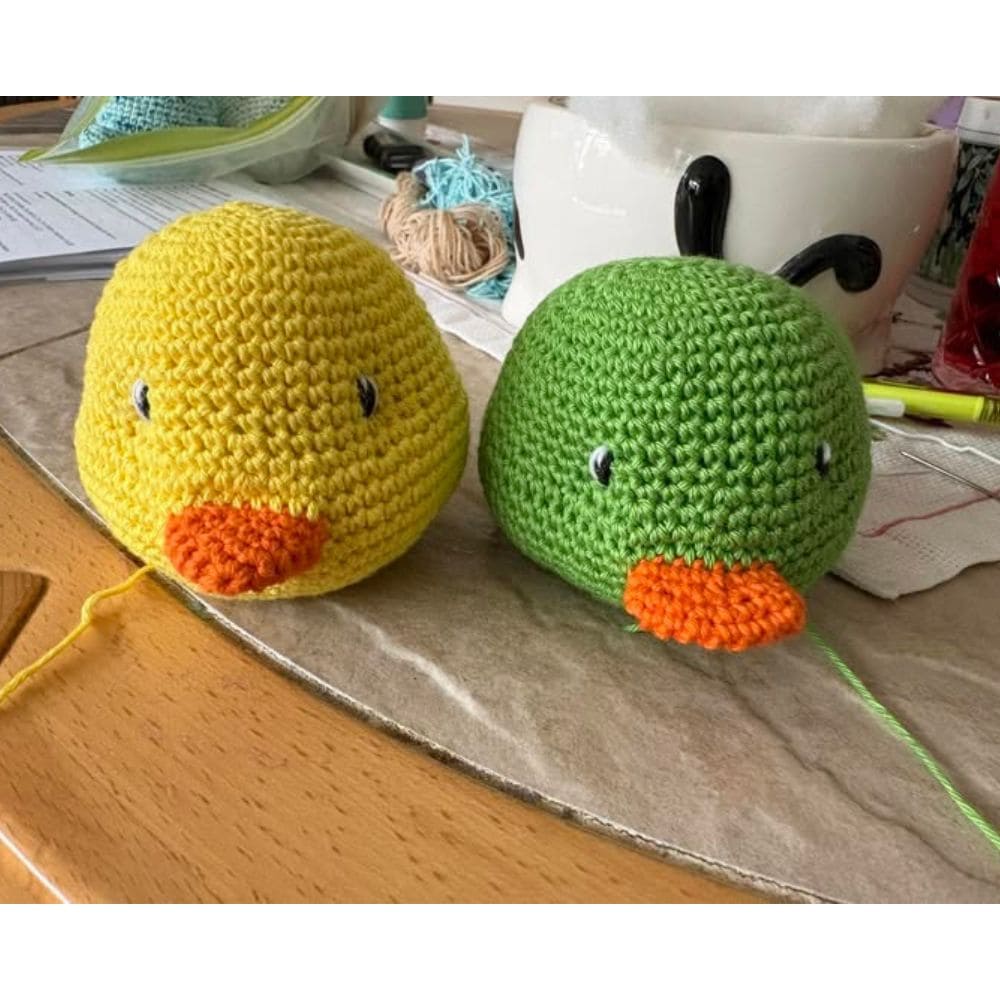
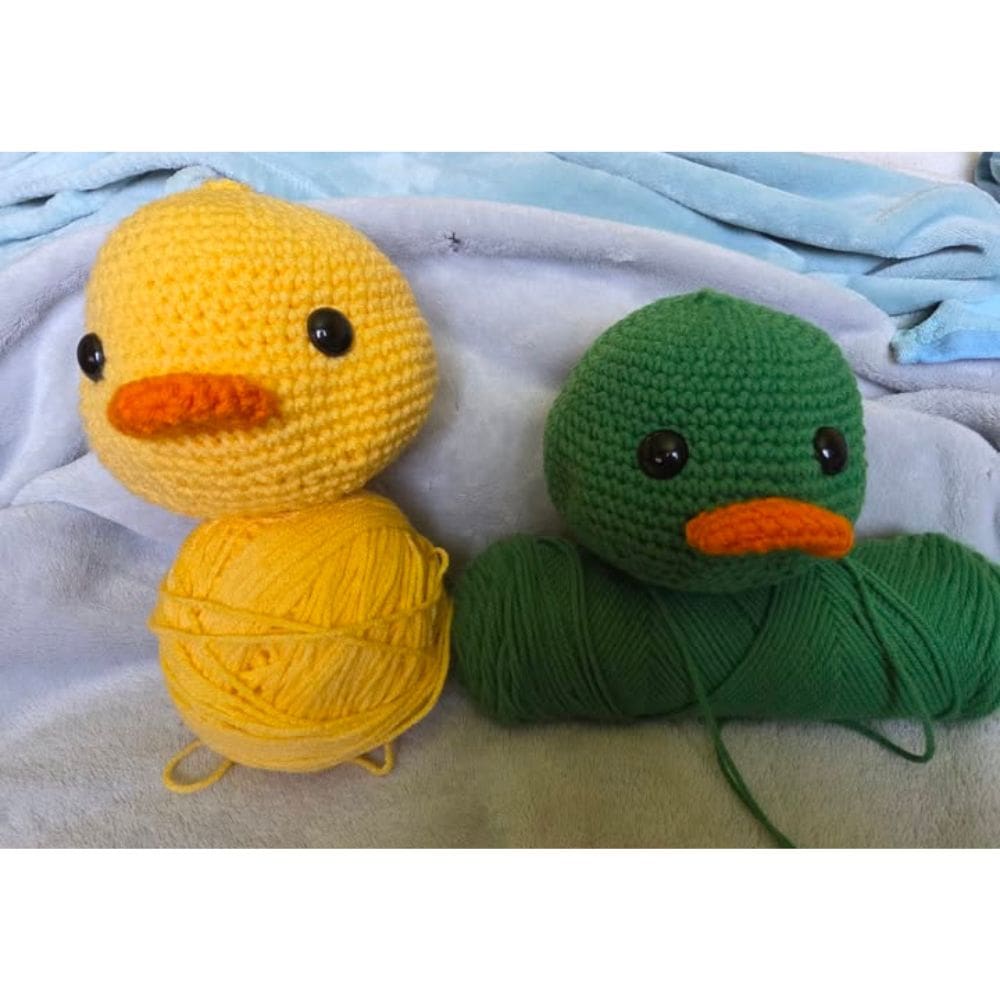
Pattern Part 3 – Now Available
You’ve all done such a wonderful job with Parts 1 and 2 – thank you for sharing your amazing photos!
Now for the exciting part…Part 3 will reveal which animals you’re creating! Many of you have already been making guesses, so let’s see if you got it right. 😊
As with the previous parts, each toy follows a slightly different pattern, so I’ll be sharing them as separate patterns.
Toy #1 Pattern
Toy #1 Pattern – consists of 2 sections:
- Section 1 – make 1 piece
- Section 2 – you will need the piece from Section 1 to complete this piece
Yarn color for Section 1: color B
Yarn color for Section 2: color A
Toy #1 Pattern – Section 1
R1: MR – 6 x SC into the ring {6}
R2: (SC in next ST, INC) x 3 {9}
R3: SC in next ST, INC, (SC in next 2 STs, INC) x 2, SC in next ST {12}
R4: (SC in next 3 STs, INC) x 3 {15}
R5: SC in next 2 STs, INC, (SC in next 4 STs, INC) x 2, SC in next 2 STs {18}
Mark the last ST of R5 with a stitch marker as you will need to refer to it later on.
INV FO, do not stuff, weave the yarn end in – watch this video tutorial on How to crochet an invisible fasten off
Toy #1 Pattern – Section 2
R1: MR – 6 x SC into the ring {6}
R2: INC in each ST around – in BLO {12} – you will have 6 unworked front loop stitches left on the top of this piece
R3: (SC in next ST, INC) x 6 {18}
R4: SC in next ST, INC, (SC in next 2 STs, INC) x 5, SC in next ST {24}
R5: (SC in next 3 STs, INC) x 6 {30}
R6: SC in next 2 STs, INC, (SC in next 4 STs, INC) x 5, SC in next 2 STs {36}
R7: (SC in next 5 STs, INC) x 6 {42}
R8: SC in next 3 STs, INC, (SC in next 6 STs, INC) x 5, SC in next 3 STs {48}
R9: (SC in next 15 STs, INC) x 3 {51}
R10-R14 (5 rounds): SC in each ST around {51} – leave a stitch marker in at the beginning of R14 as you will need to refer to it later
R15: SC in next 8 STs, INC, (SC in next 16 STs, INC) x 2, SC in next 8 STs {54}
R16: (SC in next 5 STs, INC) x 9 {63}
R17: SC in next 3 STs, INC, (SC in next 6 STs, INC) x 8, SC in next 3 STs {72}
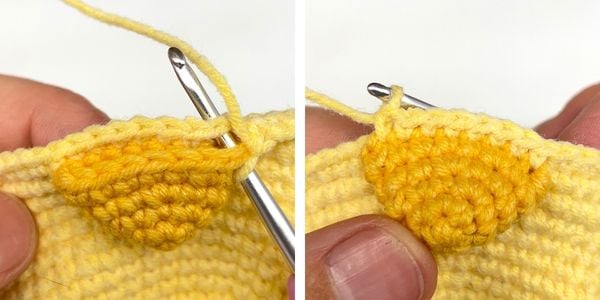
R18: You will now begin attaching the piece you created in the previous section of the pattern (Part 3 – Toy #1 – Section 1).
And because I suspect most of you have already figured out what you’re making by now, I’m going to start calling this piece a beak to make the instructions clearer and easier to follow. 😊
You will start by attaching only one half of the beak to the head and to help you out I’m going to share some images. 🙂
- SC in next 32 STs of the head
- place the beak onto the head making sure the stitch with the stitch marker is on the right hand side
- insert your hook into the marked ST on the beak and then into the next ST of the head and SC
- insert your hook into the next ST of the beak and then into the next ST of the head and SC
- continue attaching the beak in the same way across the next 6 STs
- you should now have one half of the beak attached to the head with 8 STs in total
- continue to SC in next 32 STs of the head only {72}

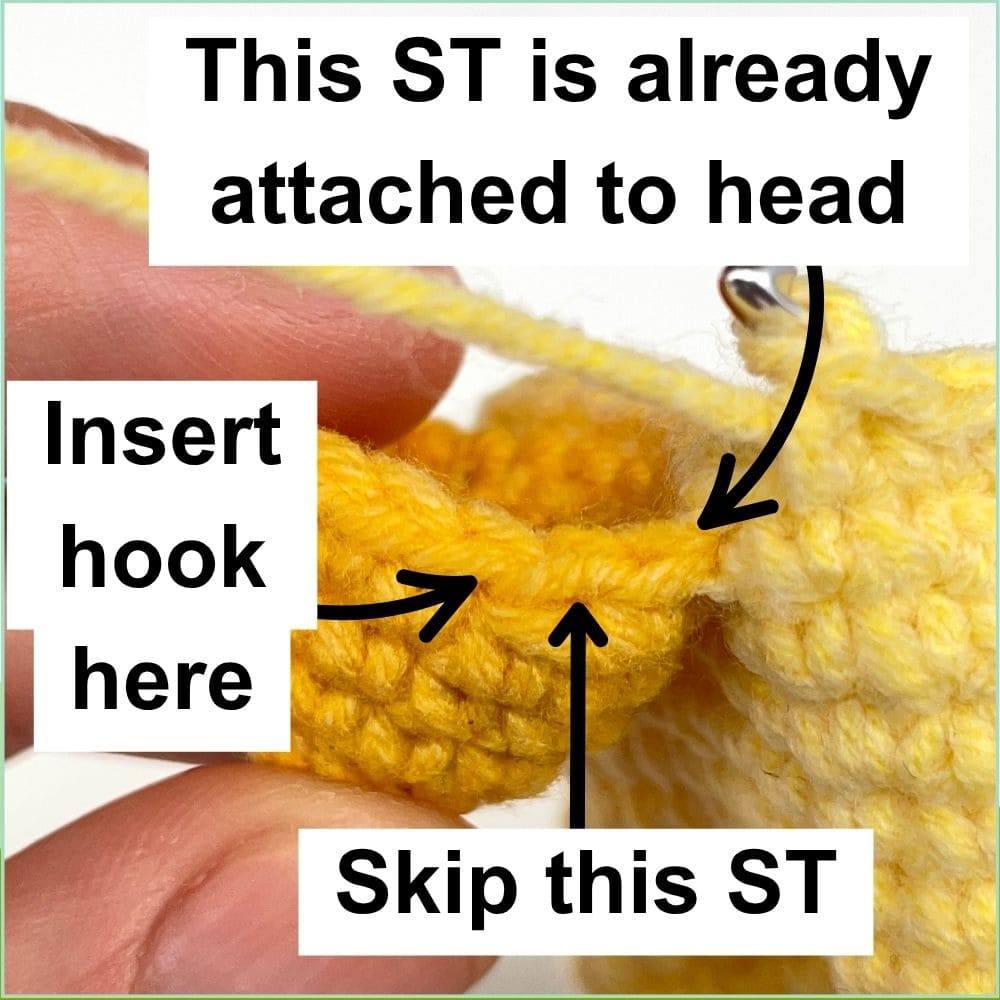
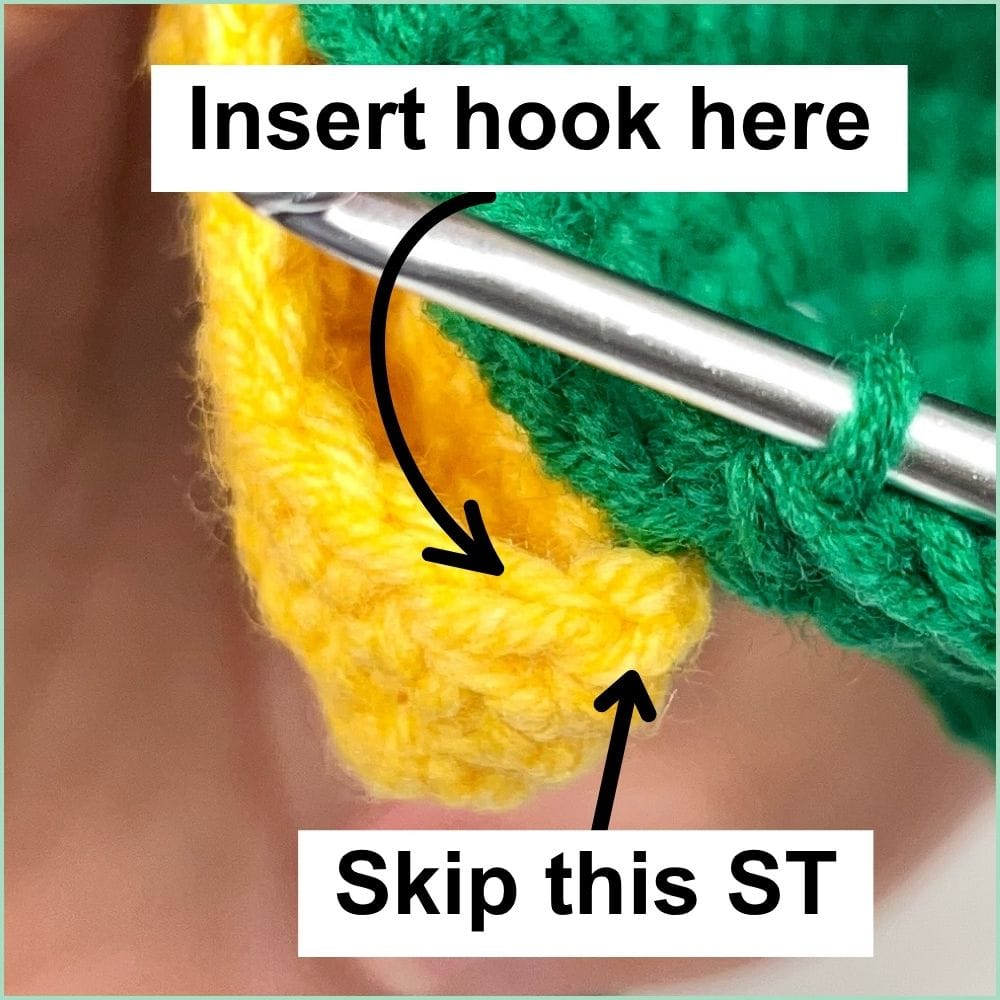
R19: You will attach the other half of the beak to the head in this round:
- SC in next 32 STs of the head
- you need to leave one unworked stitch on the side of the beak so insert your hook into the stitch shown in the photo below, then insert your hook into the next ST on the head and SC
- insert your hook into the next ST of the beak and then into the next ST of the head and SC
- continue attaching the beak in the same way across the next 6 STs
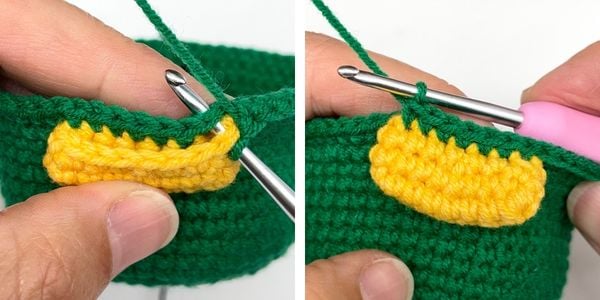
- you should now have the other half of the beak attached to the head with 8 STs in total
- continue to SC in next 32 STs of the head only {72}
- you should have the beak attached to the head with 1 unworked stitch on each side of the beak
R20-R21 (2 rounds): SC in each ST around {72}
You can now place the safety eyes between rounds R14 and R15:
– it helps to use pins with large heads to first mark the spots where the eyes will be placed – decide if you are happy with the placement and if it looks symmetrical before you insert the safety eyes
– 1st eye – count first 20 STs from the beginning of R14 and place the eye between ST20 and ST21
– 2nd eye – count first 30 STs from the beginning of R14 and place the eye between ST30 and ST31
– check if you are happy with the look and that the beak is centered between the eyes; adjust the placement of the eyes if neccessary
– place the safety backs on and continue to crochet R22
R22: SC in next 2 STs, INV DEC, (SC in next 4 STs, INV DEC) x 11, SC in next 2 STs {60}
R23: SC in next 4 STs, INV DEC, (SC in next 8 STs, INV DEC) x 5, SC in next 4 STs {54}
R24: (SC in next 7 STs, INV DEC) x 6 {48}
R25: SC in next 3 STs, INV DEC, (SC in next 6 STs, INV DEC) x 5, SC in next 3 STs {42}
R26: (SC in next 5 STs, INV DEC) x 6 {36}
Start stuffing the head
R27: (SC in next ST, INV DEC) x 12 {24}
R28: SC in next 3 STs, INV DEC, (SC in next 6 STs, INV DEC) x 2, SC in next 3 STs {21}
Stuff the head well
Do not FO or cut the yarn off as you will continue to crochet Part 4 from here.
You will now indent the eyes:
– watch this video tutorial on How to indent eyes in Amigurumi – use method 2 shown in the video, but instead of sculpting from eye to eye, sculpt each eye individually by pulling it diagonally towards the back of the head – I was going to share a photo to help you out but I don’t want to share what my final piece looks like as yet so let’s see if you can follow the instructions without a photo. 🙂 If not, please let me know and I will share it.
– insert your needle into any ST on the back of the head and bring it out through a ST right next to the eye. Leave a long yarn tail at the back of the head.
– if the safety backing makes this difficult, bring the needle out slightly away from the eye, then insert it closer to the eye as shown in the video
– insert the needle into another ST next to the eye, then bring it back out through the same ST on the back of the head. Pull the yarn tight.
– repeat the previous steps until you achieve the desired indented look. Always insert and exit through the same ST on the back of the head.
– to finish, bring the needle out through the same ST on the back of the head, tie the yarn tails into a double knot, then pull the knot inside the head through the same ST.
– repeat for the other eye
– if the back of the head loses its shape after sculpting, add extra stuffing to reshape it
And that’s it for now. 🙂 Not long to go before your toy is completed! 🙂
Toy #2 Pattern
Toy #2 Pattern – consists of 2 sections:
- Section 1 – make 1 piece
- Section 2 – you will need the piece from Section 1 to complete this piece
Yarn color for Section 1: color D
Yarn color for Section 2: color A
Toy #2 Pattern – Section 1
R1: Chain 9 STs {9}
R2: SC in next 8 STs starting from 2nd CH from the hook; go through back bump of each CH as well, now work on the opposite side of the chain, INC in next ST, SC in next 6 STs, INC in last ST {18}
R3: SC in each ST around {18}
R4: SC in next 3 STs, INV DEC, SC in next 7 STs, INV DEC, SC in next 4 STs {16}
Mark the second last ST of R4 with a stitch marker as you will need to refer to it later on.
INV FO, do not stuff, weave the yarn end in – watch this video tutorial on How to crochet an invisible fasten off
Toy #2 Pattern – Section 2
R1: MR – 6 x SC into the ring {6}
R2: INC in each ST around – in BLO {12} – you will have 6 unworked front loop stitches left on the top of the piece
R3: (SC in next ST, INC) x 6 {18}
R4: SC in next ST, INC, (SC in next 2 STs, INC) x 5, SC in next ST {24}
R5: (SC in next 3 STs, INC) x 6 {30}
R6: SC in next 2 STs, INC, (SC in next 4 STs, INC) x 5, SC in next 2 STs {36}
R7: (SC in next 5 STs, INC) x 6 {42}
R8: SC in next 3 STs, INC, (SC in next 6 STs, INC) x 5, SC in next 3 STs {48}
R9: (SC in next 15 STs, INC) x 3 {51}
R10-R14 (5 rounds): SC in each ST around {51}
R15: SC in next 8 STs, INC, (SC in next 16 STs, INC) x 2, SC in next 8 STs {54} – leave a stitch marker in at the beginning of R15 as you will need to refer to it later
R16: (SC in next 5 STs, INC) x 9 {63}
R17: SC in next 3 STs, INC, (SC in next 6 STs, INC) x 8, SC in next 3 STs {72}
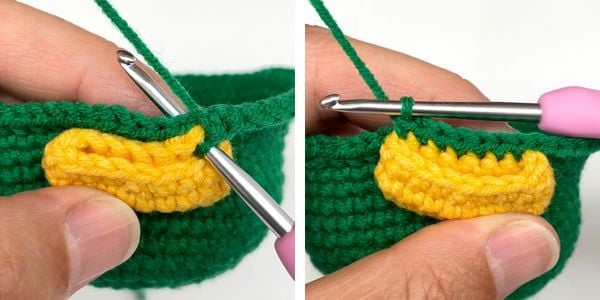
R18: You will now begin attaching the piece you created in the previous section of the pattern (Part 3 – Toy #2 – Section 1).
And because I suspect most of you have already figured out what you’re making by now, I’m going to start calling this piece a beak to make the instructions clearer and easier to follow. 😊
You will start by attaching only one half of the beak to the head and to help you out I’m going to share some images. 🙂
- SC in next 32 STs of the head
- place the beak onto the head making sure the stitch with the stitch marker is on the right hand side
- insert your hook into the marked ST on the beak and then into the next ST of the head and SC
- insert your hook into the next ST of the beak and then into the next ST of the head and SC
- continue attaching the beak in the same way across the next 5 STs
- you should now have one half of the beak attached to the head with 7 STs in total
- continue to SC in next 33 STs of the head only {72}
R19: You will attach the other half of the beak to the head in this round:
- SC in next 32 STs of the head
- you need to leave one unworked stitch on the side of the beak so insert your hook into the stitch shown in the photo below, then insert your hook into the next ST on the head and SC
- insert your hook into the next ST of the beak and then into the next ST of the head and SC
- continue attaching the beak in the same way across the next 5 STs
- you should now have the other half of the beak attached to the head with 7 STs in total
- continue to SC in next 33 STs of the head only {72}
- you should have the beak attached to the head with 1 unworked stitch on each side of the beak
R20-R21 (2 rounds): SC in each ST around {72}
You can now place the safety eyes between rounds R15 and R16:
– it helps to use pins with large heads to first mark the spots where the eyes will be placed – decide if you are happy with the placement and if it looks symmetrical before you insert the safety eyes
– 1st eye – count first 21 STs from the beginning of R15 and place the eye between ST21 and ST22
– 2nd eye – count first 32 STs from the beginning of R15 and place the eye between ST32 and ST33
– check if you are happy with the look and that the beak is centered between the eyes; adjust the placement of the eyes if neccessary
– place the safety backs on and continue to crochet R22
R22: SC in next 2 STs, INV DEC, (SC in next 4 STs, INV DEC) x 11, SC in next 2 STs {60}
R23: SC in next 4 STs, INV DEC, (SC in next 8 STs, INV DEC) x 5, SC in next 4 STs {54}
R24: (SC in next 7 STs, INV DEC) x 6 {48}
R25: SC in next 3 STs, INV DEC, (SC in next 6 STs, INV DEC) x 5, SC in next 3 STs {42}
R26: (SC in next 5 STs, INV DEC) x 6 {36}
Start stuffing the head
R27: (SC in next ST, INV DEC) x 12 {24}
R28: SC in next 3 STs, INV DEC, (SC in next 6 STs, INV DEC) x 2, SC in next 3 STs {21}
Stuff the head well
Do not FO or cut the yarn off as you will continue to crochet Part 4 from here.
You will now indent the eyes:
– watch this video on How to indent eyes in Amigurumi – use method 2 shown in the video, but instead of sculpting from eye to eye, sculpt each eye individually by pulling it diagonally towards the back of the head – I was going to share a photo to help you out but I don’t want to share what my final piece looks like as yet so let’s see if you can follow the instructions without a photo. 🙂 If not, please let me know and I will share it.
– insert your needle into any ST on the back of the head and bring it out through a ST right next to the eye. Leave a long yarn tail at the back of the head.
– if the safety backing makes this difficult, bring the needle out slightly away from the eye, then insert it closer to the eye as shown in the video
– insert the needle into another ST next to the eye, then bring it back out through the same ST on the back of the head. Pull the yarn tight.
– repeat the previous steps until you achieve the desired indented look. Always insert and exit through the same ST on the back of the head.
– to finish, bring the needle out through the same ST on the back of the head, tie the yarn tails into a double knot, then pull the knot inside the head through the same ST.
– repeat for the other eye
– if the back of the head loses its shape after sculpting, add extra stuffing to reshape it
And that’s it for now. 🙂 Not long to go before your toy is completed! 🙂
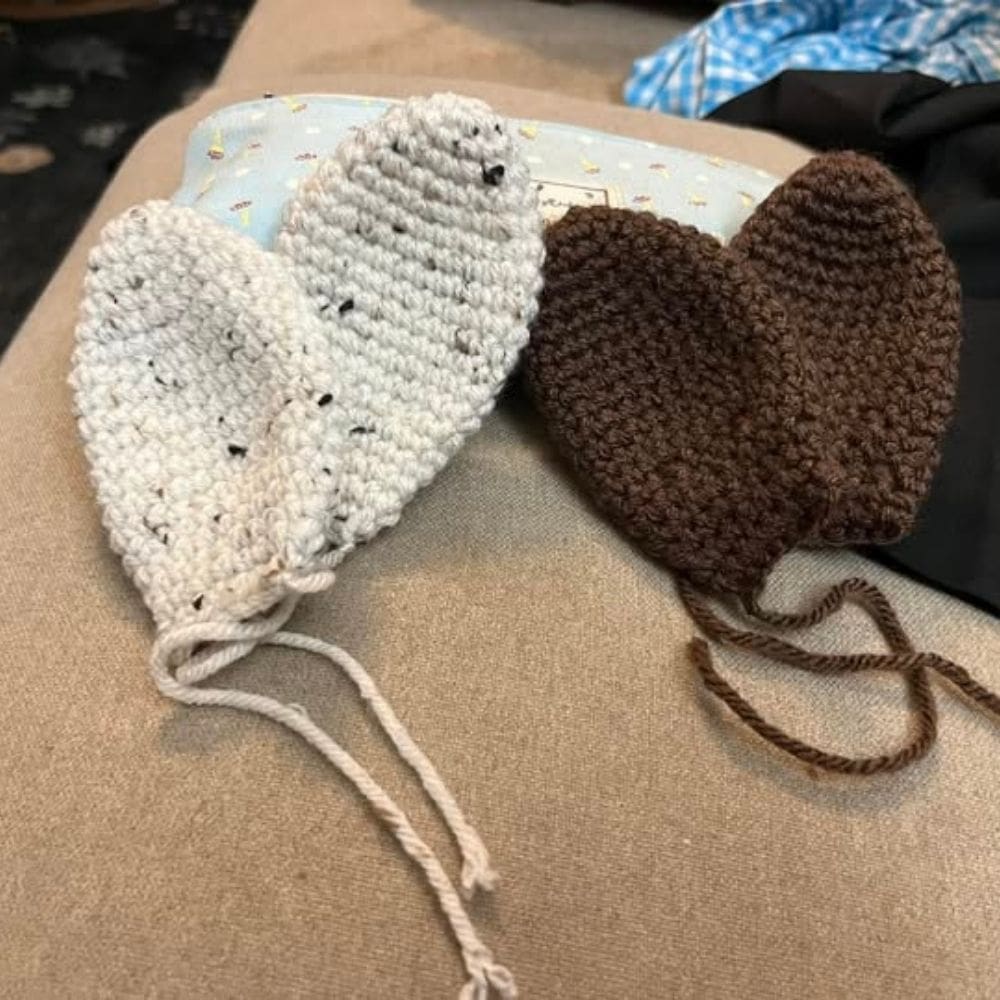
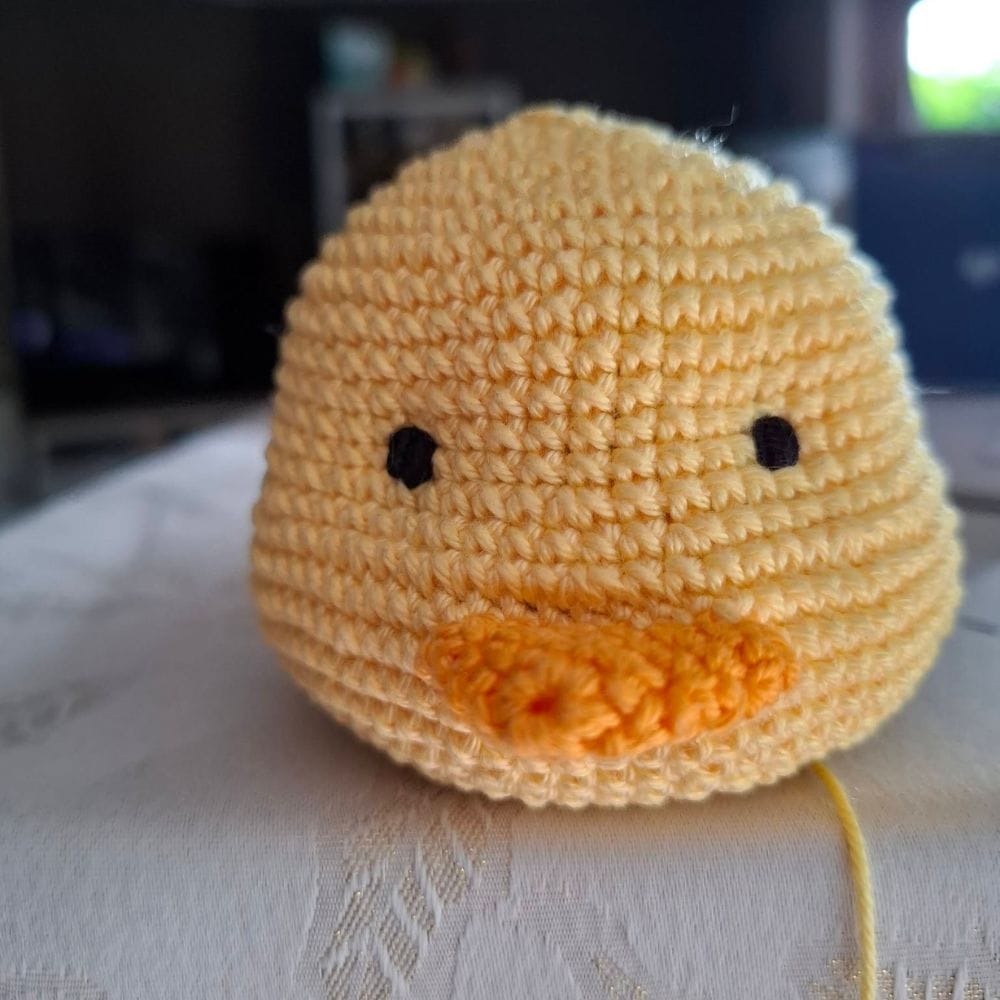
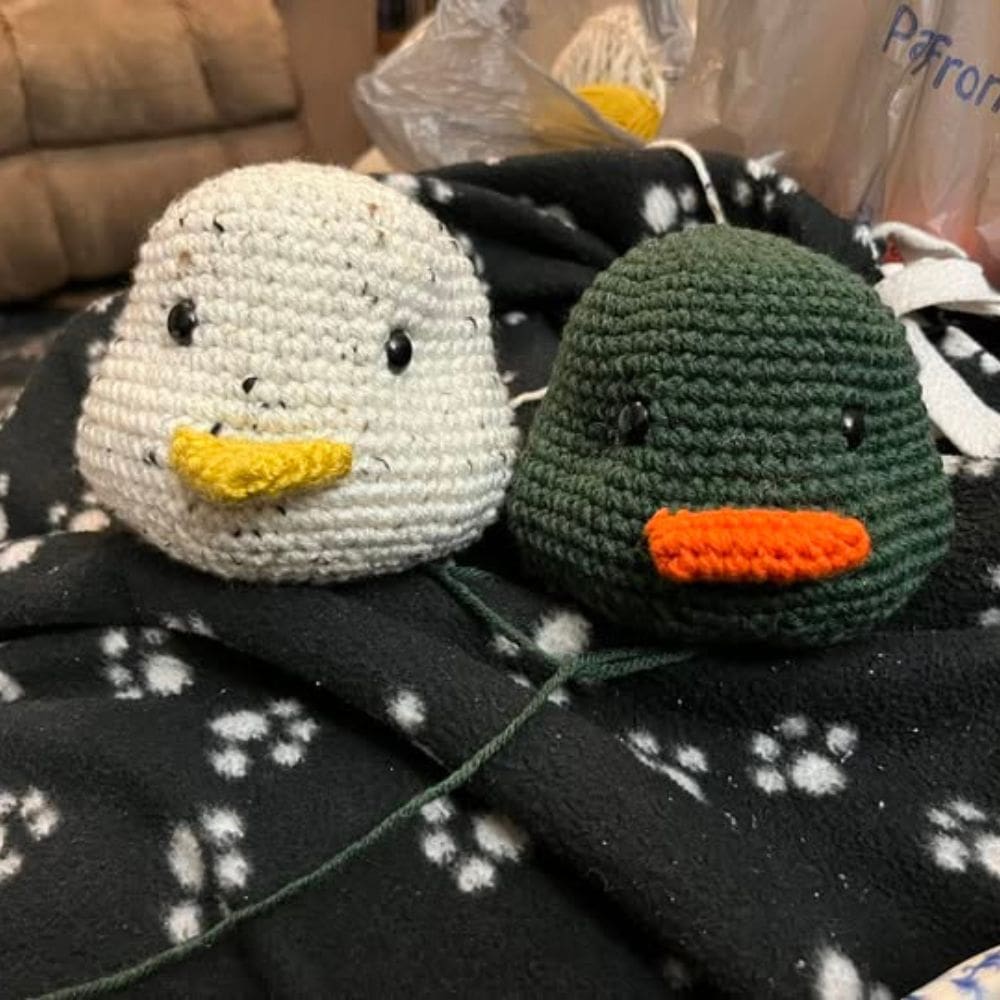
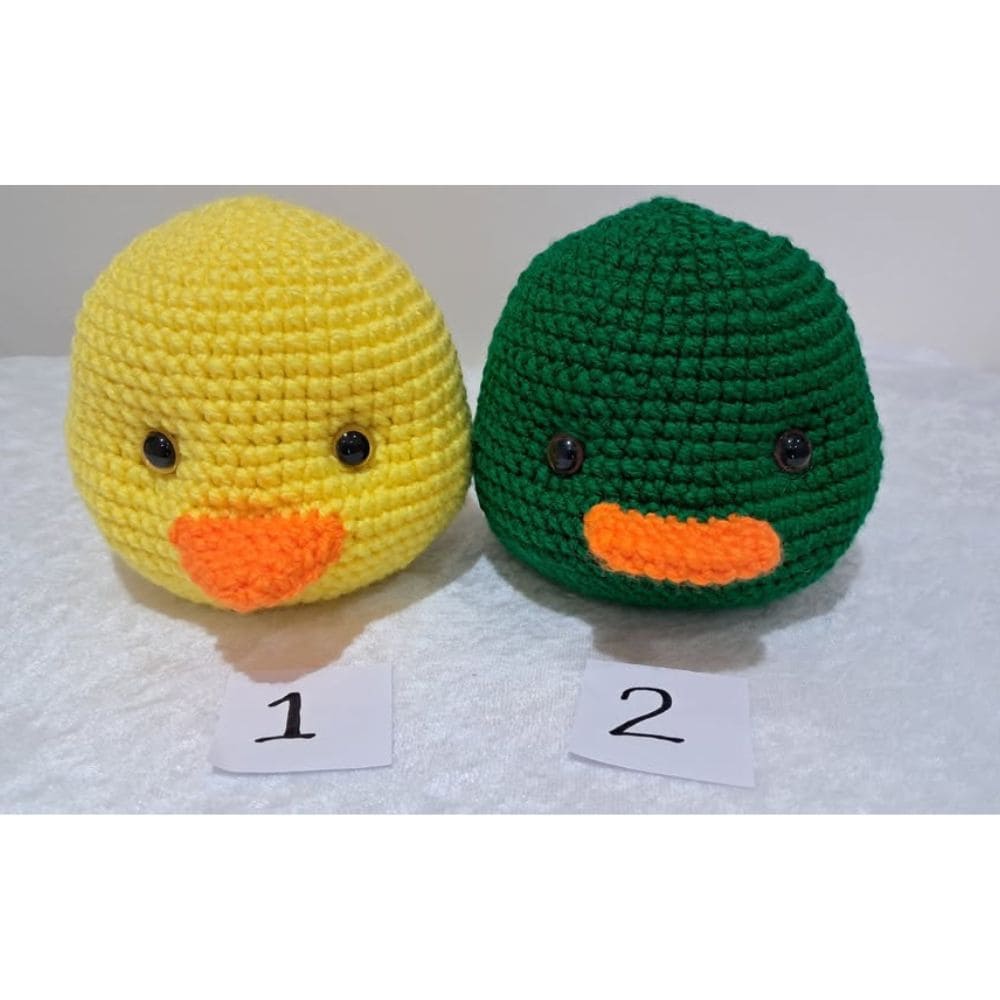
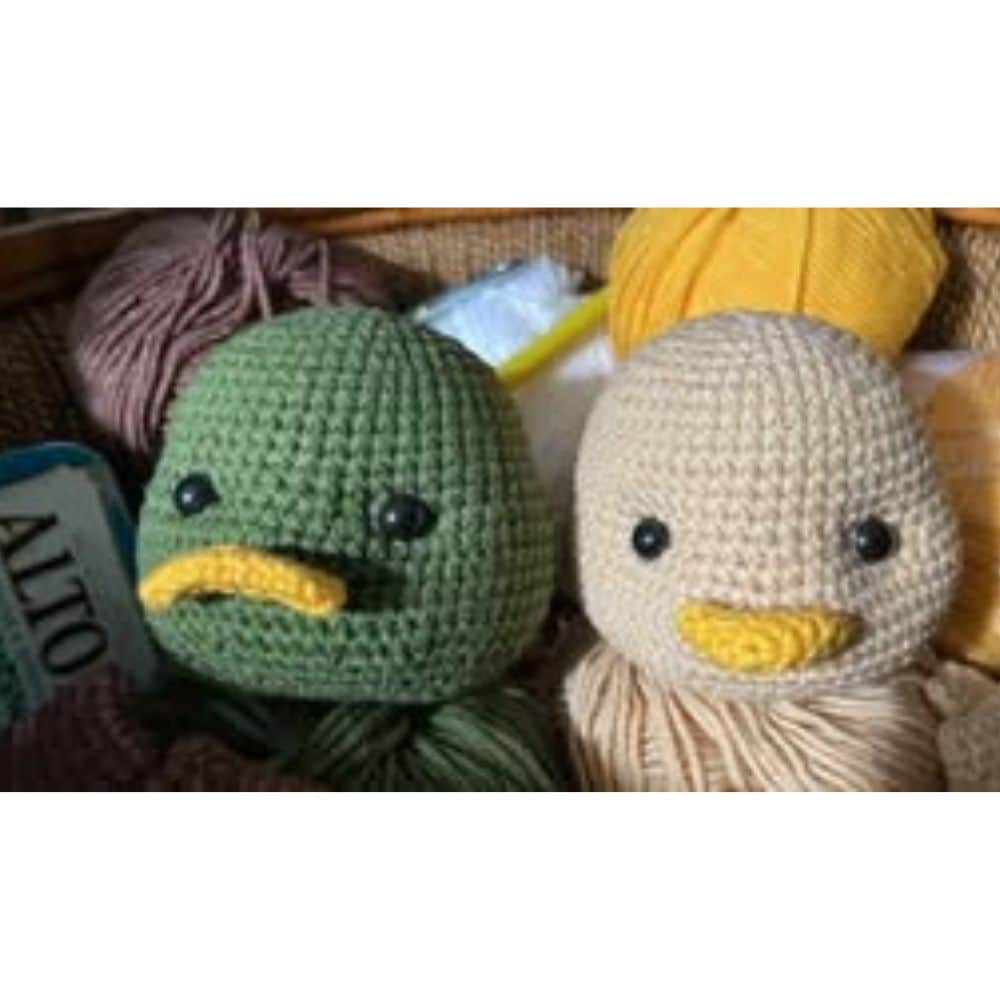
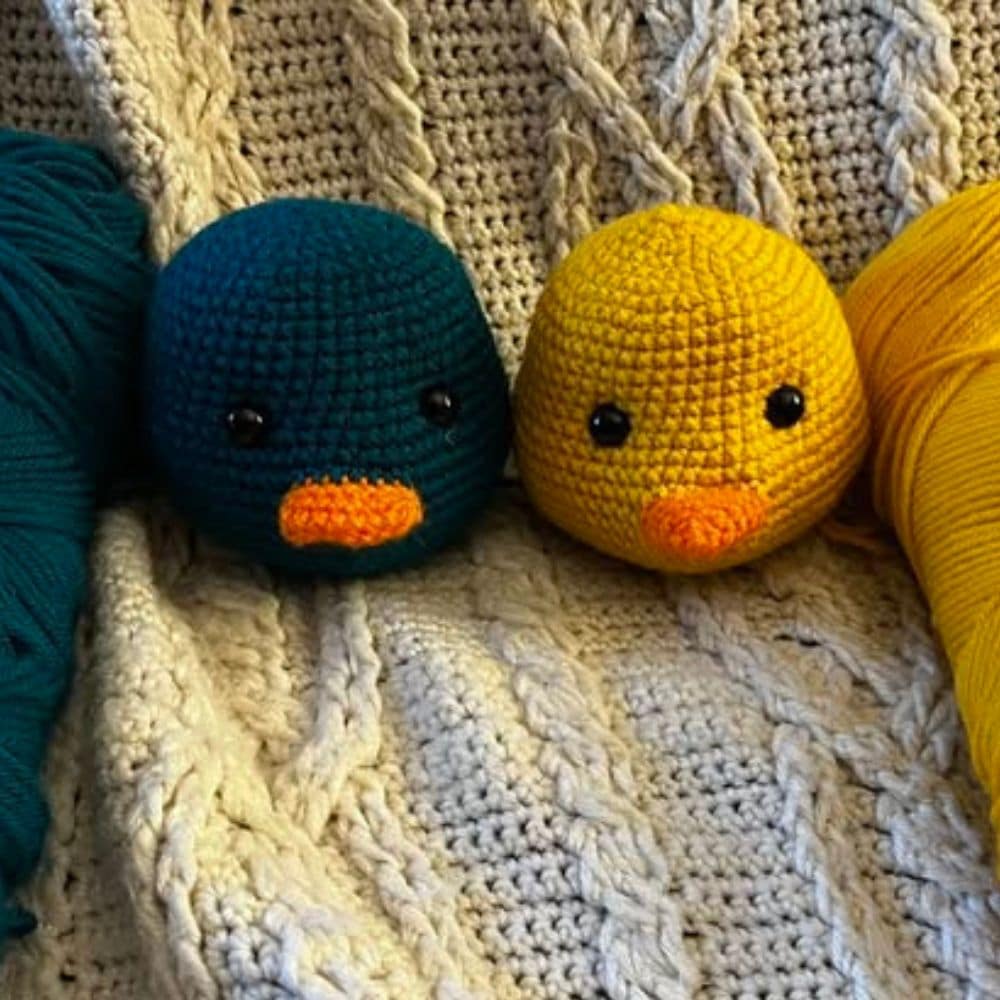
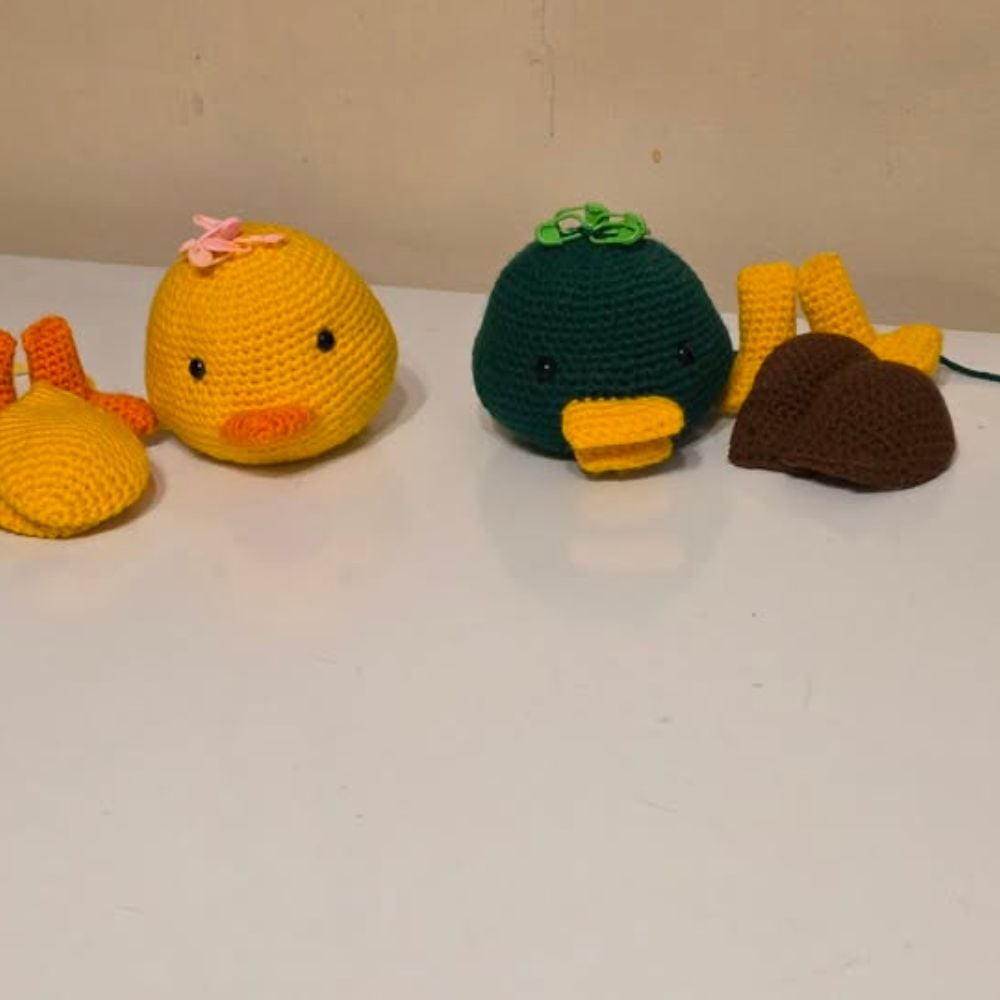
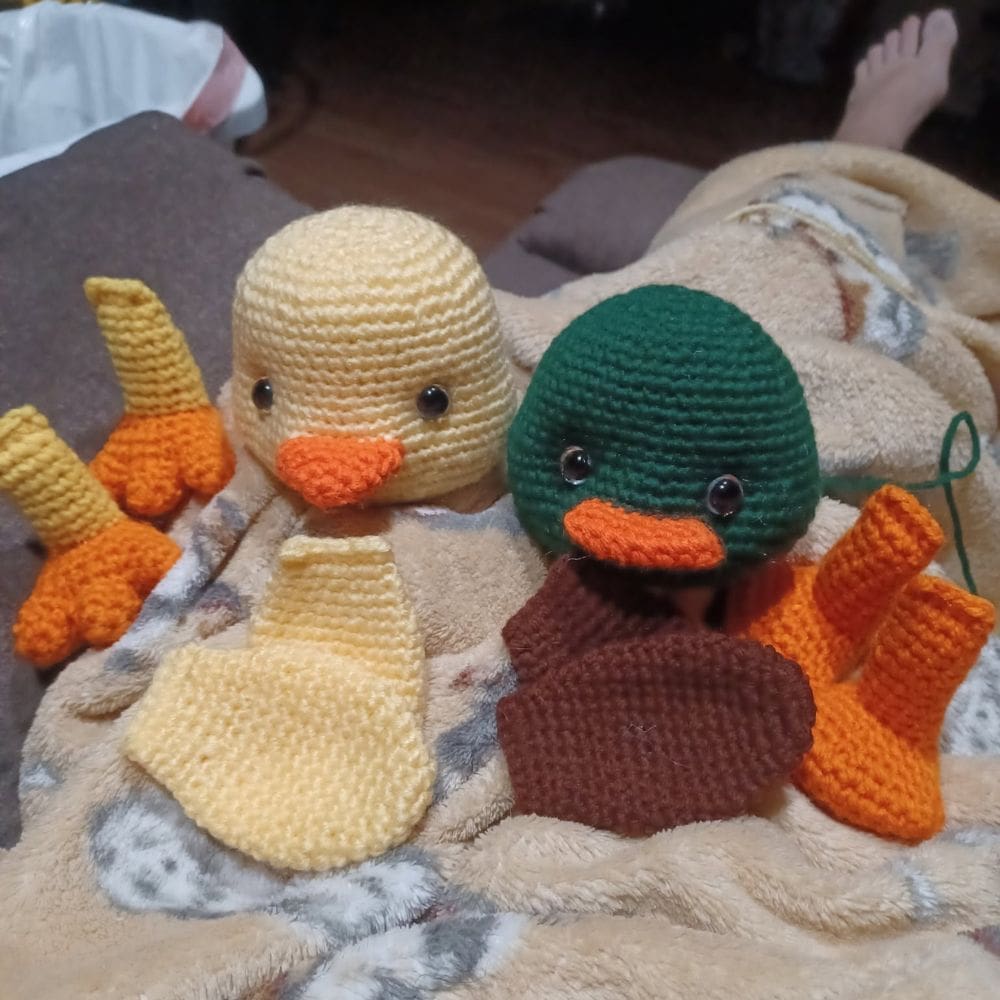
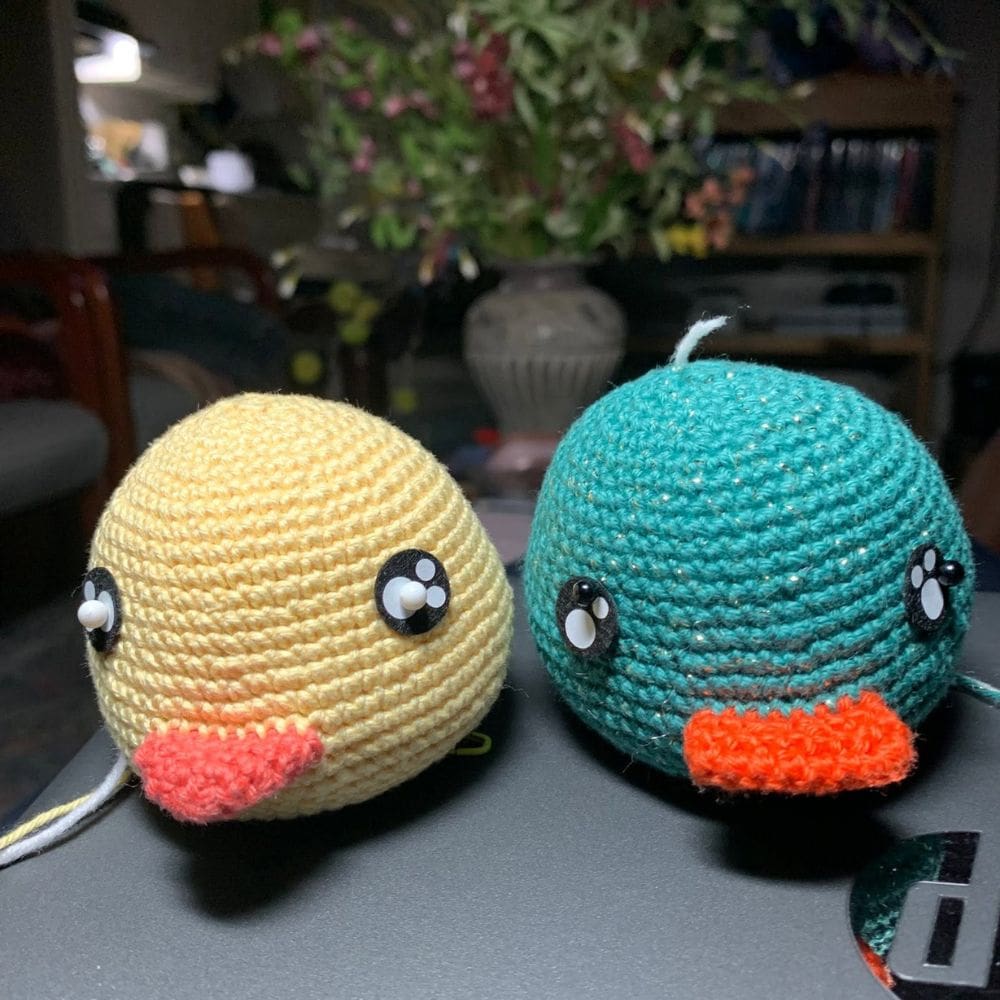
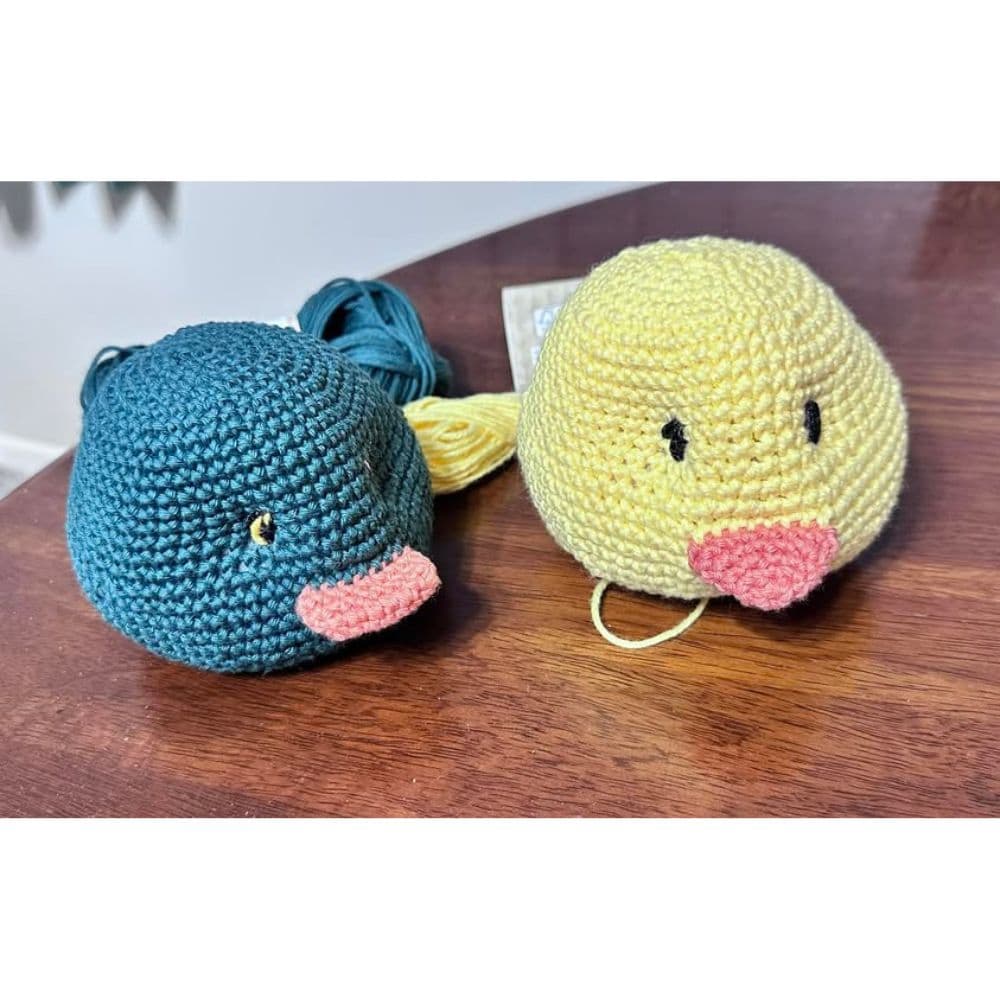
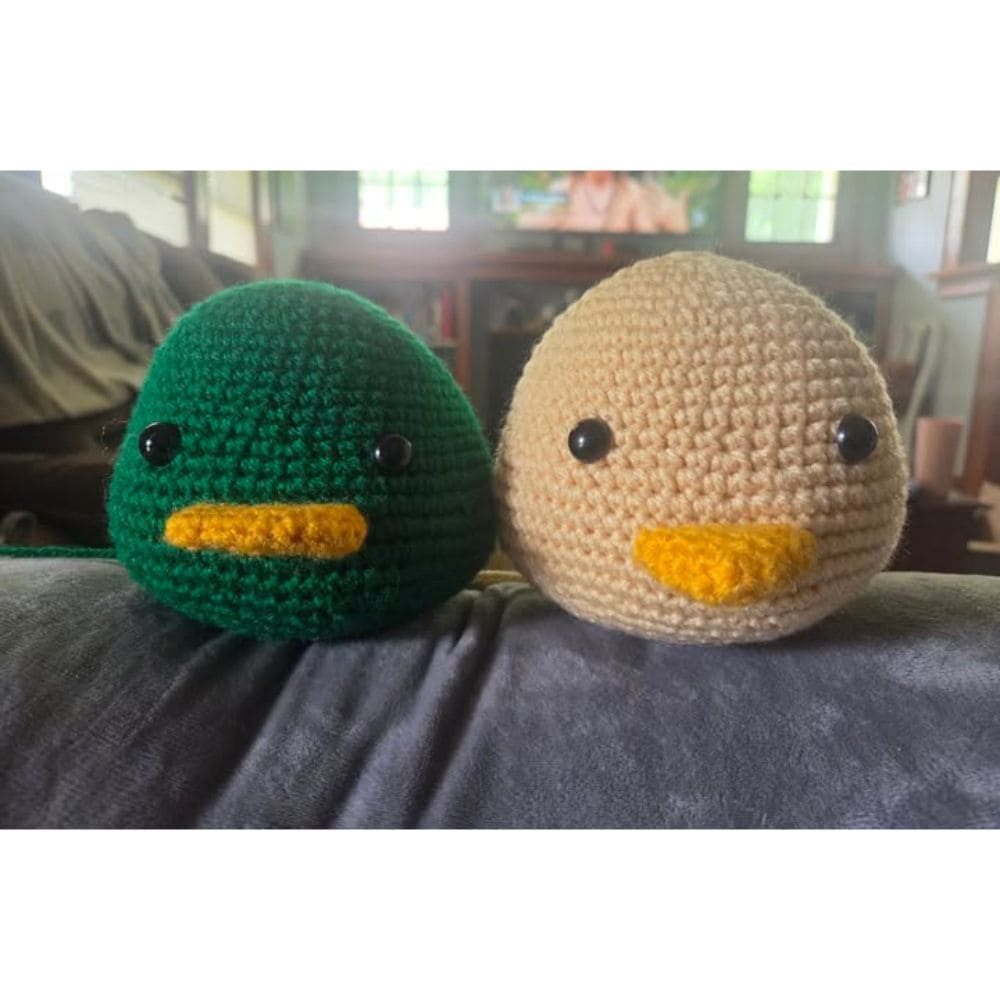
Here is what your Part 3 should look like.
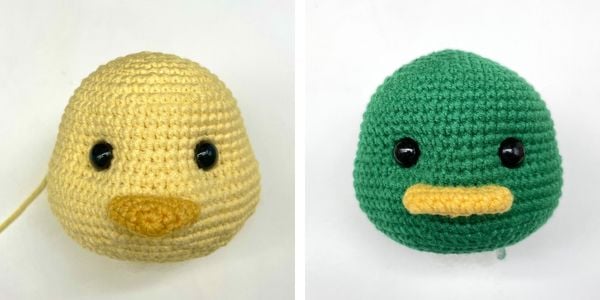
Have a look at the amazing photos shared by our Community. Simply scroll to the side to view them all.


Pattern Part 4 – Now Available
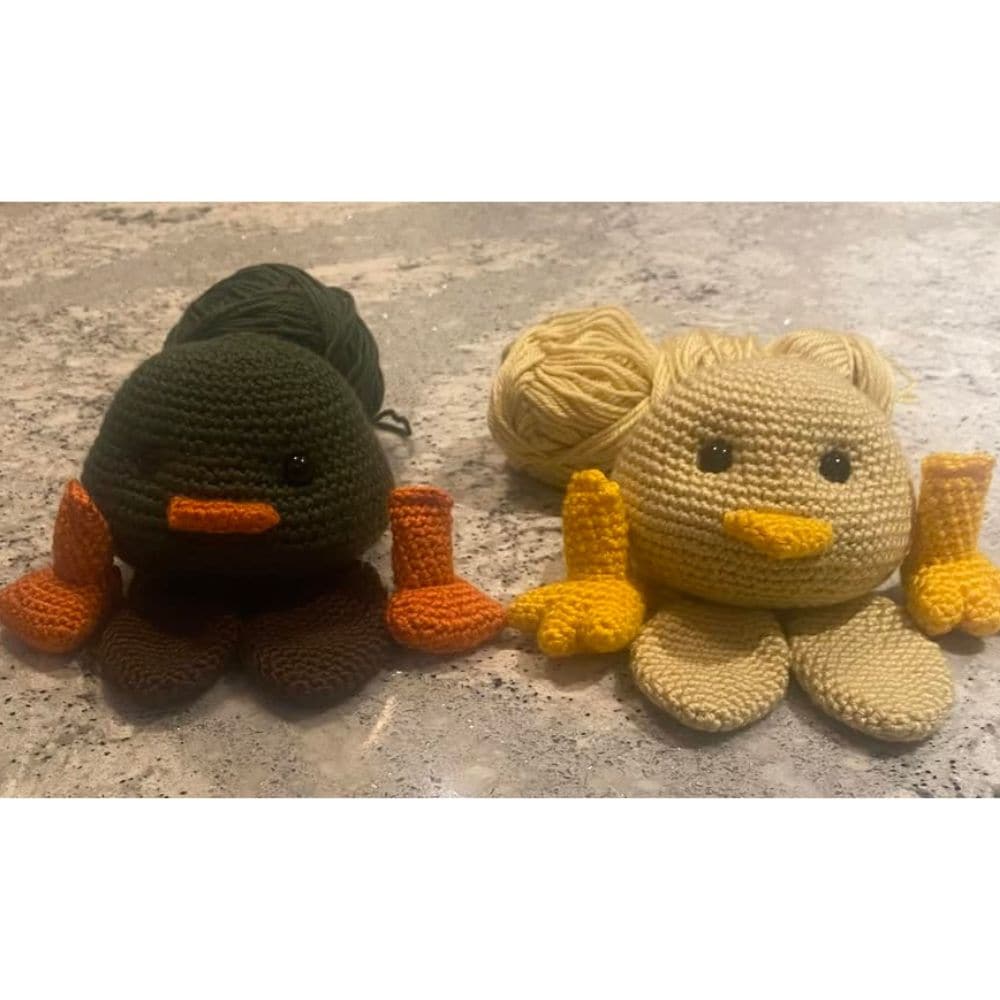
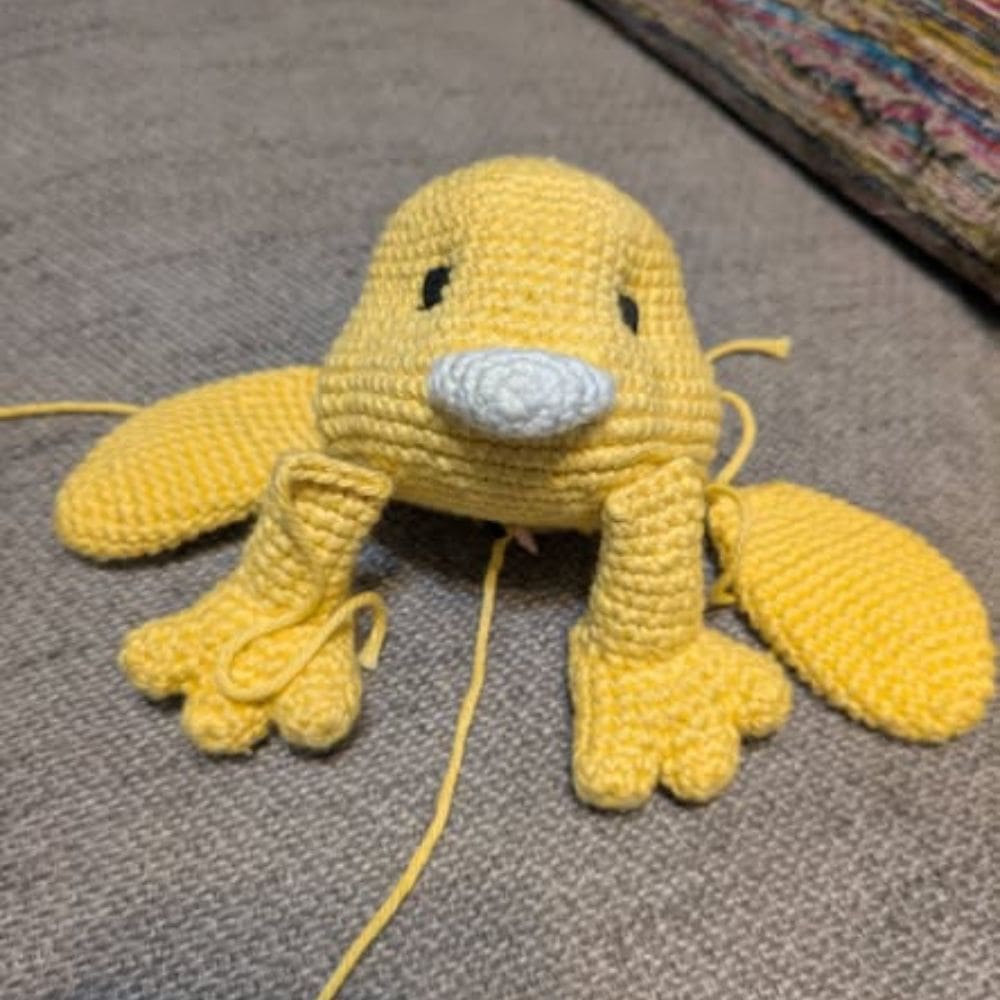
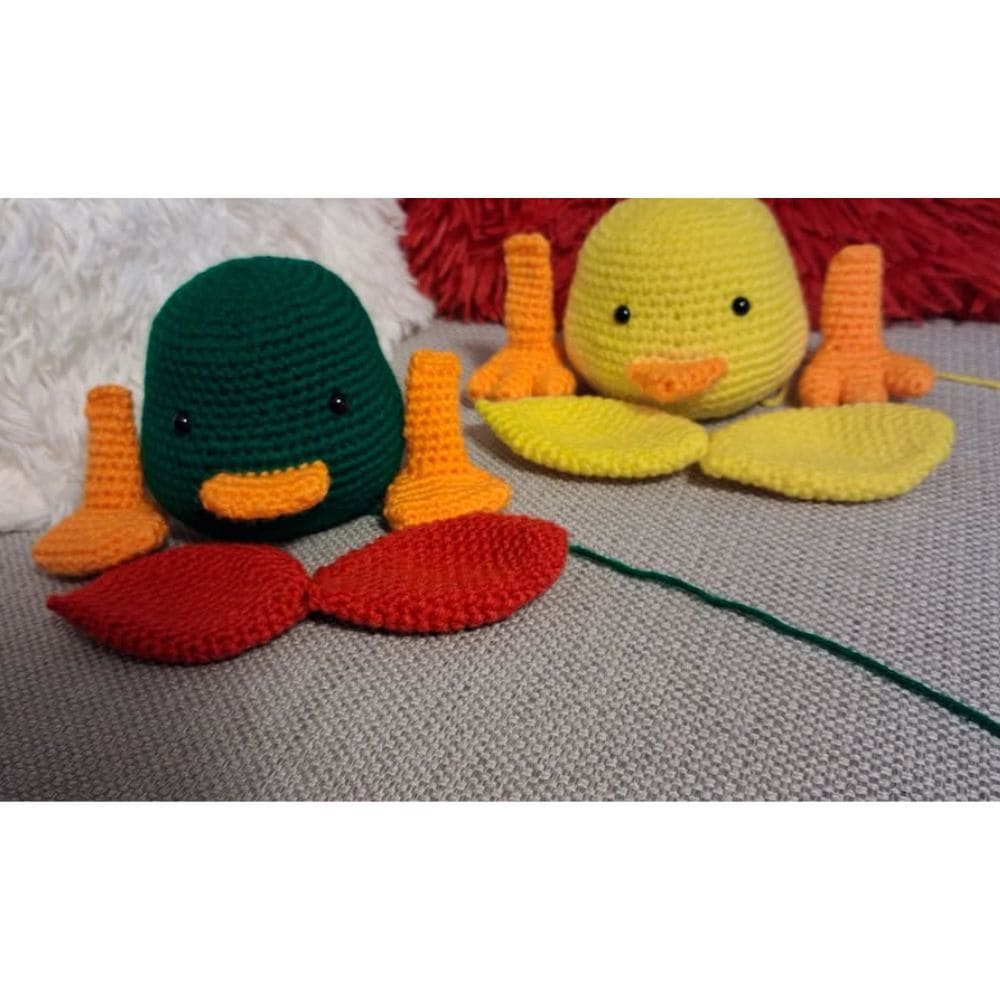
It’s time for Part 4 of the Crochet Along! And now I can finally confirm what many of you have already guessed… you were absolutely right! We are making a chicken and a duck! 🙂 🐔🦆
I’ve been absolutely loving all the photos you’ve been sharing. Seeing your creations come to life is one of my favourite parts of every crochet along and I can’t get over how adorable they all look already! 🙂
The instructions in today’s part differ between the two toys, so once again I’m publishing them as separate patterns.
If you’re a little behind, don’t worry. The final part will be released on Monday and it will cover the finishing touches, so there’s still plenty of time to catch up before completing your toys.
Toy #1 Pattern
Toy #1 Pattern consists of 1 section only today.
Yarn color to use: color A
Toy #1 Pattern – Section 1
You will now crochet the body. Continue from where you finished with the head at R28 and crochet towards the bottom of the body.
Continue crocheting with yarn color A
R29: SC in next 3 STs, INC, (SC in next 6 STs, INC) x 2, SC in next 3 STs {24}
R30: (SC in next ST, INC) x 12 {36}
R31: SC in each ST around {36}
R32: (SC in next 5 STs, INC) x 6 {42}
R33: SC in next 3 STs, INC, (SC in next 6 STs, INC) x 5, SC in next 3 STs {48}
R34: you will attach the wings (the pieces you made in Part 1 of this CAL) to the body in this round – watch this video tutorial on How to attach arms to your Amigurumi toy without sewing. In this video, I attach arms to the body but the technique is the same.
- SC in next 13 STs
- attach the first wing: SC in next 7 STs
- SC in next 17 STs
- attach the second wing: SC in next 7 STs
- SC in next 4 STs {48}
Note: if the wings don’t line up neatly with the eyes and beak, you may need to move them one or two stitches to the right or left. This can happen due to variations in yarn tension or individual crochet technique.
R35: (SC in next 7 STs, INC) x 6 {54}
R36: SC in each ST around {54}
R37: SC in next 4 STs, INC, (SC in next 8 STs, INC) x 5, SC in next 4 STs {60}
R38-R39 (2 rounds): SC in each ST around {60}
R40: (SC in next 9 STs, INC) x 6 {66}
R41-R42 (2 rounds): SC in each ST around {66}
R43: SC in next 5 STs, INC, (SC in next 10 STs, INC) x 5, SC in next 5 STs {72}
R44-R49 (6 rounds): SC in each ST around {72}
R50: SC in next 5 STs, INV DEC, (SC in next 10 STs, INV DEC) x 5, SC in next 5 STs {66}
R51: (SC in next 9 STs, INV DEC) x 6 {60}
R52: SC in next 4 STs, INV DEC, SC in next 3 STs – BLO, SC in next 5 STs, INV DEC, (SC in next 8 STs, INV DEC) x 4, SC in next 4 STs {54}
R53: INV DEC, SC in next 3 STs, SC in next 3 STs – BLO, SC in next ST, (INV DEC, SC in next 7 STs) x 5 {48}
You should now have 6 unworked front loop stitches on the back of the body. This is where you will crochet the tail so these front loops should be roughly centred between the wings.
R54: SC in each ST around {48}
You can now start stuffing the body
R55: SC in next 3 STs, INV DEC, (SC in next 6 STs, INV DEC) x 5, SC in next 3 STs {42}
R56: (SC in next 5 STs, INV DEC) x 6 {36}
R57: SC in next 2 STs, INV DEC, (SC in next 4 STs, INV DEC) x 5, SC in next 2 STs {30}
R58: (SC in next 3 STs, INV DEC) x 6 {24}
R59: you will attach the legs to the body in this round using the same technique you used for attaching the wings. Ensure that when attaching the legs, the front of the foot is facing down.
- SC in next 11 STs
- attach the first leg: SC in next 4 STs
- SC in next 3 STs
- attach the second leg: SC in next 4 STs
- SC in next 2 STs {24}
Note: if the legs don’t line up neatly with the wings, you may need to move them one or two stitches to the right or left. This can happen due to variations in yarn tension or individual crochet technique.
R60: SC in next ST, INV DEC, (SC in next 2 STs, INV DEC) x 5, SC in next ST {18}
R61: (SC in next ST, INV DEC) x 6 {12}
R62: SC in each ST around {12}
Stuff well, close the hole using a tapestry needle and weave the yarn tail in
Watch this video tutorial on How to Close Amigurumi: Ultimate Finish Tutorial
Toy #2 Pattern
Toy #2 Pattern – consists of 2 sections:
- Section 1 – make 1 piece
- Section 2 – you will crochet the body
Yarn color for Section 1: color C
Yarn color for Section 2: color E and color B
Toy #2 Pattern – Section 1
R1: MR – 6 x SC into the ring {6}
R2: INC in each ST around {12}
R3: SC in each ST around {12}
R4: (SC in next ST, INC) x 6 {18}
R5: SC in each ST around {18}
R6: SC in next ST, INC, (SC in next 2 STs, INC) x 5, SC in next ST {24}
R7: SC in each ST around {24}
R8: (SC in next 3 STs, INC) x 6 {30}
R9-R12 (4 rounds): SC in each ST around {30}
R13: (SC in next 3 STs, INV DEC) x 6 {24}
R14: SC in next ST, INV DEC, (SC in next 2 STs, INV DEC) x 5, SC in next ST {18}
R15: SC in each ST around {18}
R16: SC in next 2 STs, INV DEC, (SC in next 4 STs, INV DEC) x 2, SC in next 2 STs {15}
R17: SC the opening together to close the piece, do not stuff {7}
FO and weave the yarn tail in
Toy #2 Pattern – Section 2
You will now crochet the body. Continue from where you finished with the head at R28 and crochet towards the bottom of the body.
Change yarn to color E
R29: SC in next 3 STs, INC, (SC in next 6 STs, INC) x 2, SC in next 3 STs {24}
R30: (SC in next ST, INC) x 12 {36}
R31: SC in each ST around {36}
Change yarn to color B
R32: (SC in next 5 STs, INC) x 6 {42}
R33: SC in next 3 STs, INC, (SC in next 6 STs, INC) x 5, SC in next 3 STs {48}
R34: you will attach the wings (the pieces you made in Part 1 of our CAL) to the body in this round – watch this video tutorial on How to attach arms to your Amigurumi toy without sewing. In this video, I attach arms to the body but the technique is the same.
- SC in next 13 STs
- attach the first wing: SC in next 7 STs
- SC in next 16 STs
- attach the second wing: SC in next 7 STs
- SC in next 5 STs {48}
Note: if the wings don’t line up neatly with the eyes and beak, you may need to move them one or two stitches to the right or left. This can happen due to variations in yarn tension or individual crochet technique.
R35: (SC in next 7 STs, INC) x 6 {54}
R36: SC in each ST around {54}
R37: SC in next 4 STs, INC, (SC in next 8 STs, INC) x 5, SC in next 4 STs {60}
R38-R39 (2 rounds): SC in each ST around {60}
R40: (SC in next 9 STs, INC) x 6 {66}
R41-R42 (2 rounds): SC in each ST around {66}
R43: SC in next 5 STs, INC, (SC in next 10 STs, INC) x 5, SC in next 5 STs {72}
R44-R49 (6 rounds): SC in each ST around {72}
R50: SC in next 5 STs, INV DEC, (SC in next 10 STs, INV DEC) x 5, SC in next 5 STs {66}
R51: (SC in next 9 STs, INV DEC) x 6 {60}
R52: SC in next 4 STs, INV DEC, (SC in next 8 STs, INV DEC) x 5, SC in next 4 STs {54}
R53: (SC in next 7 STs, INV DEC) x 6 {48}
R54: SC in each ST around {48}
You can now start stuffing the body
R55: SC in next 3 STs, INV DEC, (SC in next 6 STs, INV DEC) x 5, SC in next 3 STs {42}
R56: (SC in next 5 STs, INV DEC) x 6 {36}
R57: you will attach the tail (this is the piece you made in Section 1 of today’s Part 4) to the body in this round using the same technique you used for attaching the wings
- SC in next ST
- attach the tail: SC in next 7 STs
- SC in next 28 STs {36}
- don’t worry if the tail is floppy, you will fix this after finishing the body
Note: if the tail is not centred nicely between the wings, you may need to move it one or two stitches to the right or left. This can happen due to variations in yarn tension or individual crochet technique.
R58: SC in next 2 STs, INV DEC, (SC in next 4 STs, INV DEC) x 5, SC in next 2 STs {30}
R59: (SC in next 3 STs, INV DEC) x 6 {24}
R60: you will attach the legs to the body in this round using the same technique you used for attaching the wings. Ensure that when attaching the legs, the front of the foot is facing down.
- SC in next 11 STs
- attach the first leg: SC in next 4 STs
- SC in next 3 STs
- attach the second leg: SC in next 4 STs
- SC in next 2 STs {24}
Note: if the legs don’t line up neatly with the wings and the tail is not centred between the legs, you may need to move them one or two stitches to the right or left. This can happen due to variations in yarn tension or individual crochet technique.
R61: SC in next ST, INV DEC, (SC in next 2 STs, INV DEC) x 5, SC in next ST {18}
R62: (SC in next ST, INV DEC) x 6 {12}
R63: SC in each ST around {12}
Stuff well, close the hole using a tapestry needle and use the yarn tail to fix the floppy tail as described below.
Watch this video tutorial on How to Close Amigurumi: Ultimate Finish Tutorial
You can now fix the floppy tail by attaching the top of it to the body with two or three stitches using the yarn tail you have left after closing the body. I stitched R5 of the tail to R47 of the body but you can attach it as per your preference. You can then weave the yarn tail in.
Pattern Part 5 – will be published on Monday 22nd June 2026
Explore My Free Amigurumi Patterns and Tutorials
If you like my crochet along patterns, you may also love these Amigurumi patterns and video tutorials. Why don’t you give them a try?!
What is Amigurumi? And why you’ll love it!
Best yarn for Amigurumi crochet
Free crochet bunny lovey pattern
Happy crocheting!


Is it the same pattern for toy 1 and 2 in different colours?
Christine, Part 3 has slight differences between Toy #1 and Toy #2, which is why I published them as two separate patterns. And yes, they are different colors. 🙂
Love,
Petra x
It is a duck in toy 1. Am I right?
Hi Christine, I can’t tell just yet but I think you will pretty much know what you are making once you have completed Part 3. 🙂
Love, Petra x
Hi. Im struggled in part 2 in toy 1. I try to follow the instructions but still i don’t get it it is round 4. I try the video but it doesn’t help as video says 48 and your instructions says 24. In kind of lost. Can you help me video how you get 24 with captions. Im deaf and English is my 2nd language. Thanks you.
Hi Christine, sorry to hear you are struggling with this part. Unfortunately I am not able to record a video to show how to make that art at the moment but if you watch the vifeo provided, you just follow the same technique but just change the number of stitches according to the written pattern. Alternatively, you can always use the pattern for Toy#2 for both toys.
Love,
Petra x
What is the yardage needed if using worsted weight yarn? I read twice and didn’t see worsted weight yardage. Thank you
Hi Mary, I use different weight of yarn to make my crochet toys so unfortunately I don’t have the yardage information available for worsted weight yarn. But here is what I would suggest:
Toy #1 – yardage needed:
– color A – one skein of 100g
– color B – one quarter of a 100g skein
Toy #2 – yardage needed:
– color A – one half of a 100g skein
– color B – one half of a 100g skein
– color C – one quarter of a 100g skein
– color D – one quarter of a 100g skein
– color E – one quarter of a 100g skein
I hope this helps but please let me know if you have more questions.
Love,
Petra x
I made several of your animals. I just purchased your pattern for the otter. there is no video showing how to change the color for the belly and for the face. I can’t figure out how to do it. this is the first time I’ve gotten stumped on one of your patterns.
Hi Caroline, unfortunately I don’t have a video tutorial on how to change colours but there is quite a few on YT that you may find helpful. Sorry I can’t help on this occasion.
Love,
Petra x
Thanks for such a cute dinosaur pattern, lots of fun and happy memories!
You are very welcome!
Love,
Petra x
Congratulations to all the winners!
Hi, Petra,
I very much enjoyed doing the Triceratops. It was my 1st crochet-along. Mine looks just like the purple one but I didn’t send a picture.
I was wondering if you would do a Beaver?
Can’t wait for the June project.
Hi Sherry, so glad to hear you enjoyed the crochet along and making the triceratops. I already have my designs planned for the rest of the year but I will try to make the beaver next year. Sorry it’s not gonna be done faster.
Love,
Petra x
A lot of fun to do !
Very clear instructions
Thank you Petra
Thank you Francine and you are more than welcome! 🙂
Love,
Petra x
Hi Petra
sadly I didn’t participate in the crochet along as I didn’t manage to complete the registration. It was to far into the crochet project to catch up when I worked it out.
Hopefully next time. Love everyone’s work, well done
HI Christine, so sorry to hear that. To be honest, you can start working on it at anytime, the pattern will stay published on my blog forever. 🙂
Love,
Petra x
can’t wait to get started! love your patterns!
Thank you so much Paula, so happy to hear you love my patterns! I hope you enjoy the crochet along. 🙂
Love,
Petra x
Just joined for my first stitch along, hoping to be able to do it on my night shifts 😉
Hi Tine, welcome and I hope you have fun. Hopefully my pattern won’t put you to sleep during your night shifts! haha 🙂
Love,
Petra x
For R8 MSP what do you mean with first piece and second piece? Thank you, Tine
Hi Tine, you have to make two pieces using the same pattern for part 1. So the first piece you make, you use the instructions for ‘First piece’ and the second piece you make you use the instructions for ‘Second piece’. I hope this helps but please let me know if you have more questions.
Love,
Petra x
What am I doing wrong? I can see a photo but have the instructions. It’s my first time and I want to get started. I’ve been waiting over a month…so excited.
Hi Cecilia, There won’t be any photos of the finished toy published until the end of the crochet along because it is a mystery what you are making. 😉 I will publish a photo of each part of the pattern when the next part is due. So the photo for Part 1 will be published tomorrow (Wednesday) just before I publish Part 2.
Love,
Petra x
I DONT SEE A PLACE TO SUBSCRIBE
Hi Jackie, to subscribe for the crochet along, please click on this link and then click on the ‘Stitch Along With Us’ button.
https://www.cuddlystitchescraft.com/join-mystery-crochet-along/
Love,
Petra x
Very excited to join for first time and how nice to have the opportunity to participate.
Welcome Cecilia and I hope you enjoy our crochet along! 🙂
Thank you so much, I am so anxious to be doing this and so appreciate this opportunity.
You are more than welcome Rhonda. I hope you enjoy the crochet along! 🙂
Love,
Petra x
I enjoyed making the Cat pattern.
Interesting mine looked so much like yours. Everytime I make a pattern of yours I learn something new and I try to incorporate it into my crochet making.
Hi Jeanette,
So pleased you enjoyed making the cat and yes, I was a bit confused for a second when I saw your photo because it looked just like my cat and a thought to myself…but hold on this is not my photo! haha 🙂
Anyway, really good to hear you always learn something new and use it in the future when working on other toys, that’s perfect! 🙂
Love,
Petra x
Great job Petra. l love your choice of winners. Such a great representation of all the finished cats.
Thank you so much Frances! Yes, I always try to pick different looks and styles because all of them deserve appreciation! And I love it when my followers have a bit of fun with my patterns and make it their own. 🙂
Love,
Petra x
congratulations to all winners, great work and a always great instructions!
Thank you so much Paula! 🙂
Love,
Petra x
I just love all your animals and the no sew method. They always turn out perfectly. I would love to see a doll, boy or girl or both, as a Crochet Along.
any plans in the future?
Thanks for your patterns and videos.
Hi Fran, thank you so much for your lovely message! So happy to hear you like my patterns! 🙂 I already have quite a long to-do list for next year but I will see if I can manage to squeeze a boy or girl in there. 🙂
And you are very welcome to the patterns and videos, always a pleasure! 🙂
Love,
Petra x
Hi Petra, I am currently doing the December 2025 CAL.
Today (3 Dec) is making the ears day (I assume). Just want to ask with the color change, it makes « dots » in the other color. Do you have a specific way of changing color?
Thank you in advance
Hi Mari-Lese, may I ask how you change the color at the moment? Do you get the ‘spots’ because you carry the yarn through the stitches and it is showing? I chose to let the yarn ‘hang’ inside the piece and pick it up again when needed. I just had to make sure the loop on the inside was not too short so it would not pull the piece tight and distort the shape. Normally I would cut the yarn off and attach a new one with a knot but the ears were too small for all the yarn ends and knots to fit inside.
I hope this helps but please let me know if you have more questions.
Love,
Petra x
Do you have a video for the ears, mine are not as neat as yours
Hi Morag, no sorry I don’t have a video tutorial for the ears. How did you change the colours? Did you carry the yarn through the stitches or cut off an attach a new one or let it hang on the inside and then pick up again?
Love,
Petra x
after about 20 goes I just made them as best as I could hiding the yarn behind.they are not as good as yours but I think they are ok
Oh wow, you had 20 goes at it? You are very determined, I like that! 🙂 I left the yarn hang on the inside and then picked it up again. But you have to be careful not to make the yarn too tight or it will distort the shape of the ear. But I’m sure your ears look really nice and I can’t wait to see your cat. 🙂
Love,
Petra x
Hi Petra, I am interested in joining the crochet alongs but I can’t find what time that they are on and if they are held every day or perhaps weekly? I am in Australia so the timing of the crochet alongs may be at a time that would make it difficult to join. Thanks, Michelle
Hi Michelle, no problem at all.
Here is the link where you can read more info: https://www.cuddlystitchescraft.com/mystery-amigurumi-crochet-along-info/
And here is the link where you can sign up: https://www.cuddlystitchescraft.com/join-mystery-crochet-along/
The crochet alongs usually run for 3 weeks every 3 months or so. You can crochet as and when you are free and at your own pace so it dosn’t really matter at all where you are based. 🙂
The next crochet along will start in November and if you sign up you will receive an email about 2 weeks before it starts with the info.
I hope this helps but please let me know if you have more questions.
Love,
Petra x
Wat een leuke wasbeer ik haak niet zo snel ben nu een beer aanhet maken
Thank you so much Clara! 🙂 And it’s not important if you crochet fast or slow as long as you enjoy it. 🙂
Love,
Petra x
Everyone did a great job. I hope I can try one sometime. I am my worst critic when it comes to the ones I make. I sent a box of ones I did make to my little 2 year old great-great twin granddaughters in Fla. I watch them open the box and saw their eyes light up.Congratulations to all who entered the contest,
Judie
Hi Judie, I know what you mean because I am the same. BUT I always say, it’s not important what your work looks like as long as you enjoy making it. 🙂
And as you can see, your great great granddaughters loved your toys no matter what you think. Win win! 🙂
Love,
Petra x
Please leave a tutorial for whiskers option 3. That is my favorite!!!
Hi Alma, will do. Already on my to do list for this week. 🙂
Love,
Petra x
I have so enjoyed the Mystery crochet along and look forward to another one soon! I also loved that is is a low sew pattern as I’m not good at lining things up on animals or dolls, I love making them tho. You did a wonderful job on the otter!!!
Awww, thank you so much Dottie! That is so sweet of you and I’m so happy you enjoyed the crochet along and like the otter. 🙂 I realise this one was a bit challenging with the color changes but the finished toys look fantastic! 🙂
Love,
Petra x
Hi Petra, I’m going to get my facebook followers to choose the colours! How exciting.
https://www.facebook.com/share/p/16dCsPpuUK/
I’ll make 2 and give them away.
Brenda x
Hi Brenda, what an excellent idea! I like that a lot! 🙂 I couldn’t help myself and had to read all the colour suggestions and I must say there are some interesting combos there! 🙂
Can’t wait to see which one you pick.
Love,
Petra x
For upcoming June mystery crochet along: If I use the YarnArt Jeans yarn, is the hook size 2.5? Thanks, Jeanne
Hi Jeanne,
that is correct. I use 2.5mm hook when using YarnArt Jeans to avoid large gaps between the stitches.
Love,
Petra x
how can I but the latest crochet along pattern please now that it’s finished and how much
Hi Diedre, the crochet along will close tomorrow (Friday 4th Oct) and the PDF will be available next week. If you sign up to my newsletter you will receive an update when it’s ready. 🙂
Love, Petra x
I have not received anything and can’t find where to go for pdf that is supposedly been published
Hi Linda, to get started with the crochet along, visit this page (https://www.cuddlystitchescraft.com/mystery-amigurumi-crochet-along/) and scroll down to Part 1 of the pattern. The PDF pattern will be available after the crochet along has finished because this is a Mystery crochet along. So noone has access to the full PDF pattern and photos of the finished toy until the crochet along is over.
You just have to keep visiting the page on my blog every time a new part of the pattern is published.
I hope this helps but please let me know if you have more questions.
Love,
Petra x
This is the first time I have done a Mystery crochet along. Wasn’t sure I would enjoy it but surprisingly it has been so very much fun. I know what the animal is but woun’t give it away. Thank you for all your patterns. Have done several
Hi Barb, so happy you are having fun working on my CAL project! 🙂 And thank you for not giving away what animal it was. Did you guess right? 🙂
And you are very welcome, glad you made several of my toys!
Love, Petra x
Hello! I love working with your patterns. You have a great talent and imagination. My question is about the no sew method when you crochet left handed. For this mystery project the arms were out of line. I read and reread the pattern and believe that I followed the pattern correctly. I did adjust the placement of the arms and it look just fine now. Just wondering if anyone has experienced problem?
Hi Bridget, thank you so much for such a lovely compliment! 🙂 Really happy you like my patterns!
May I ask if the no-sew method worked fine for the placement of the legs and the tail? If it did then it should also work for the arms in theory because you are just going a a different direction but the stitch counts should be the same. Seeing a photo would be really helpful please.
Thank you.
Love, Petra x