
This post may contain affiliate links, please read my full disclosure policy for more details.
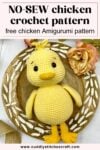
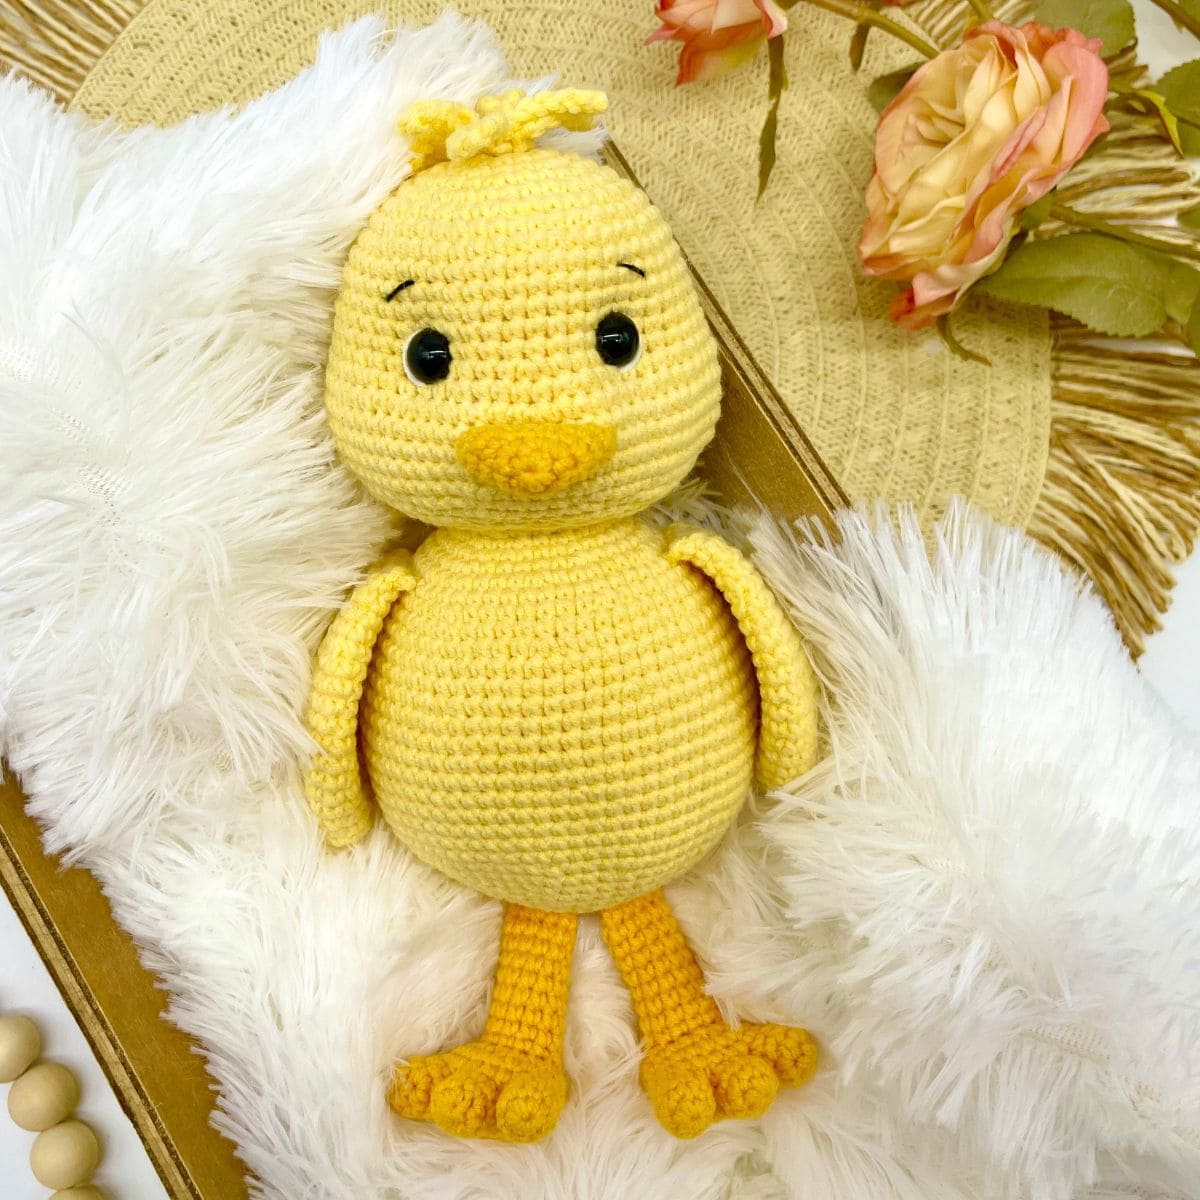
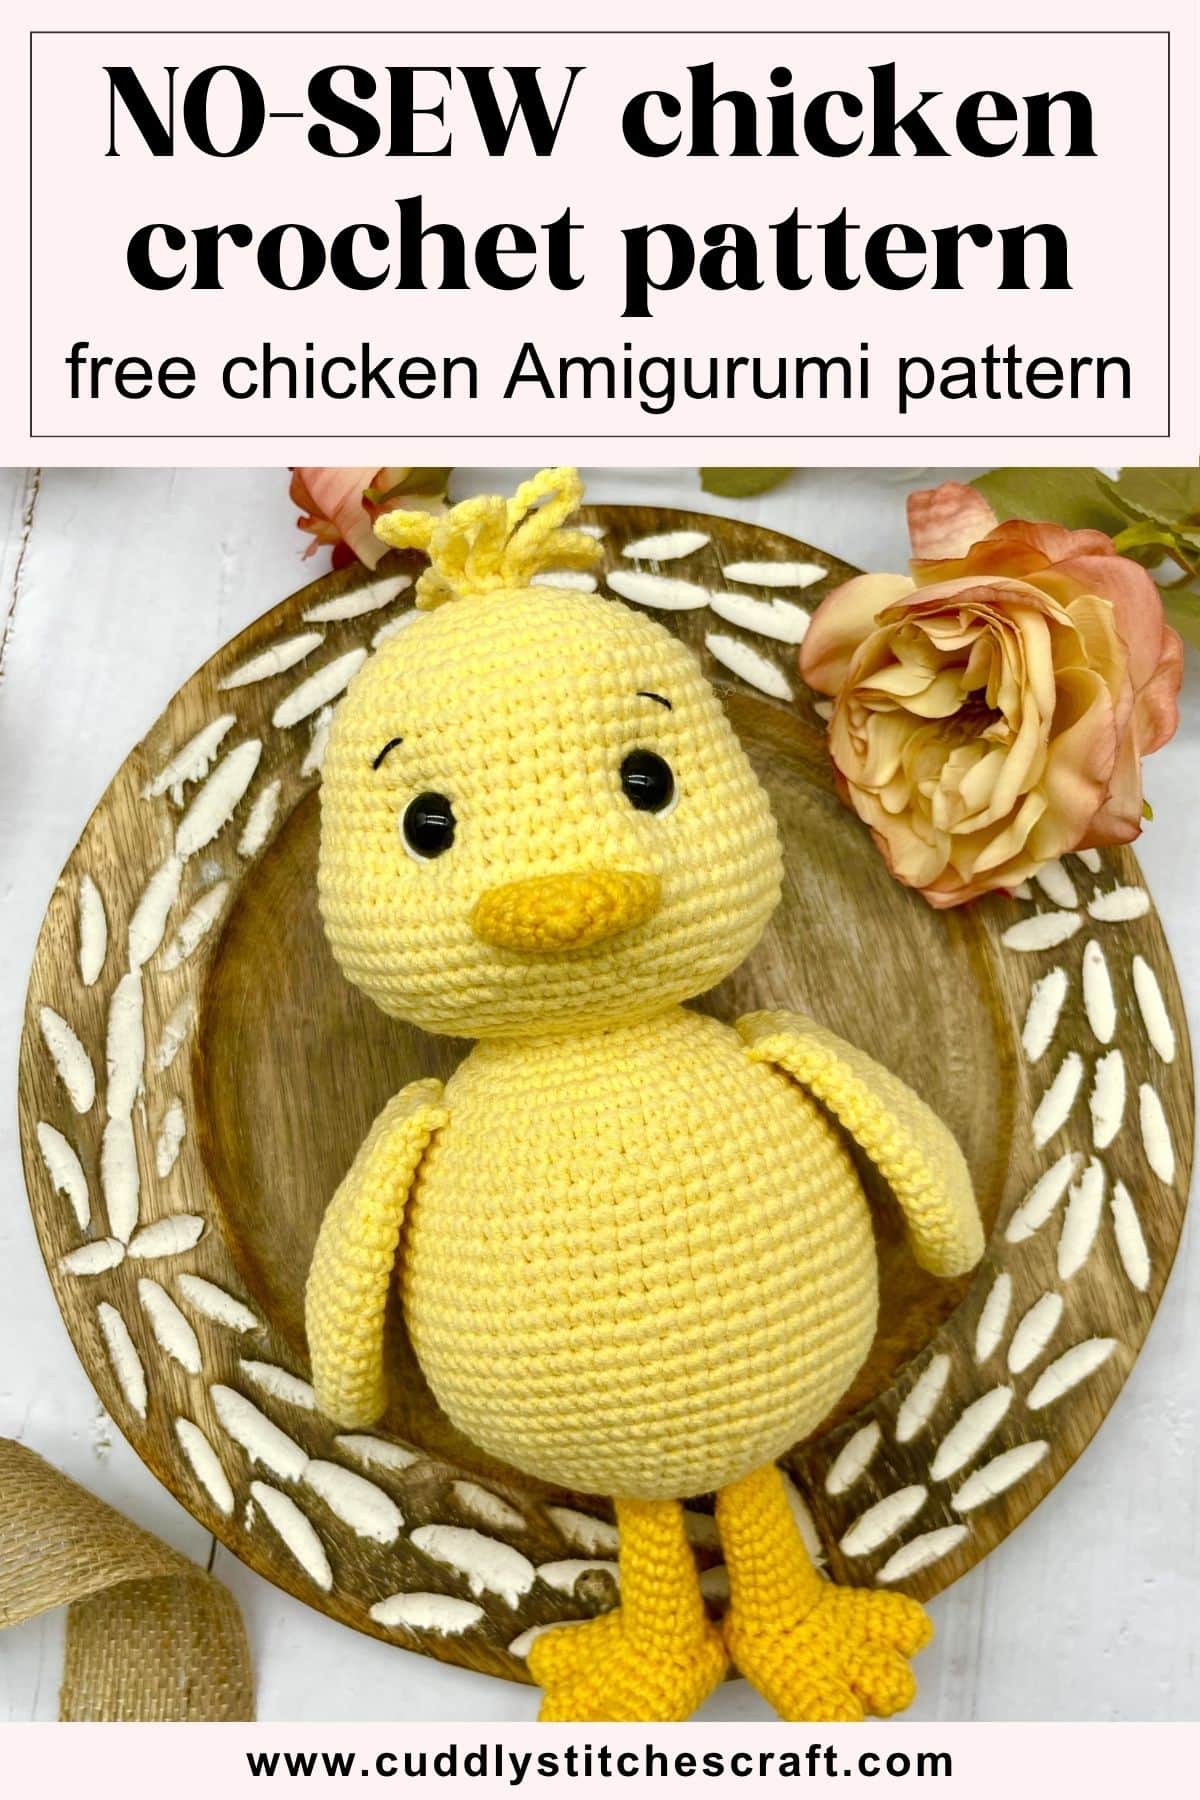
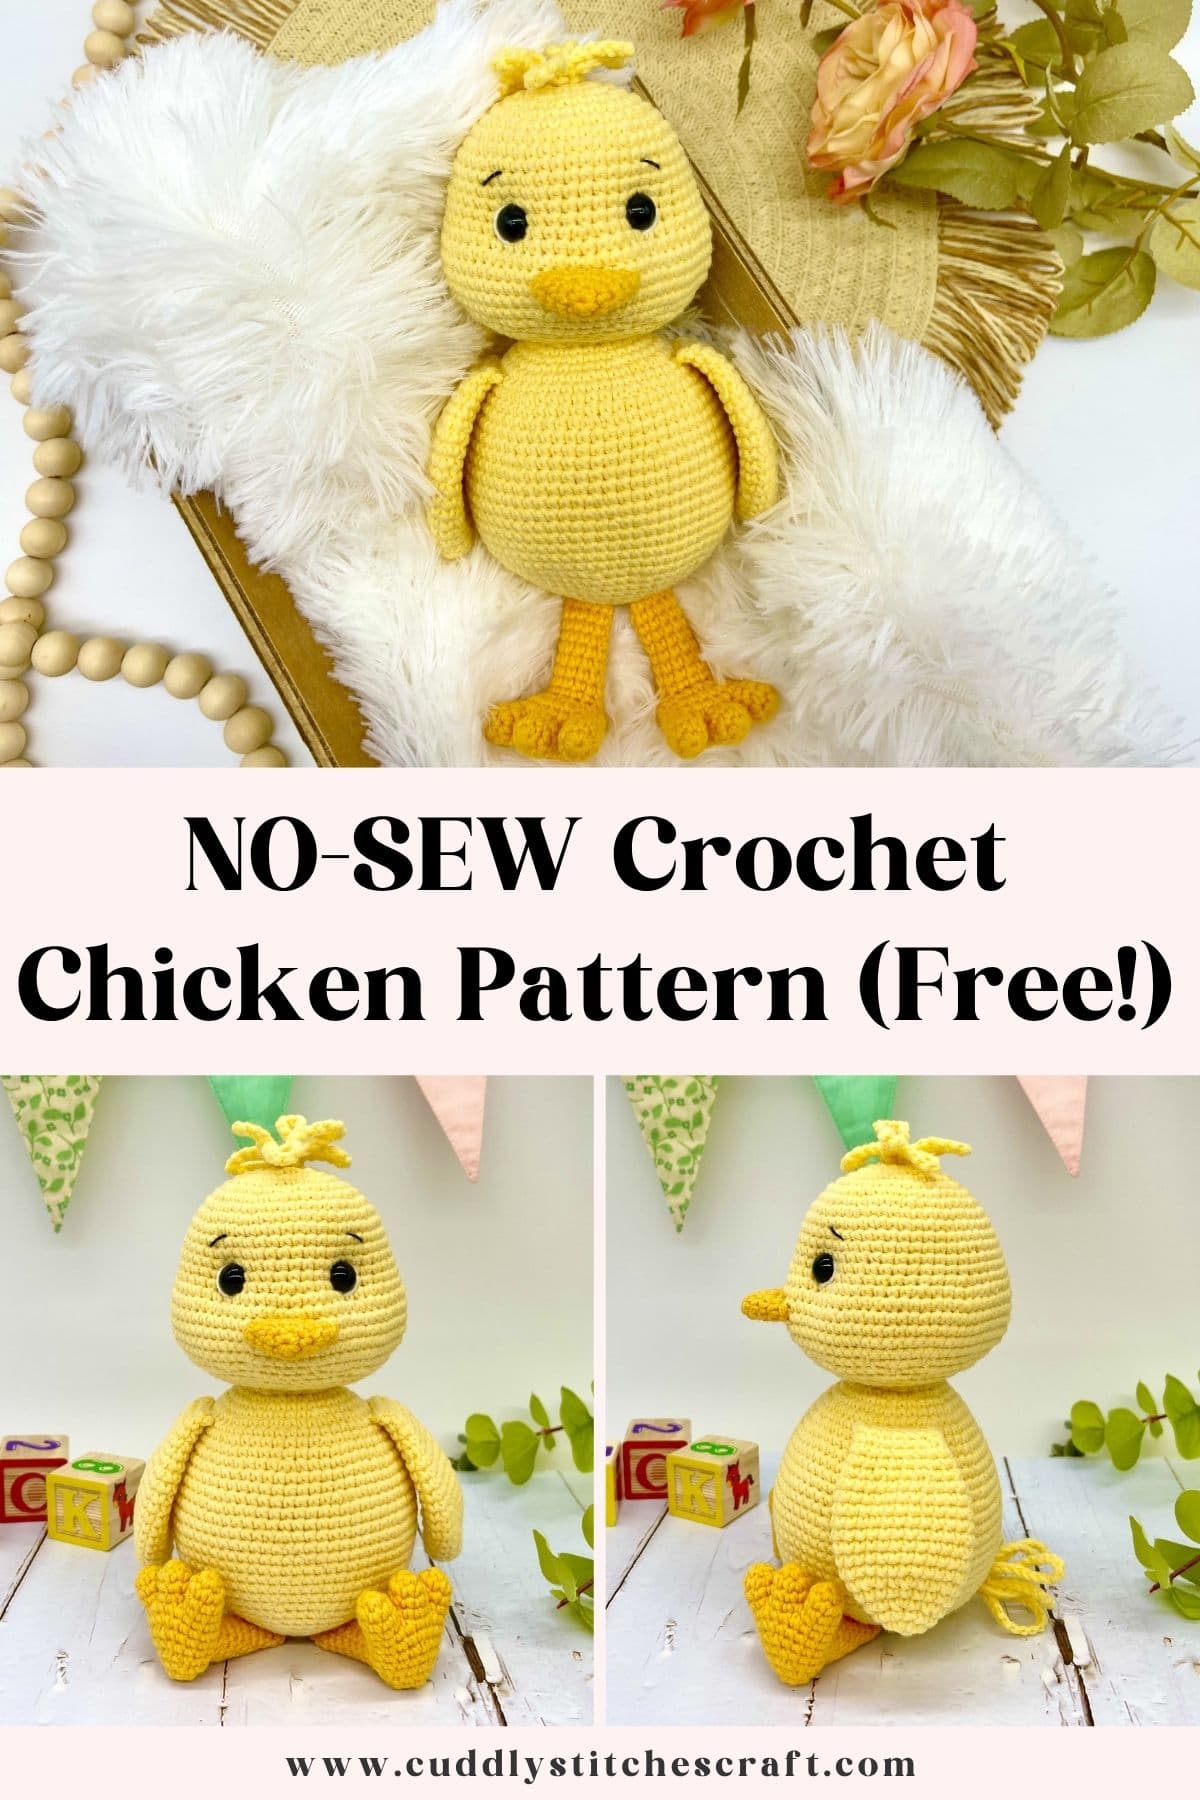
If you’ve been looking for a cute chicken crochet pattern, I think you’re going to love this one! I had so much fun designing this crocheted chicken for my latest mystery Amigurumi crochet along and I’m pleased to say it was a huge hit!
This chicken Amigurumi is quick to make and best of all, it’s a no-sew crochet project, so there’s no sewing required to assemble it together. If sewing Amigurumi body parts isn’t your favourite part of crocheting, this pattern is definitely for you! 🙂
And as always, I’ve included lots of video tutorials for some of the trickier parts of this chicken crochet free pattern. So if you get stuck or just want to refresh your skills, you can simply follow along. I hope you’ll find this pattern fun and relaxing to make!
Why You Will Love this Pattern!
- No-sew: no sewing required to assemble your crochet toy
- All you need to know is basic crochet stitches
- Works great with a variety of different yarns including worsted weight yarn
- Easy-to-follow instructions with step by step photos
- Includes detailed video tutorials for extra help
- I’m always happy to provide support with this pattern
- And more importantly…you will have fun making a beautiful gift for your little one or family and friends
Scroll down to view the full written pattern. Or purchase the ad-free printable PDF on Etsy or Ravelry.
How to Crochet a Chicken
– This chicken crochet pattern (free) is worked in continuous rounds so no need to slip stitch to join the rounds. This way you will avoid having a visible seem on your crochet toy.
– Use a stitch marker to mark the beginning of each round.
– All stitches are worked in both loops unless stated otherwise.
– I always recommend using the invisible decrease that will give you a nicer finish without visible bumps and gaps.
– Always use a crochet hook at least one size smaller than the size recommended on the yarn label to avoid large gaps and the stuffing showing.
– This free crochet chicken pattern requires no sewing at all, as every piece is crocheted on, making it an easy and enjoyable crochet project to finish.
– The use of safety eyes or buttons poses a choking risk for children under the age of 3 therefore I recommend using embroidery instead.
– Explore my YouTube channel for more Amigurumi tips and tricks
Get Started with this Chicken Crochet Pattern
Pattern Notes
Skill level: intermediate crochet skills and knowledge
Finished size – using 2.5 mm crochet hook (B/1) and Sport weight yarn (4ply #2):
- seated: 18cm (7″)
- standing: 23cm (9″)
Pattern Gauge
Flat crochet circle 2 inches (5 cm) in diameter:
– when using 2.5 mm hook (B/1) and Sport weight yarn (4ply #2)
– 7 rounds with 42 stitches in the last round
Pattern for gauge:
R1: MR – 6 x SC into the ring {6}
R2: INC in each ST around {12}
R3: (SC in next ST, INC) x 6 {18}
R4: SC in next ST, INC, (SC in next 2 STs, INC) x 5, SC in next ST {24}
R5: (SC in next 3 STs, INC) x 6 {30}
R6: SC in next 2 STs, INC, (SC in next 4 STs, INC) x 5, SC in next 2 STs {36}
R7: (SC in next 5 STs, INC) x 6 {42}
Best Yarn for Amigurumi – Get the Free Guide Now!
Sign up for my newsletter and receive the free guide straight into your inbox. Plus stay in the loop with updates on new designs, tutorials and special offers.
Yarn Requirements
This easy crochet chicken pattern will work great with the below yarns.
- 100% cotton yarn, 100% acrylic yarn or a blend of cotton and acrylic
- Sport weight yarn (4ply #2)
- Light worsted weight yarn (DK #3)
- Worsted weight yarn (Aran #4)
- Plush yarn/velvet yarn (Bulky #5)
Yardage – when using 2.5mm or B/1 crochet hook and Sport weight yarn (4ply #2):
- Yellow yarn – approx 40g (128m = 140yds)
- Orange yarn – approx 9g (29m = 32yds)
Yarn Substitutes
US Suppliers:
Sport weight yarn (4ply #2):
- 100% cotton: Schachenmayr Pyramid Cotton
- blend of cotton/acrylic: WeCrochet Comfy
Light worsted weight yarn (DK #3):
- 100% cotton:: WeCrochet Animation DK
- blend of cotton/acrylic: Sirdar Stories DK
Worsted weight yarn (Aran #4):
- 100% acrylic: Universal Yarn Uptown
- 100% acrylic: WeCrochet Brava
UK Suppliers:
Sport weight yarn (4ply #2):
- 100% cotton: Scheepjes Catona
- 100% cotton: Paintbox Yarns Cotton
Light worsted weight yarn (DK #3):
- 100% cotton: Paintbox Yarns Cotton DK
- blend of cotton/acrylic: Paintbox Yarns Cotton Mix DK
Worsted weight yarn (Aran #4):
- 100% acrylic: Universal Yarn Uptown
- 100% acrylic: Scheepjes Chunky Monkey
If you would like to check some more substitutes for YarnArt Jeans then have a read of my Best Yarn for Amigurumi Crochet tutorial. You can find the substitutes towards the end of the article.
Materials and Equipment
Materials needed:
- a long strand of white yarn – about 30cm (12″)
- a long strand of black thread embroidery yarn – about 30cm (12″)
- polyester fibre fill
Crochet hook size:
- 2.5 mm crochet hook (B-1) for Sport weight yarn (4ply #2)
- 3 mm crochet hook (C-2) for Light worsted weight yarn (DK #3)
- 3.5 mm crochet hook (E-4) for Worsted weight yarn (Aran #4)
- if using a different weight of yarn then refer to the hook size recommendations on the yarn label but use a smaller hook – go at least one size smaller
I highly recommend this ergonomic crochet hooks set from Amazon as it comes in a stylish case and with other handy accessories such as stitch markers etc.
Other equipment needed:
- scissors
- tapestry needle/yarn needle
- pins with large heads
- stitch marker
- 10 mm safety eyes – when using Sport weight yarn (4ply #2)
- 12mm safety eyes – when using Light worsted weight yarn (DK #3) or Worsted weight yarn (Aran #4)
Complete the Flock
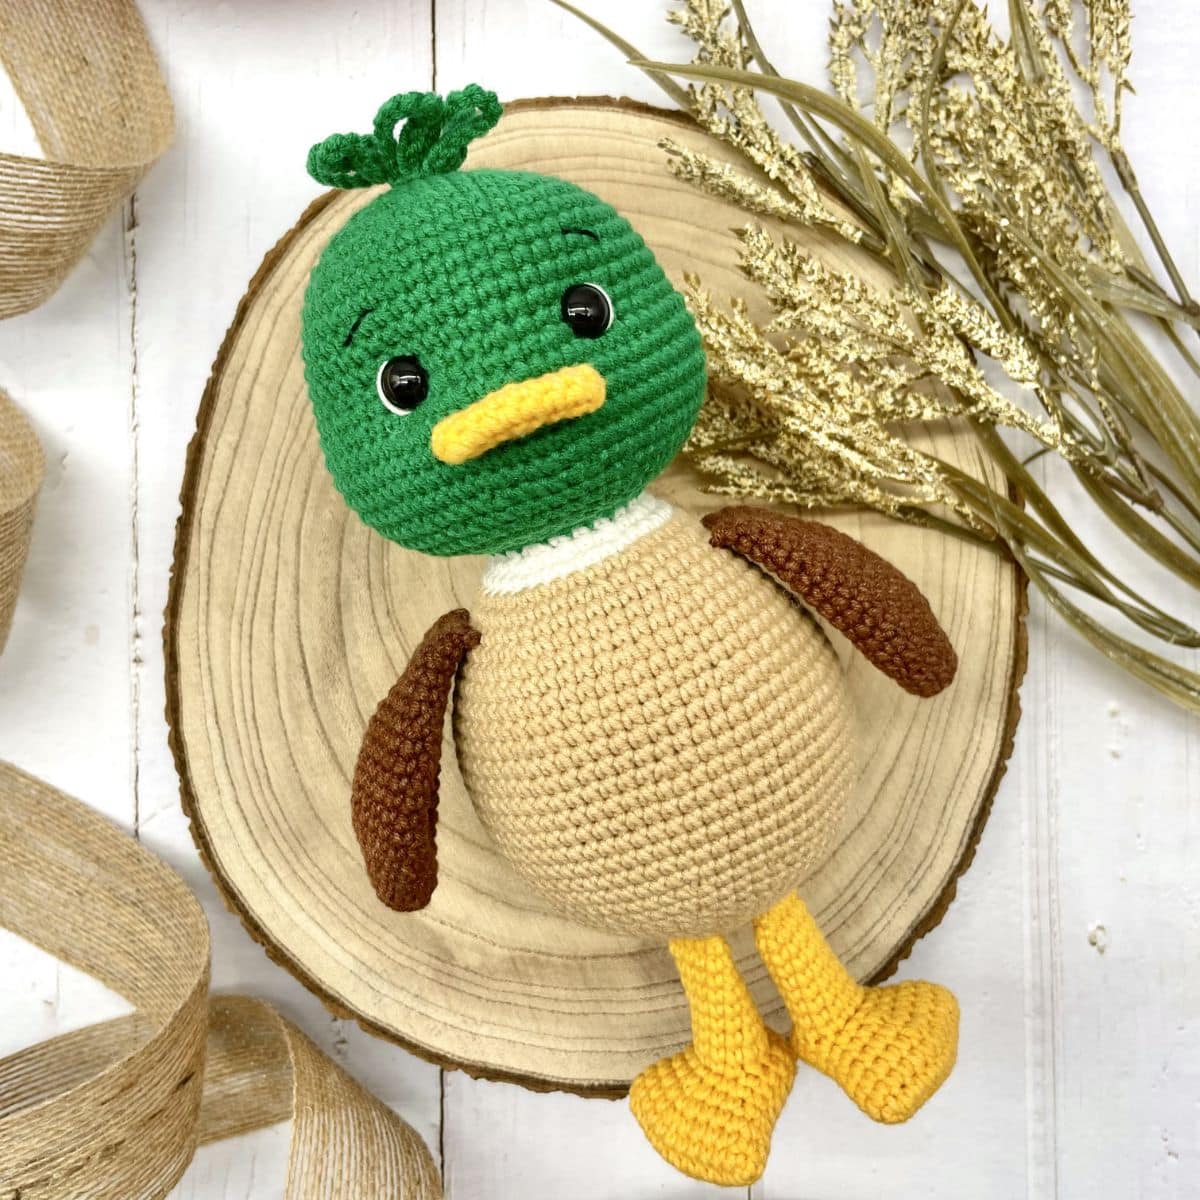
This adorable crochet chicken pairs perfectly with my crochet duck. Crochet both to create a charming farmyard duo!
Pattern Abbreviations
This chicken crochet pattern (free pattern) is written using US crochet terms.
MR: magic ring/magic circle
CH: chain
SL ST: slip stitch
ST: stitch
SC: single crochet stitch
INC: increase = two single crochet stitches in the same stitch
INV DEC: invisible decrease = insert the hook into the front loop of the first stitch (two loops on hook) and immediately insert it again into the front loop of the next stitch (three loops on the hook). Yarn over and draw through the first two loops on the hook (two loops on the hook). Yarn over and draw through the two loops on the hook to finish your invisible decrease
BLO: back loop only
FL ST: front loop stitch
FO: fasten off
INV FO: invisible fasten off
(…..) x 6: repeat the pattern inside the brackets by the given number (in this example, repeat the pattern in the brackets 6 times)
{…}: number shown inside these brackets equals the number of stitches at the end of each round
Special Stitches
INV DEC = invisible decrease:
- insert hook into the front loop of the next stitch
- then insert your hook into the front loop of the following stitch
- yarn over and draw through the first two loops on the hook (two loops left on the hook)
- yarn over and draw through the remaining two loops on the hook to finish your invisible decrease
Video Tutorials
If it is your first time dipping your toes in the world of Amigurumi, then you may find these Amigurumi tutorials handy before you get started with this free Amigurumi pattern.
And don’t forget to watch my step-by-step video tutorials for extra help with my free crochet patterns. Many of my videos also have a left handed version available.
Need Help with this Amigurumi Chicken Pattern?
The fastest way to get help with this crochet chicken free pattern is to leave your question in the comment box at the bottom of this post.
Or join our Cuddly Stitches Community Facebook group to ask for support with this pattern. Many of the members have experience with my patterns and will be more than happy to help. You can also share your creations, chat to fellow Amigurumi makers or exchange tips and tricks.
Cuddly Stitches Community
Join thousands of other Amigurumi crocheters in our community. Get help with your projects, show off your creations and share helpful tips and tricks.
How to Download My Amigurumi Patterns
My free Amigurumi patterns are supported by ads on this website and are not downloadable or printable. But you can download the ad-free PDF pattern for a small fee from my Etsy store or Ravelry shop.
Your generous contribution will help towards the cost of materials and running this website. So I can continue to publish my free online patterns on this blog for everyone to enjoy.
Printable Chicken Crochet Pattern
Purchase the ad-free PDF pattern with easy to follow instructions and extra photos.
Just want the free option? Keep scrolling!
Chicken Crochet Pattern: Step-by-Step Instructions
You can find the free crochet pattern below. I have included lots of photos to make it easier for you to follow the detailed instructions. Some sections of the pattern also include step-by-step video tutorials needed for that specific part of the pattern.
Wings
Yarn color: yellow
Construction: crochet from the bottom of the wing upwards
Make two wings
R1: MR – 6 x SC into the ring {6} – watch this video tutorial on How to crochet a magic ring
R2: INC in each ST around {12}
R3: SC in each ST around {12}
R4: (SC in next ST, INC) x 6 {18}
R5: SC in each ST around {18}
R6: SC in next ST, INC, (SC in next 2 STs, INC) x 5, SC in next ST {24}
R7-R14 (8 rounds): SC in each ST around {24}
R15: SC in next ST, INV DEC, (SC in next 2 STs, INV DEC) x 5, SC in next ST {18} – watch this video tutorial on How to crochet an invisible decrease
R16-R17 (2 rounds): SC in each ST around {18}
R18: SC in next 2 STs, INV DEC, (SC in next 4 STs, INV DEC) x 2, SC in next 2 STs {15}
R19: SC in each ST around {15}
R20: SC the opening together to close the wing, do not stuff {7} – watch this video tutorial on How to close a hole in a flat Amigurumi piece
FO and weave the yarn tail in
Mystery Crochet Along
Join our free crochet along and unravel the mystery as you stitch along with other fellow crocheters.
Toes
Yarn color: orange
Construction: first crochet three separate toes and then connect them together to finish the foot
Make 3 toes for each foot
R1: MR – 6 x SC into the ring {6}
R2: (SC in next 2 STs, INC) x 2 {8}
R3: SC in each ST around {8}
1st and 2nd toe: INV FO and leave a yarn tail for sewing – watch this video tutorial on How to crochet an invisible fasten off
Insert a stitch marker in the first stitch of R3 as you will need to refer to it later.
3rd toe: do not FO and leave your hook in after R3
Do not stuff the toes at this stage.
Continue with R4 as described in the ‘Feet’ section of this pattern.
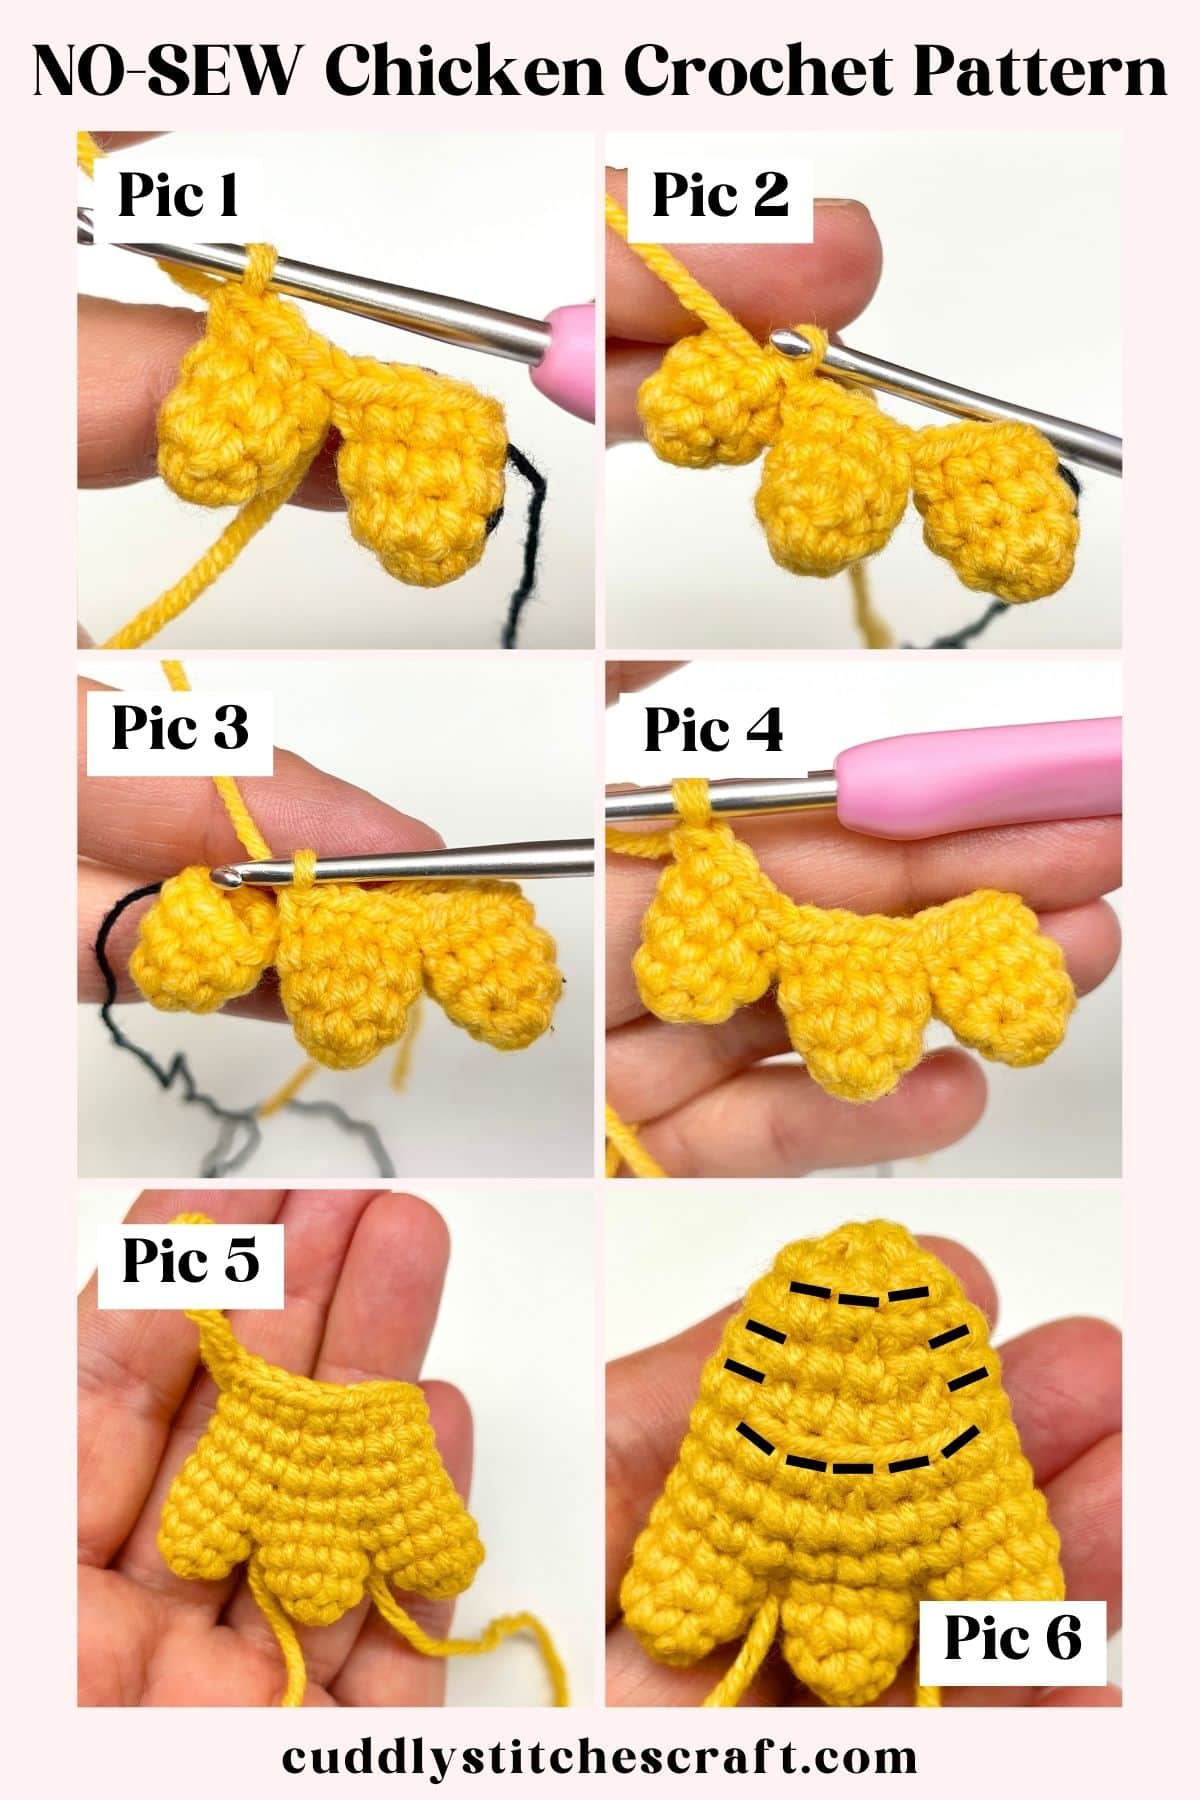
Feet
Yarn color: orange
Construction: join the toes together to make a foot
Watch this video tutorial on How to join toes in Amigurumi – the final stitch count is different for each toe in this video, so follow the written pattern below. The technique stays the same.
R4: continue from where you finished with R3 in 3rd toe:
- SC in next 4 STs in 3rd toe
- insert your hook into the middle toe – the marked ST and SC, SC in next 3 STs (Pic 1)
- insert your hook into the last toe – the marked ST and SC (Pic 2), SC in next 7 STs
- insert your hook back into the middle toe and SC, SC in next 3 STs (Pic 3)
- insert your hook back into the original toe – 3rd toe and SC, SC in next 3 STs (Pic 4) {24}
- you have now joined the toes into one round and will continue crocheting the foot in continuous rounds from here.
R5: SC in next 3 STs, INV DEC, SC in next 2 STs, INV DEC, SC in next 6 STs, INV DEC, SC in next 2 STs, INV DEC, SC in next 3 STs {20}
You will notice you have small gaps in between the toes, you can pull the yarn tails out through these gaps and then will use these tails to sew the holes with a few stitches.
R6: SC in each ST around {20}
R7: SC in next 4 STs, INV DEC, SC in next 8 STs, INV DEC, SC in next 4 STs {18}
Start stuffing the toes and the foot
R8: SC in next 2 STs, SC in next 5 STs – BLO, SC in next 11 STs {18} (Pic 5)
R9: SC in next ST, SC in next ST – BLO, INV DEC, SC in next 3 STs, SC in next ST – BLO, INV DEC, SC in next 4 STs, INV DEC, SC in next 2 STs {15}
R10: SC in next ST, SC in next ST – BLO, SC in next ST, INV DEC, SC in next ST, SC in next ST – BLO, SC in next ST, INV DEC, SC in next 3 STs, INV DEC {12}
R11: SC in next 2 STs, SC in next 3 STs – BLO, SC in next 7 STs {12}
Stuff well, close the hole using a tapestry needle and weave the yarn tail in.
Watch this video tutorial on How to Close Amigurumi: Ultimate Finish Tutorial
You can now close the small gaps in between the toes using a yarn needle. Three or four stitches should do the trick and you can then weave the yarn ends in.
You should have 12 unworked front loop stitches on the top of the foot (Pic 6). You will now continue to crochet the leg into these as per the instructions in the ‘Legs’ section of this pattern.
Legs
Yarn color: orange
Construction: crochet the base of the leg into the unworked front loop stitches on top of the foot and then continue to crochet upwards
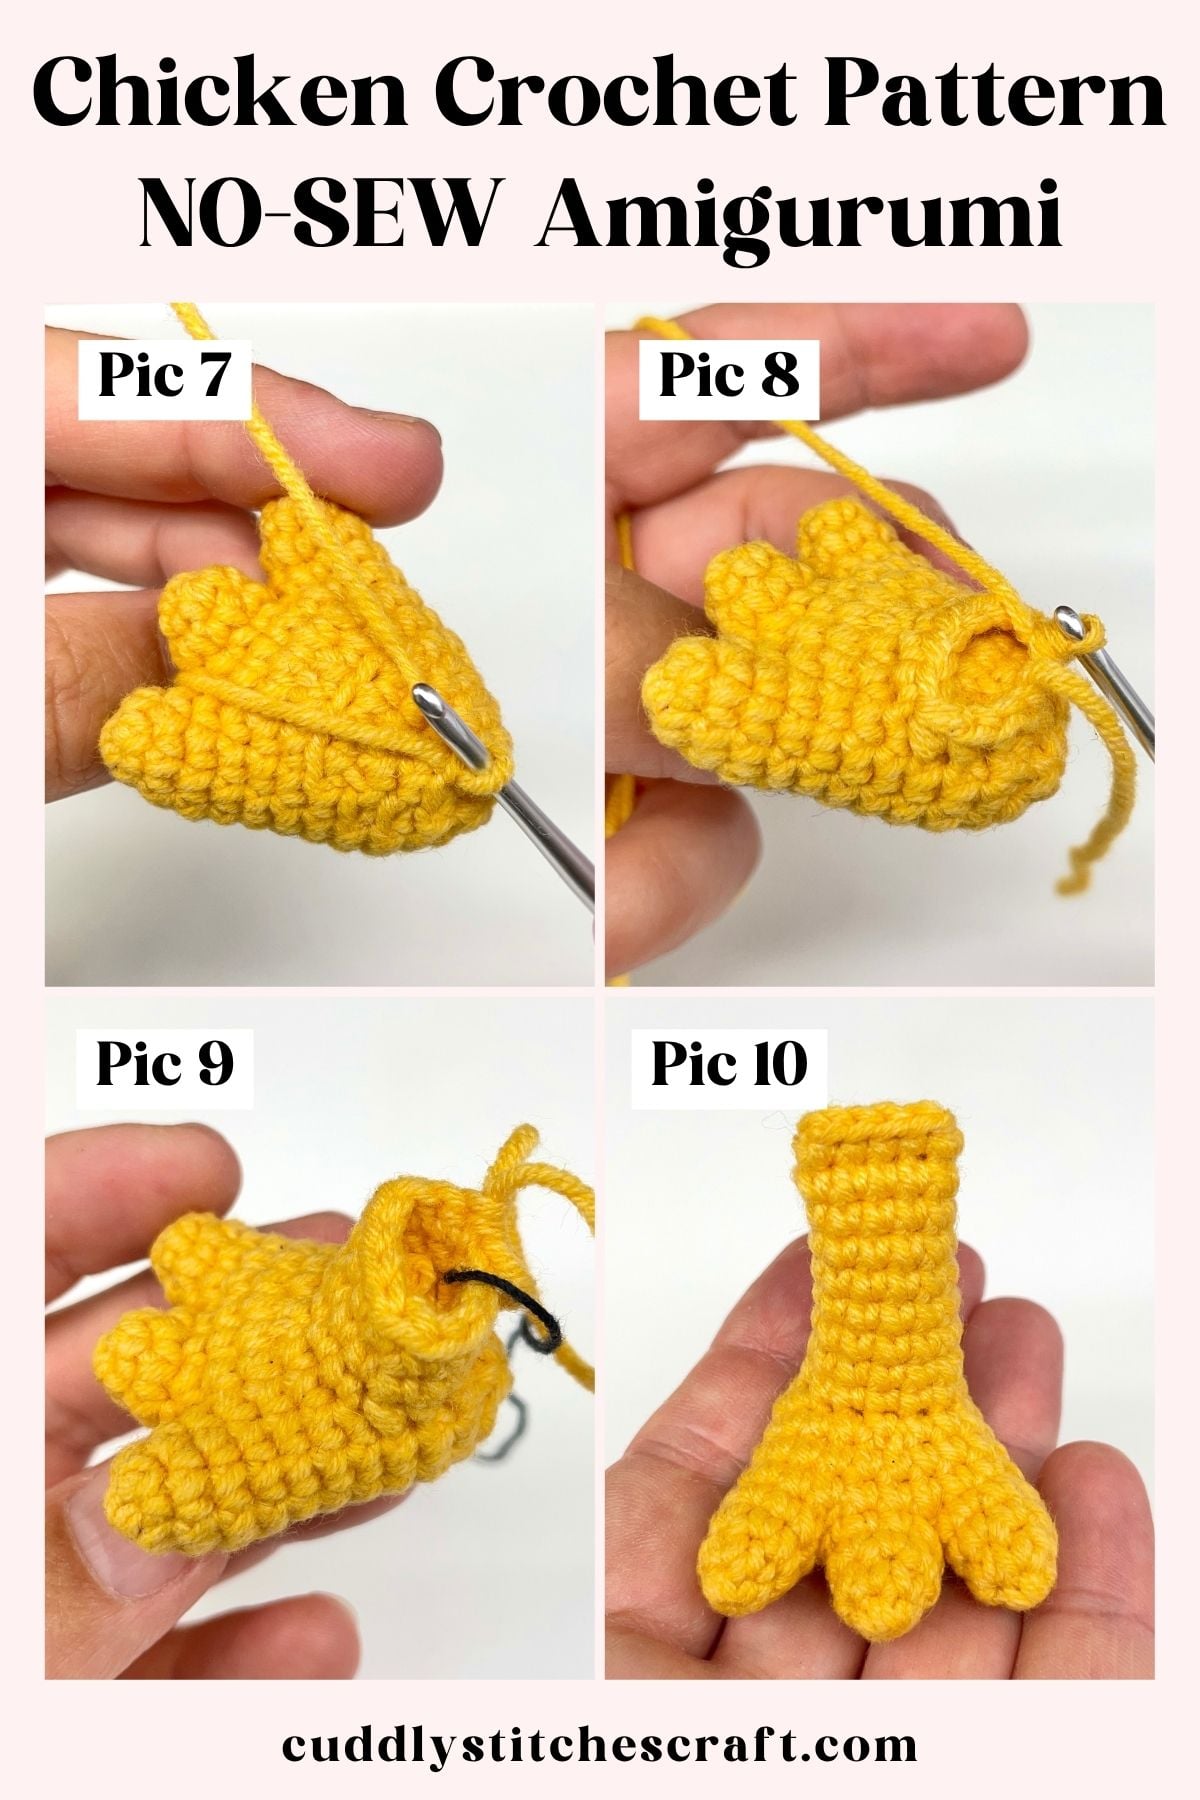
R1: hold the foot so you are facing the back of it
- insert your hook into the middle FL STs in R11, wrap a new strand of yarn around it, pull it through the FL ST (Pic 7) and CH 1x. This will count as your first ST in this round.
- continue to SC in each of the unworked FL STs on the top of the foot to create a round {12} (keep the yarn tail inside the leg). This will be the base of the leg (Pic 8).
R2-R3: (2 rounds): SC in each ST around {12} (Pic 9)
You can now weave the starting yarn tail in
R4: INV DEC, SC in next 10 STs {11}
R5-R6: (2 rounds): SC in each ST around {11}
R7: INV DEC, SC in next 9 STs {10}
R8: SC in each ST around {10}
Stuff the leg half way up
R9: SC in next 4 STs and then SC the opening together to close the leg {4}
FO and weave the yarn tail in (Pic 10)
Beak
Yarn color: orange
Construction: crochet from the tip of the beak towards the head
R1: MR – 6 x SC into the ring {6}
R2: (SC in next ST, INC) x 3 {9}
R3: SC in next ST, INC, (SC in next 2 STs, INC) x 2, SC in next ST {12}
R4: (SC in next 3 STs, INC) x 3 {15}
R5: SC in next 2 STs, INC, (SC in next 4 STs, INC) x 2, SC in next 2 STs {18}
Mark the last ST of R5 with a stitch marker as you will need to refer to it later on.
INV FO, do not stuff, weave the yarn end in.
Explore My Popular Pattern Bundles!
Get Lifetime Access to All Patterns!
Don’t miss out on this fantastic offer! Get unlimited access to all of my printable crochet patterns.
Head
Yarn color: yellow
Construction: crochet from the top of the head towards the neck
R1: MR – 6 x SC into the ring {6}
R2: INC in each ST around – in BLO {12} – you will have 6 unworked front loop stitches left on the top of the head
R3: (SC in next ST, INC) x 6 {18}
R4: SC in next ST, INC, (SC in next 2 STs, INC) x 5, SC in next ST {24}
R5: (SC in next 3 STs, INC) x 6 {30}
R6: SC in next 2 STs, INC, (SC in next 4 STs, INC) x 5, SC in next 2 STs {36}
R7: (SC in next 5 STs, INC) x 6 {42}
R8: SC in next 3 STs, INC, (SC in next 6 STs, INC) x 5, SC in next 3 STs {48}
R9: (SC in next 15 STs, INC) x 3 {51}
R10-R14 (5 rounds): SC in each ST around {51} – leave a stitch marker in at the beginning of R14 as you will need to refer to it later
R15: SC in next 8 STs, INC, (SC in next 16 STs, INC) x 2, SC in next 8 STs {54}
R16: (SC in next 5 STs, INC) x 9 {63}
R17: SC in next 3 STs, INC, (SC in next 6 STs, INC) x 8, SC in next 3 STs {72}
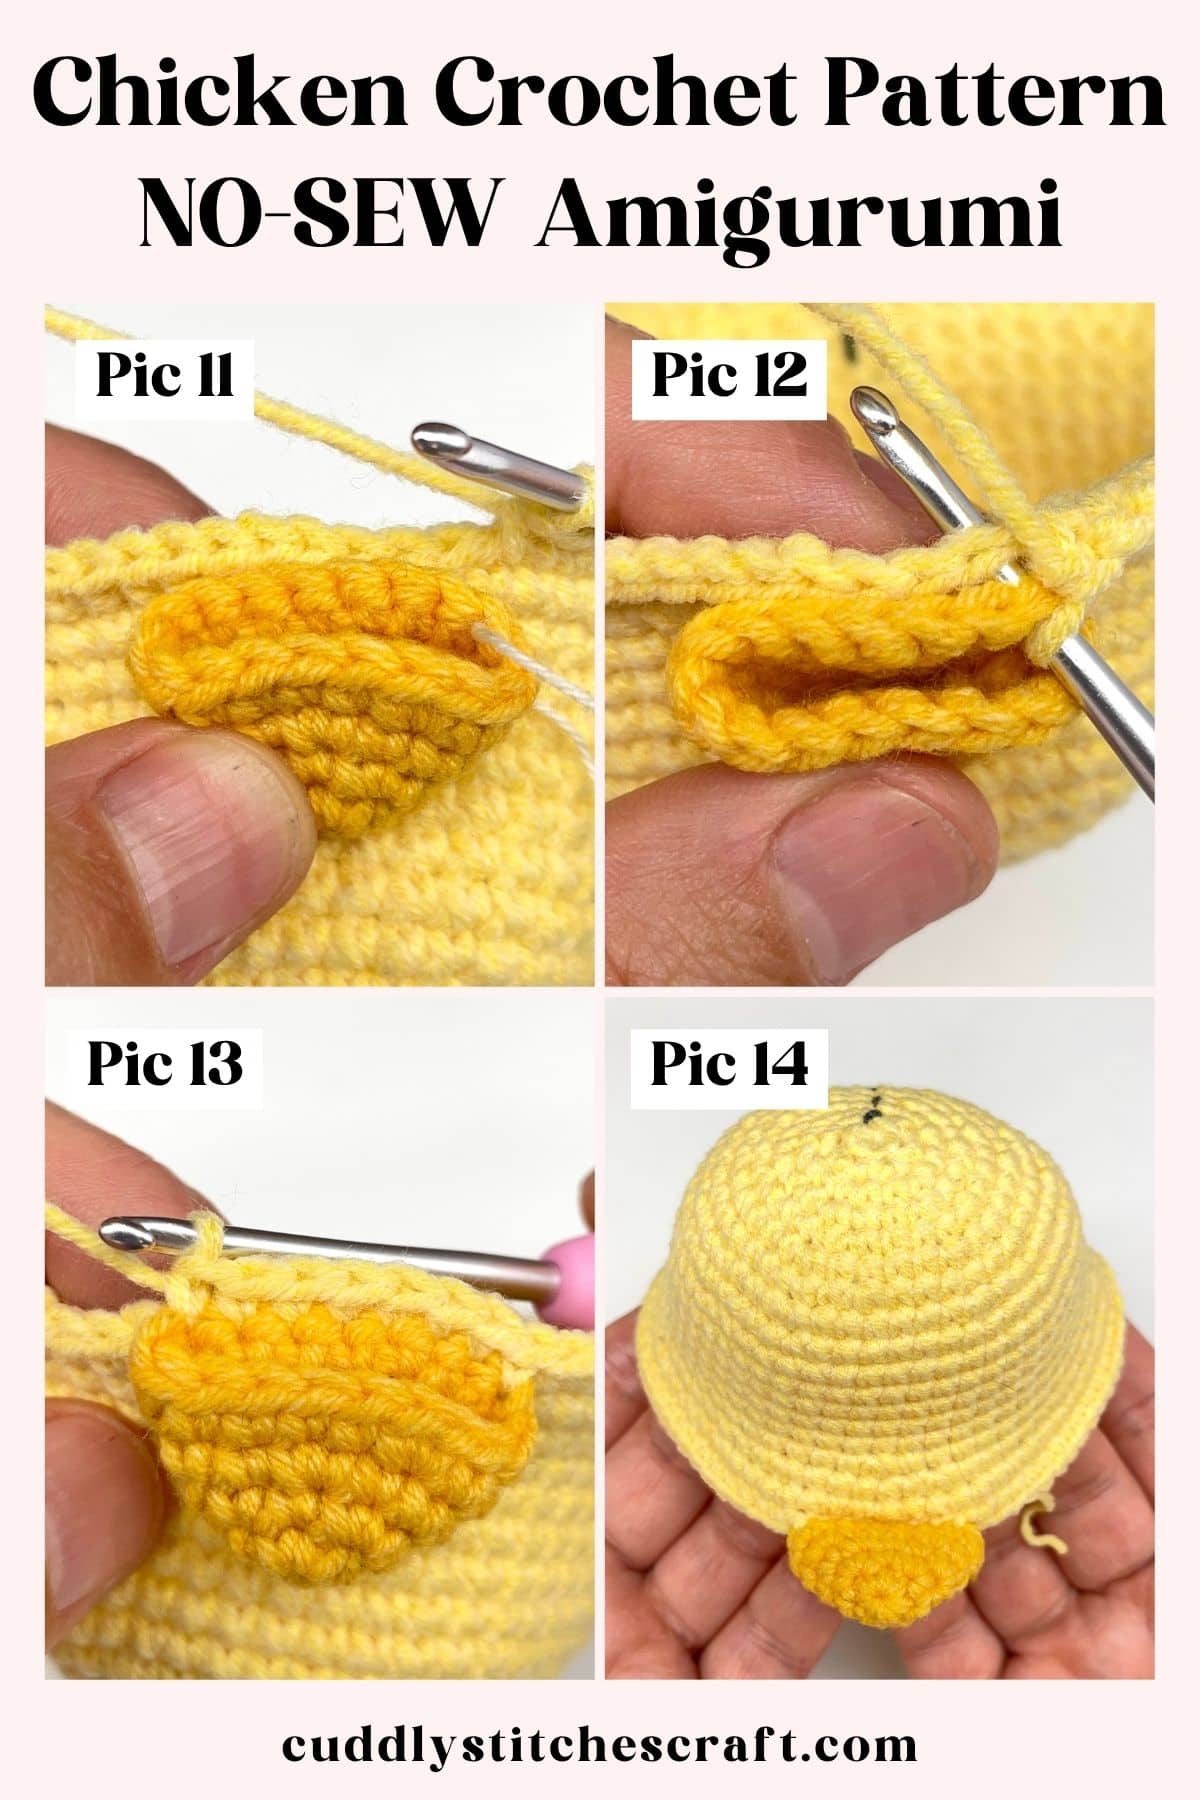
R18: You will attach one half of the beak to the head in this round:
- SC in next 32 STs of the head
- place the beak onto the head making sure the stitch with the stitch marker is on the right hand side (Pic 11)
- insert your hook into the marked ST on the beak and then into the next ST of the head (Pic 12) and SC
- insert your hook into the next ST of the beak and then into the next ST of the head and SC
- continue attaching the beak in the same way across the next 6 STs
- you should now have one half of the beak attached to the head with 8 STs in total (Pic 13)
- continue to SC in next 32 STs of the head only {72} (Pic 14)
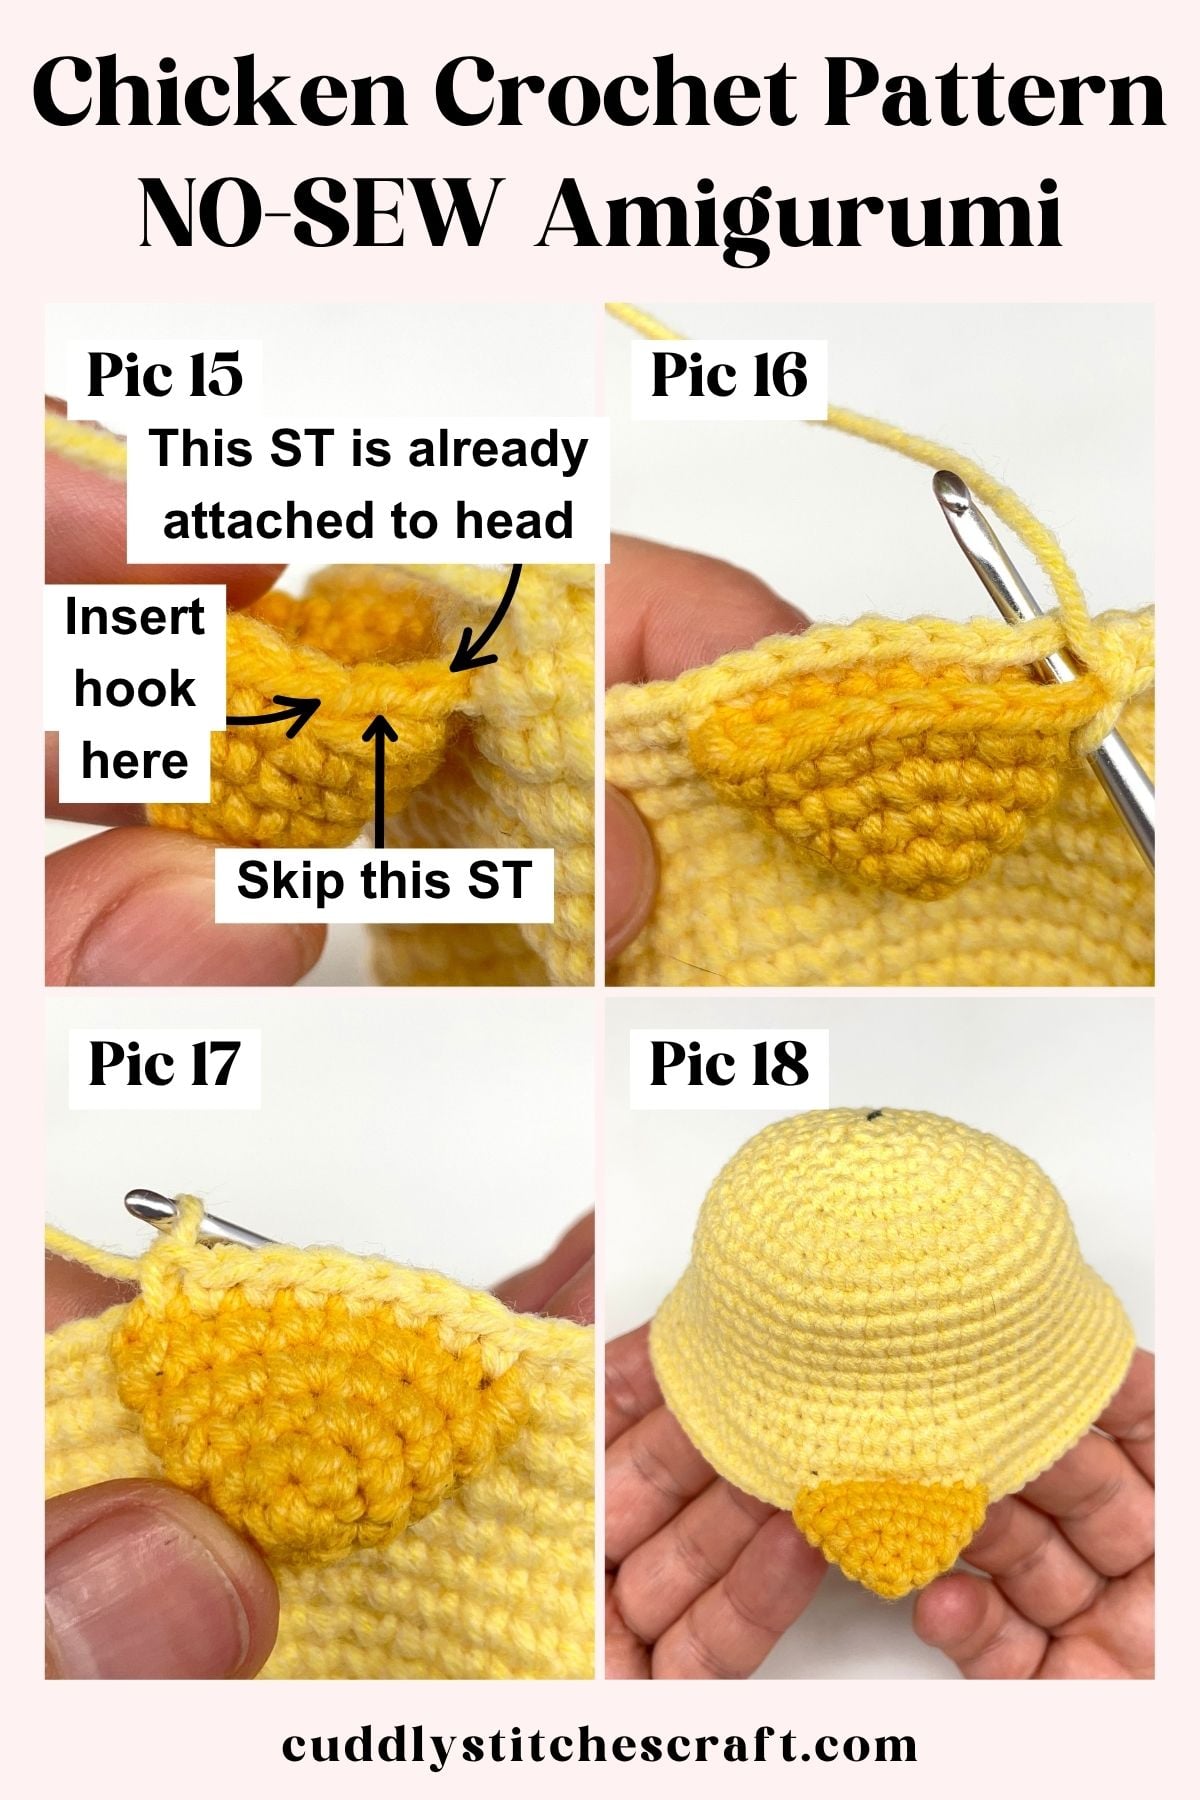
R19: You will attach the other half of the beak to the head in this round:
- SC in next 32 STs of the head
- you need to leave one unworked stitch on the side of the beak so insert your hook into the stitch shown in Pic 15, then insert your hook into the next ST on the head (Pic 16) and SC
- insert your hook into the next ST of the beak and then into the next ST of the head and SC
- continue attaching the beak in the same way across the next 6 STs
- you should now have the other half of the beak attached to the head with 8 STs in total (Pic 17)
- continue to SC in next 32 STs of the head only {72} (Pic 18)
- you should have the beak attached to the head with 1 unworked stitch on each side of the beak
R20-R21 (2 rounds): SC in each ST around {72}
You can now place the safety eyes between rounds R14 and R15:
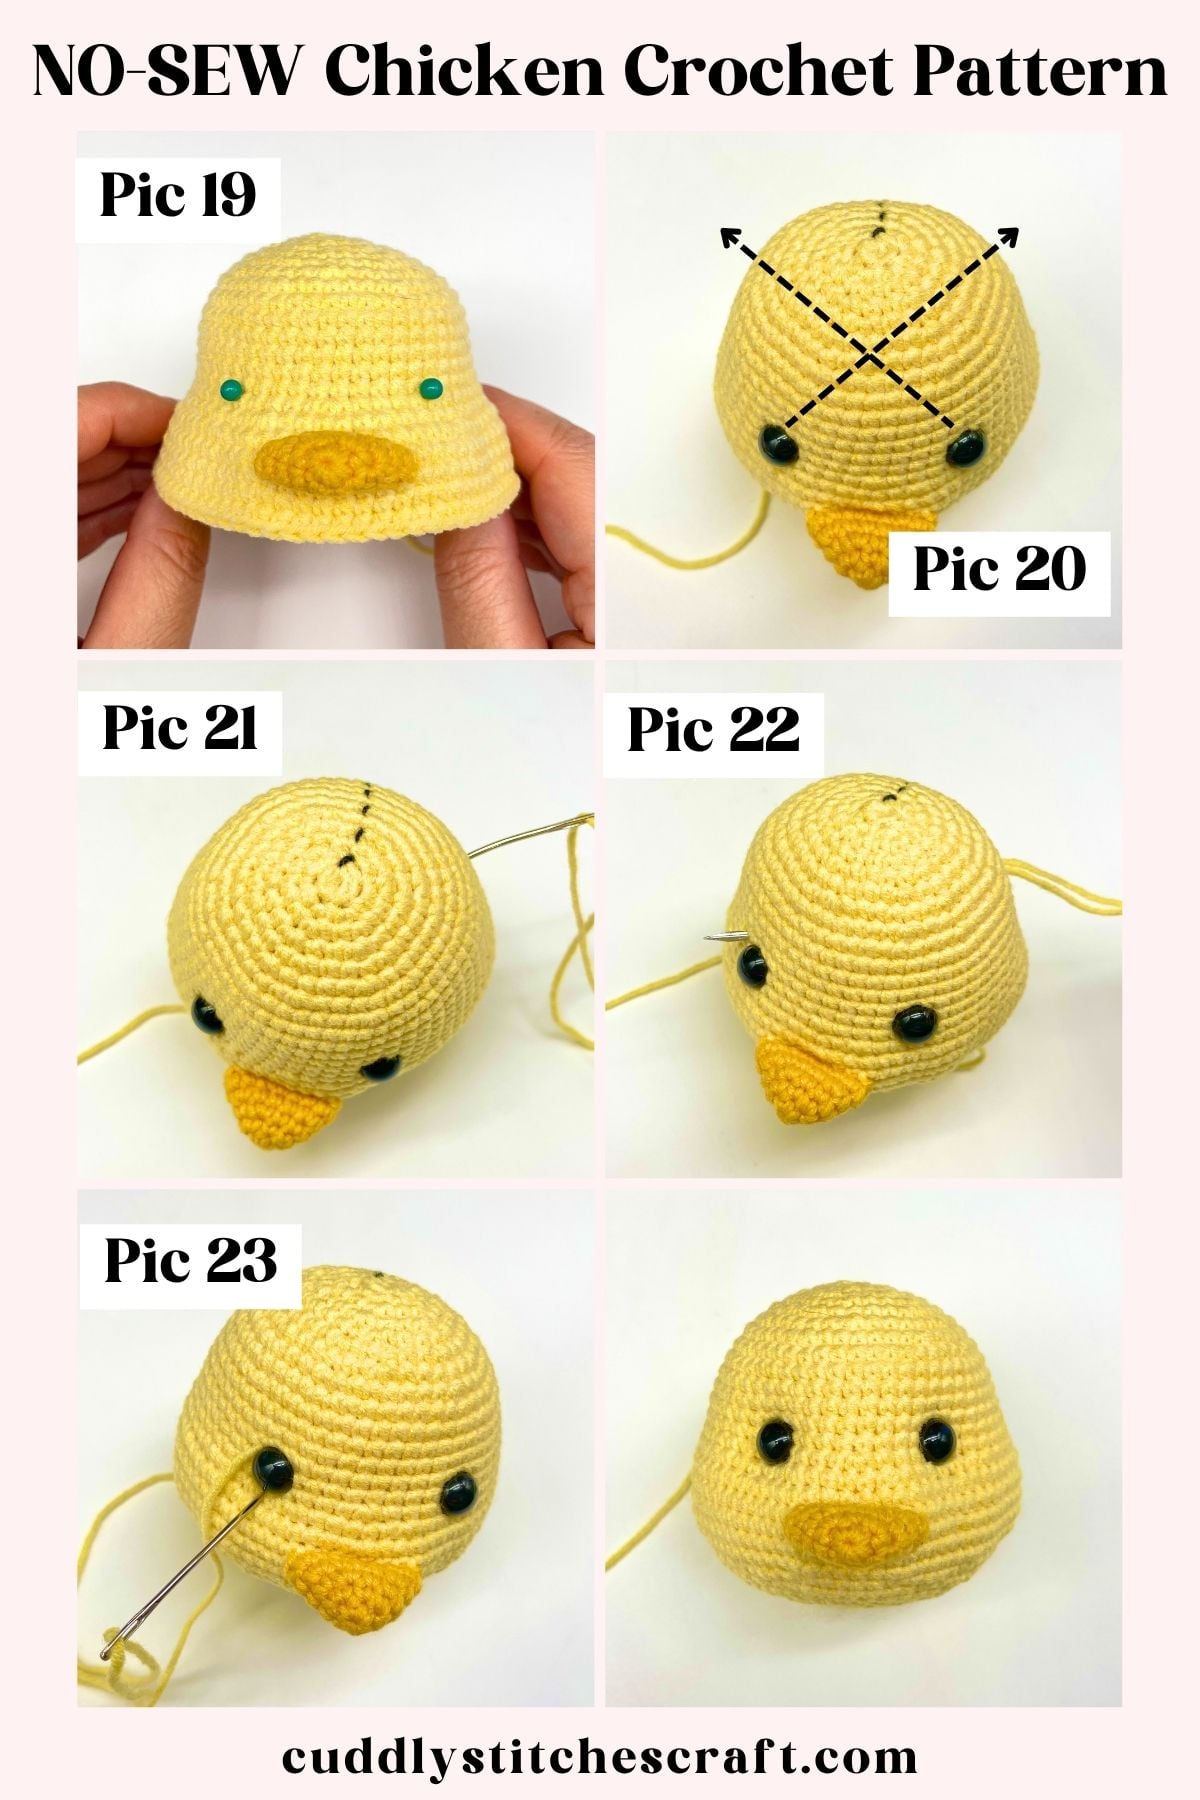
– it helps to use pins with large heads to first mark the spots where the eyes will be placed – decide if you are happy with the placement and if it looks symmetrical before you insert the safety eyes (Pic 19)
– 1st eye – count first 20 STs from the beginning of R14 and place the eye between ST20 and ST21
– 2nd eye – count first 30 STs from the beginning of R14 and place the eye between ST30 and ST31
– check if you are happy with the look and that the beak is centred between the eyes; adjust the placement of the eyes if necessary
– place the safety backs on and continue to crochet R22
R22: SC in next 2 STs, INV DEC, (SC in next 4 STs, INV DEC) x 11, SC in next 2 STs {60}
R23: SC in next 4 STs, INV DEC, (SC in next 8 STs, INV DEC) x 5, SC in next 4 STs {54}
R24: (SC in next 7 STs, INV DEC) x 6 {48}
R25: SC in next 3 STs, INV DEC, (SC in next 6 STs, INV DEC) x 5, SC in next 3 STs {42}
R26: (SC in next 5 STs, INV DEC) x 6 {36}
Start stuffing the head
R27: (SC in next ST, INV DEC) x 12 {24}
R28: SC in next 3 STs, INV DEC, (SC in next 6 STs, INV DEC) x 2, SC in next 3 STs {21}
Stuff the head well
Do not FO or cut the yarn off as you will continue to crochet the body from here.
You can now sculpt the eyes (indented eye look):
– watch this video tutorial on How to indent eyes in Amigurumi – use method 2 shown in the video, but instead of sculpting from eye to eye, sculpt each eye individually by pulling it diagonally towards the back of the head (Pic 20)
– insert your needle into any ST on the back of the head (Pic 21) and bring it out through a ST right next to the eye (Pic 22). Leave a long tail at the back of the head.
– if the safety backing makes this difficult, bring the needle out slightly away from the eye, then insert it closer to the eye as shown in the video
– insert the needle into another ST next to the eye (Pic 23), then bring it back out through the same ST on the back of the head. Pull the yarn tight.
– repeat the previous steps until you achieve the desired indented look. Always insert and exit through the same ST on the back of the head.
– to finish, bring the needle out through the same ST on the back of the head, tie the yarn tails into a double knot, then pull the knot inside the head through the same ST.
– repeat for the other eye
– if the back of the head loses its shape after sculpting, add extra stuffing to reshape it
Body
Yarn color: yellow
Construction: continue from where you finished with the head at R28 and crochet towards the bottom of the body
R29: SC in next 3 STs, INC, (SC in next 6 STs, INC) x 2, SC in next 3 STs {24}
R30: (SC in next ST, INC) x 12 {36}
R31: SC in each ST around {36}
R32: (SC in next 5 STs, INC) x 6 {42}
R33: SC in next 3 STs, INC, (SC in next 6 STs, INC) x 5, SC in next 3 STs {48}
R34: you will attach the wings to the body in this round – watch this video tutorial on How to attach arms to your Amigurumi toy without sewing. In this video, I attach arms to the body but the technique is the same.
- SC in next 13 STs
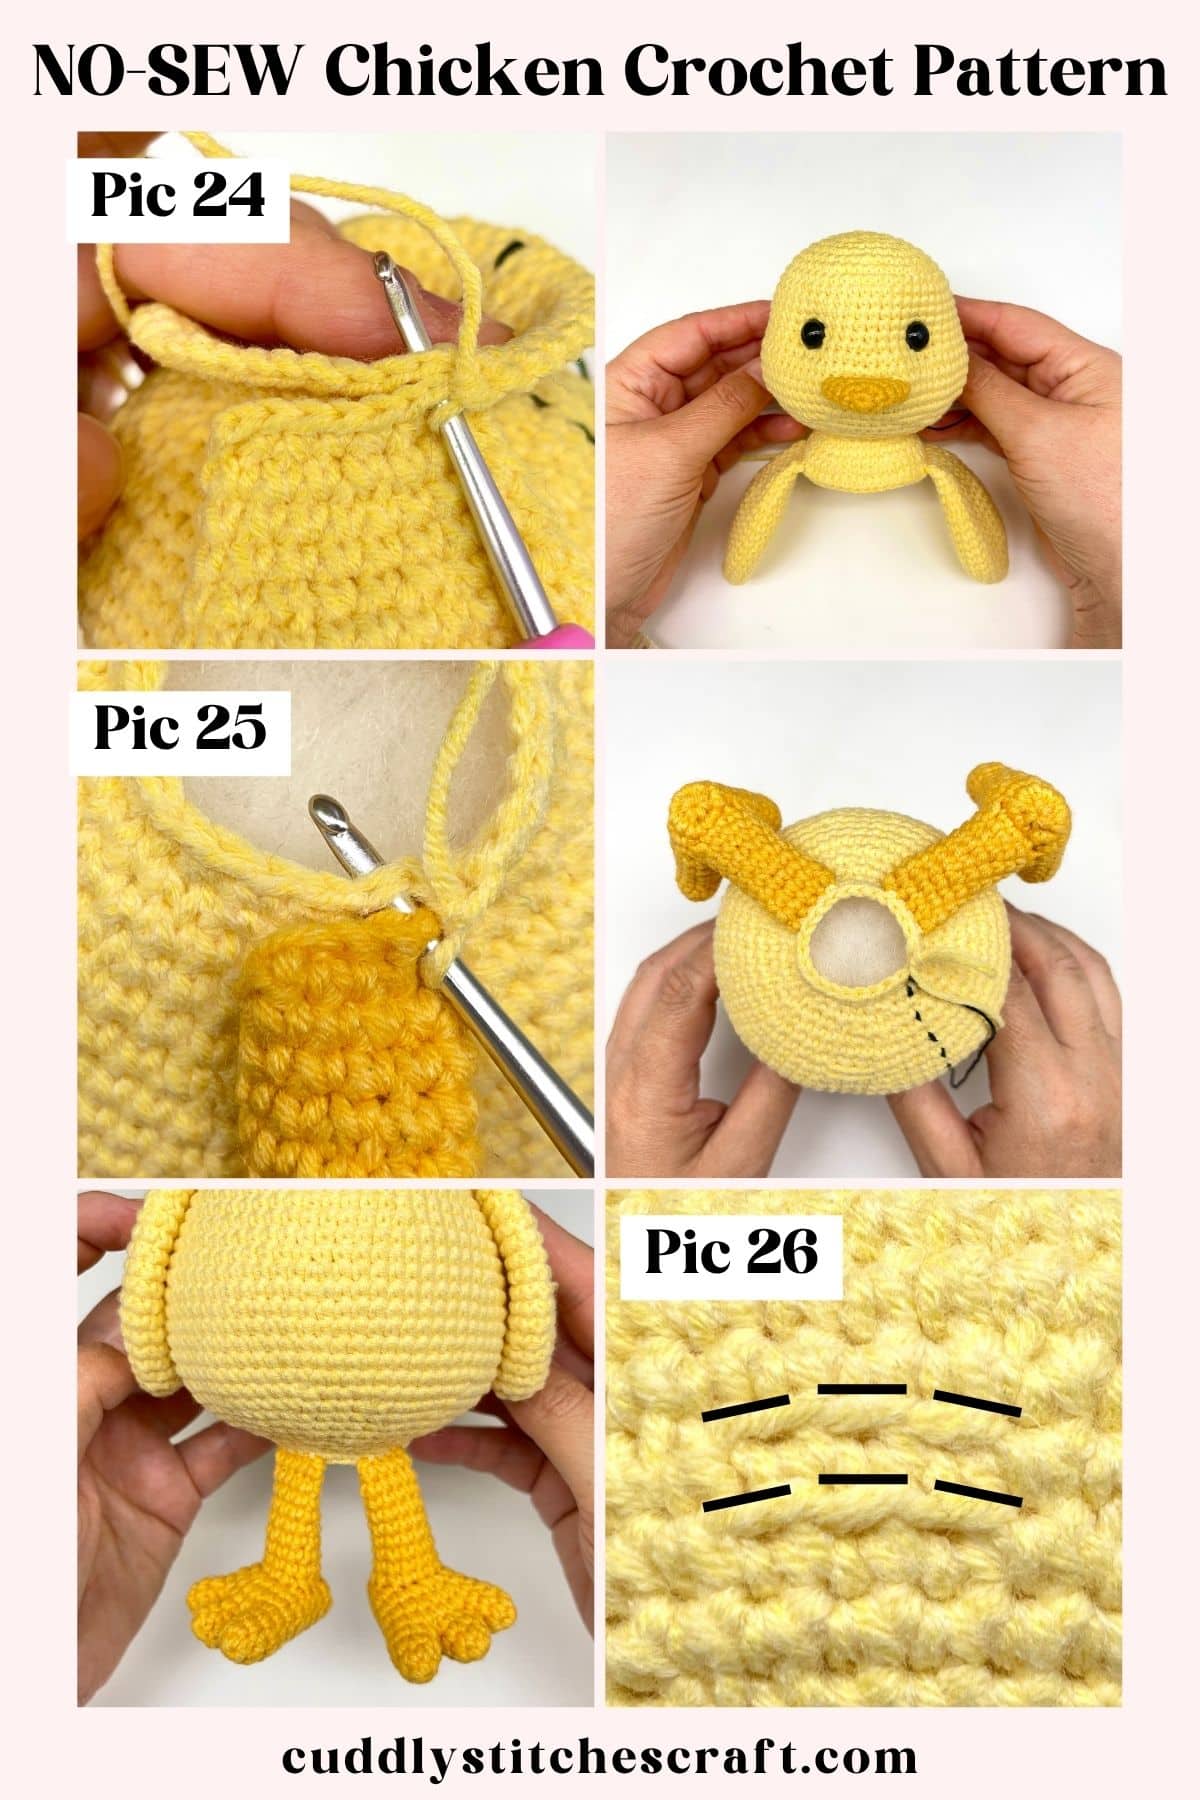
- attach the first wing: SC in next 7 STs (Pic 24)
- SC in next 17 STs
- attach the second wing: SC in next 7 STs
- SC in next 4 STs {48}
Note: if the wings don’t line up neatly with the eyes and beak, you may need to move them one or two stitches to the right or left. This can happen due to variations in yarn tension or individual crochet technique.
R35: (SC in next 7 STs, INC) x 6 {54}
R36: SC in each ST around {54}
R37: SC in next 4 STs, INC, (SC in next 8 STs, INC) x 5, SC in next 4 STs {60}
R38-R39 (2 rounds): SC in each ST around {60}
R40: (SC in next 9 STs, INC) x 6 {66}
R41-R42 (2 rounds): SC in each ST around {66}
R43: SC in next 5 STs, INC, (SC in next 10 STs, INC) x 5, SC in next 5 STs {72}
R44-R49 (6 rounds): SC in each ST around {72}
R50: SC in next 5 STs, INV DEC, (SC in next 10 STs, INV DEC) x 5, SC in next 5 STs {66}
R51: (SC in next 9 STs, INV DEC) x 6 {60}
R52: SC in next 4 STs, INV DEC, SC in next 3 STs – BLO, SC in next 5 STs, INV DEC, (SC in next 8 STs, INV DEC) x 4, SC in next 4 STs {54}
R53: INV DEC, SC in next 3 STs, SC in next 3 STs – BLO, SC in next ST, (INV DEC, SC in next 7 STs) x 5 {48}
You should now have 6 unworked front loop stitches on the back of the body. (Pic 26) This is where you will crochet the tail so these front loops should be roughly centred between the wings.
R54: SC in each ST around {48}
You can now start stuffing the body
R55: SC in next 3 STs, INV DEC, (SC in next 6 STs, INV DEC) x 5, SC in next 3 STs {42}
R56: (SC in next 5 STs, INV DEC) x 6 {36}
R57: SC in next 2 STs, INV DEC, (SC in next 4 STs, INV DEC) x 5, SC in next 2 STs {30}
R58: (SC in next 3 STs, INV DEC) x 6 {24}
R59: you will attach the legs to the body in this round using the same technique you used for attaching the wings. Ensure that when attaching the legs, the front of the foot is facing down.
- SC in next 11 STs
- attach the first leg: SC in next 4 STs (Pic 25)
- SC in next 3 STs
- attach the second leg: SC in next 4 STs
- SC in next 2 STs {24}
Note: if the legs don’t line up neatly with the wings, you may need to move them one or two stitches to the right or left. This can happen due to variations in yarn tension or individual crochet technique.
R60: SC in next ST, INV DEC, (SC in next 2 STs, INV DEC) x 5, SC in next ST {18}
R61: (SC in next ST, INV DEC) x 6 {12}
R62: SC in each ST around {12}
Stuff well, close the hole using a tapestry needle and weave the yarn tail in
Watch this video tutorial on How to Close Amigurumi: Ultimate Finish Tutorial
Facial Features
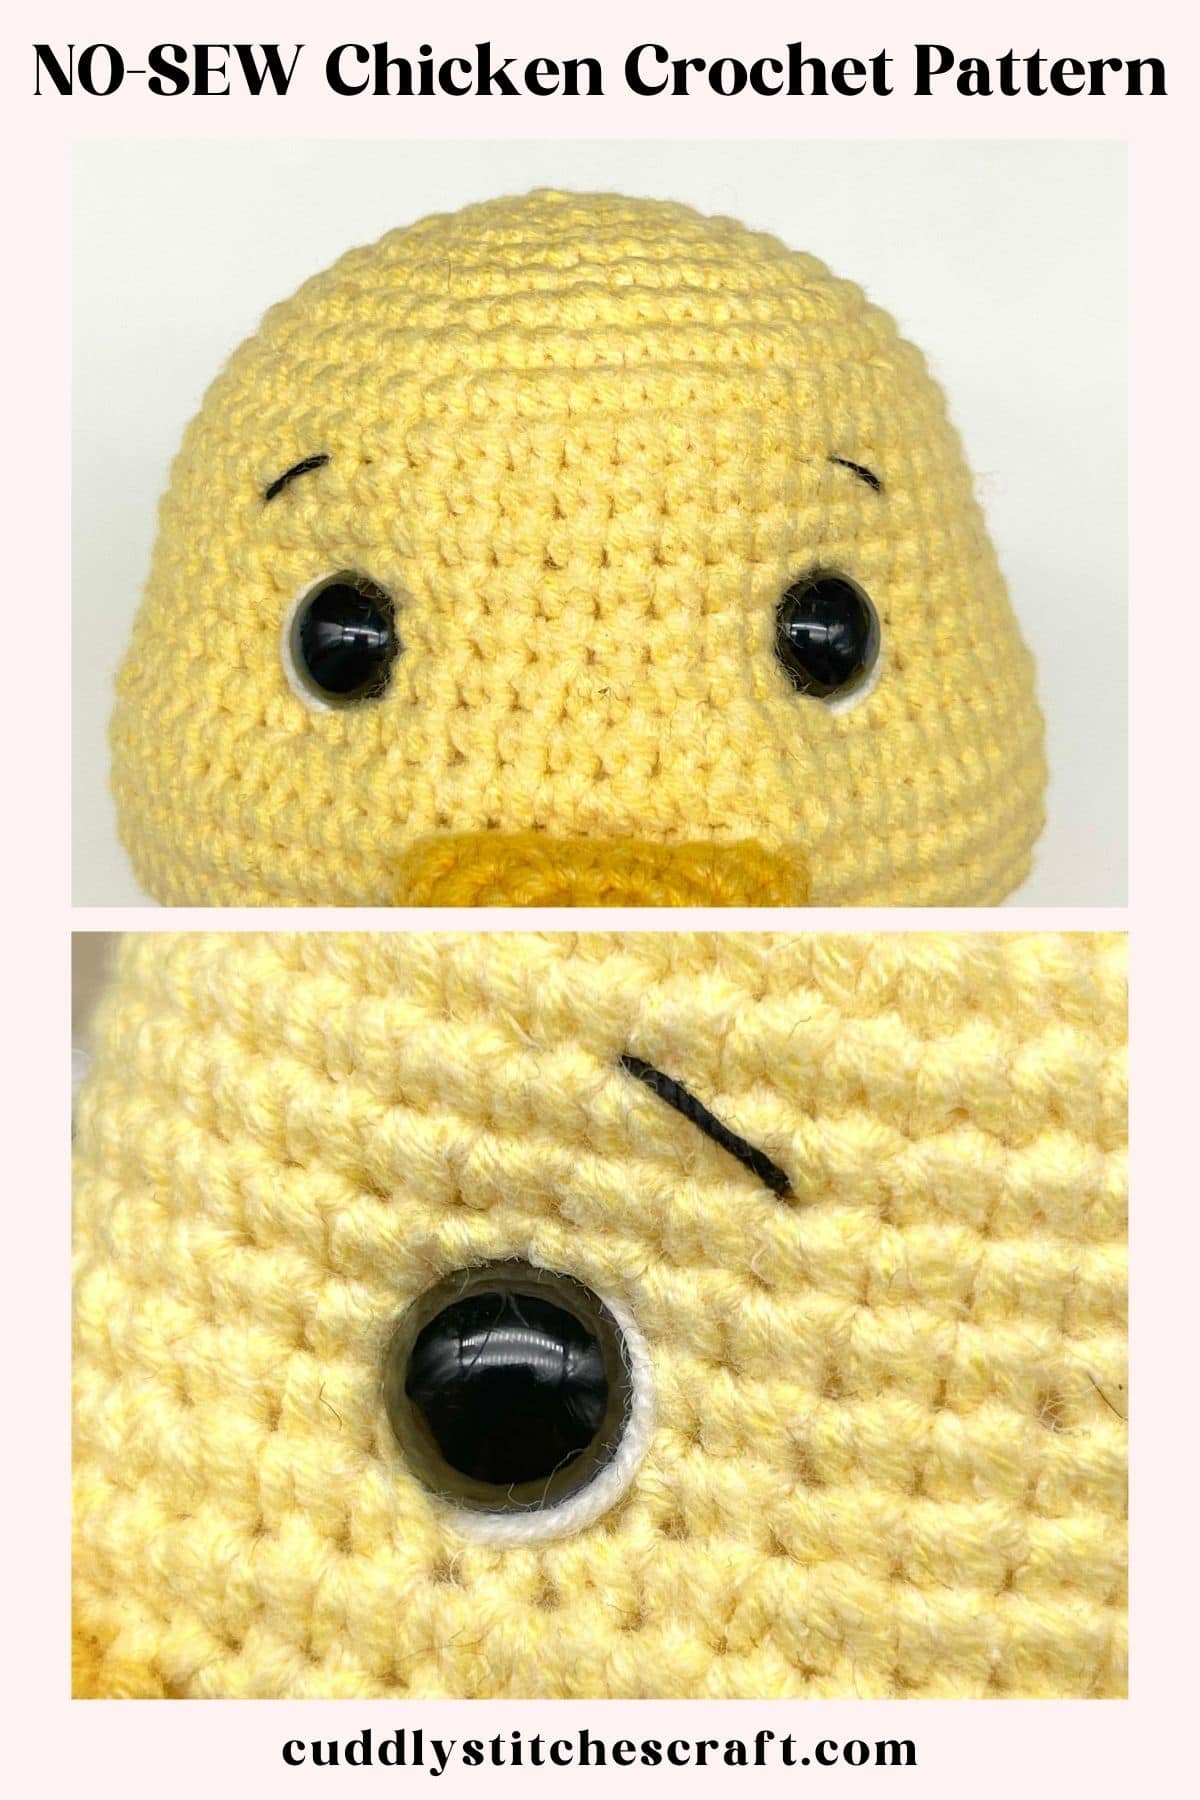
Eye brows: Embroider the eye brows using black thread embroidery yarn – about 30cm (12 inches). Mark the placement of the eye brows with pins first before you start embroidering. I embroidered the eye brows between R10 and R12 of the head; leaving 11 stitches between them. Watch this video tutorial on How to embroider nostrils on Amigurumi. It shows the same technique you can use for the eye brows too.
Eye detail around the eye: You can also embroider nice little details around the eyes using white yarn (about 30cm /12 inches) as shown in the photos below.
Hair
Yarn color: yellow
Construction: create the hair by crocheting chain loops into the unworked front loops on the top of the head
Tip: if you find it difficult to insert your hook into the front loops then use a slightly smaller hook instead but you may need to crochet more chains (e.g. 16 instead of 14) otherwise the loops may be too short.
Step 1: insert your hook into the first unworked front loop stitch, wrap a new strand of yarn around it, pull it through the loop and chain 1x
Step 2: chain 14x and SL ST into the same FL ST – that’s your first loop created
Step 3: SL ST into the next FL ST, chain 14x and SL ST into the same FL ST – that’s your second loop created
Step 4: repeat the above step until you reach the end of the round with the unworked FL STs – you should have 6 loops of hair in total
Step 5: SL ST into the first unworked FL ST where you started and FO. Cut the yarn off.
Step 6: if you would like to close the little circle in the middle of the hair, you can pull the yarn tail through the bottom chains all the way round using a tapestry needle and then pull on the yarn tail tight to close it. Weave the yarn tails in.
Save 15% off all PDF patterns!
Sign up for my newsletter and receive a discount on all current and future patterns purchased on Etsy. Plus stay in the loop with updates on new designs, tutorials and special offers.
Tail
Yarn color: yellow
Construction: create the tail feathers by crocheting chain loops into the unworked front loops on the lower back, just like you did for the hair
Step 1: hold the chicken upside down and insert your hook into the first unworked front loop stitch in R52 of the body, wrap a new strand of yarn around it, pull it through the loop and chain 1x
Step 2: chain 20x and SL ST into the same FL ST – that’s your first loop created
Step 3: SL ST into the next FL ST in R52, chain 20x and SL ST into the same FL ST – that’s your second loop created
Step 4: repeat the above step until you have created a loop in each of the 6 FL STs in R52 and R53 – you should have 6 loops in total
Step 5: SL ST into the first unworked FL ST where you started and FO. Cut the yarn off.
Step 6: if you would like to close the little gap in the middle of the tail, you can pull the yarn tail through the bottom chains all the way round using a tapestry needle and then pull on the yarn tail tight to close it. Weave the yarn tails in.
And that’s it! 😊 I hope you had fun making this no-sew crochet chicken. If you’d like to make her a little friend, don’t forget to check out my adorable little chick crochet pattern too!
And if you enjoyed how simple and straightforward the assembly process was, be sure to check out these crochet toy patterns:
Explore More of My Free Amigurumi Patterns
If you like this free chicken crochet pattern free, you may also love these patterns. Why don’t you give them a try?!
NO-SEW duck crochet pattern
Free crochet bunny lovey pattern
Free crochet dinosaur pattern
Or explore more of my crochet farm animals patterns and create adorable and fun farm animals that are sure to capture the hearts of all ages!
Happy crocheting!
Frequently Asked Questions
Have a question? Why don’t you search for the answer in the FAQ below.
Yes, absolutely. My crochet animal patterns work great with a variety of different yarns including worsted weight yarn. Your crochet toy will just be a bit bigger than specified.
However, I wouldn’t use worsted weight yarn for making my loveys as they could feel a bit bulky. I prefer using thinner yarn such as Sport yarn #2 of Light worsted yarn #3 for a nice cuddly feel.
Having said that, my lovey patterns will absolutely work with worsted weight yarn if that’s the type of yarn you prefer using. But bear in mind that your loveys will be a bit bigger than specified in this pattern.
To find out more about the best yarn for making crochet toys have a read of my Best Yarn for Amigurumi Crochet tutorial.
I am very happy to help and provide support with any of my patterns. Visit my Contact page for different options on how to get in touch with me.
I would be very grateful if you could link to my patterns and tutorials on social media. But sharing of my actual written patterns on social media is strictly prohibited. For more details, have a read of my Copyright Policy.
You may sell finished items that you made using my Amigurumi patterns, provided you credit me as the original designer and provide a link back to my blog.
My free patterns are only available online on my blog and are not printable. If you would like to download a PDF version of my patterns then you can purchase them for a small fee from my Etsy store or Ravelry store.


Your Tiger pattern is the absolute best! Here in Baton Rouge, we love our Tigers! I made yours twice. I put a football in his paws and added a neck scarf with LSU initials on it. The first one was almost 20 inches tall and was sold at a charity fund raiser. The second one was about 11 inches tall and sits on a shelf at my son’s house. Each of them was a big hit! Your pattern was perfect! Thank you so very much for your generosity!
Wow, thank you so much for your lovely comment! 😊 I love that you personalized the tigers with a football and an LSU scarf — that sounds like such a fun touch! Congratulations on the fundraiser success too, it’s so rewarding to know one of my patterns helped support such a great cause. 🙂
Love,
Petra x