
This post may contain affiliate links, please read my full disclosure policy for more details.

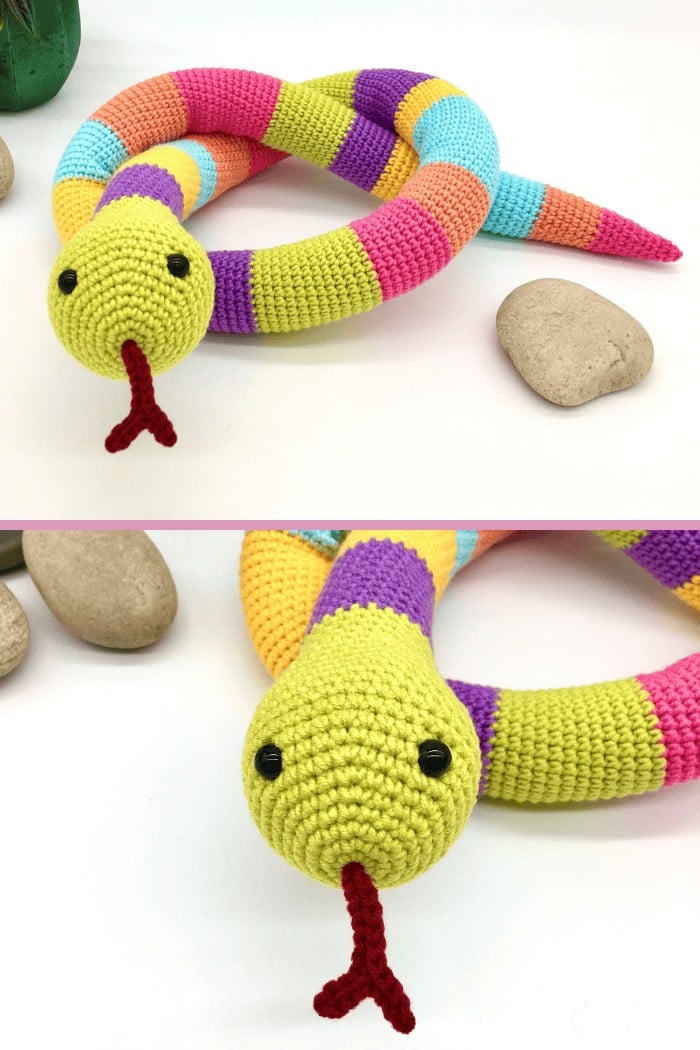
This free crochet snake pattern is an ideal project to start with for any Amigurumi beginner out there! Although snakes are known as cold blooded creatures, Sammy is warm at heart and would make a great gift to play with.
You just need to follow a few easy instructions and voila…you are done! 🙂 And if you wish to adjust the length of your snake, just add or remove a few rounds to make it your own.
Free Crochet Snake Pattern – Notes
Skill level: beginner crochet skills and knowledge
Finished size – length: 92cm / 35.5 inches
Finished size – height: 6cm / 2.5 inches
Free Crochet Snake Pattern – Materials and Equipment
Yarn I used:
– Fine Sport #2 = 4 ply
– 55% cotton and 45% acrylic
– 1x ball of green yarn – YarnArt Jeans – colour 29 – (50g/160m)
– 1x ball of purple yarn – YarnArt Jeans – colour 72 – (50g/160m)
– 1x ball of yellow yarn – YarnArt Jeans – colour 35 – (50g/160m)
– 1x ball of blue yarn – YarnArt Jeans – colour 76 – (50g/160m)
– 1x ball of orange yarn – YarnArt Jeans – colour 23 – (50g/160m)
– 1x ball of pink yarn – YarnArt Jeans – colour 42 – (50g/160m)
– 1x ball of red yarn – YarnArt Jeans – colour 66 – (50g/160m)
I like to purchase my YarnArt Jeans from Amazon or from Etsy. If you would like to check some great substitutes for YarnArt Jeans then have a read of my Best Yarn for Amigurumi Crochet tutorial. You can find the substitutes towards the end of the article.
Or just simply use any 100% cotton that will work just as well. You can also use 100% acrylic if you prefer to work with this type of yarn.
Other materials used: polyester fibre fill
Crochet hook: I used 3mm = C/2, if using different weight of yarn then refer to hook size recommendations on the yarn but go one size smaller. I highly recommend this ergonomic crochet hook set from Amazon as it comes in a stylish case and with other accessories such as stitch markers etc.
Other equipment used: scissors, yarn needle, pins with large heads, stitch marker or thin yarn to use instead, 8mm safety eyes
Choking hazard warning: the use of safety eyes or buttons poses a choking risk for children under the age of 3 therefore I recommend using embroidery instead.
Free Crochet Snake Pattern – Abbreviations Used
This pattern is written using US crochet terminology
MR: magic ring
ST: stitch
SC: single crochet stitch
HDC: half double crochet stitch
DC: double crochet stitch
CH: chain stitch
SL: slip stitch
INC: increase = two single crochet stitches in the same stitch
L INC: large increase = three single crochet stitches in the same stitch
INV DEC: invisible decrease = insert the hook into the front loop of the first stitch (two loops on hook) and immediately insert it again into the front loop of the next stitch (three loops on the hook). Yarn over and draw through the first two loops on the hook (two loops on the hook). Yarn over and draw through the two loops on the hook to finish your invisible decrease.
BLO: back loops only
FO: fasten off
(…..) x 6: repeat the pattern inside the brackets by the given number (in this example, repeat the pattern in the brackets 6 times)
{…}: number shown inside these brackets equals the number of total stitches at the end of each round
Free Crochet Snake Pattern – Let’s Get Started!
You may find these Amigurumi tutorials handy before you get started with this free crochet snake pattern. And don’t forget to watch my step by step video tutorials for extra help with my patterns.
To view the free online pattern, please continue to scroll down. You can also download the ad-free and printable version of this pattern for a small fee from my Etsy shop. Your generous contribution will help towards the cost of materials and running this website so I can continue to publish my free online patterns for everyone to enjoy.
Join our Cuddly Stitches Community Facebook group to share your creations, chat to fellow Amigurumi makers or to exchange tips and tricks. You can also share feedback and ask for support when working with my patterns.
Take advantage of this AMAZING OFFER…open an Etsy shop and list your first 40 items for FREE!

How to Crochet the Head and the Body
Starting from the front of the head to the tail.
R1: MR – 6 x SC into the ring {6} – watch this step by step video tutorial on How to crochet a magic ring for Amigurumi
R2: INC in each ST around {12}
R3: (SC in next ST, INC) x 6 {18}
R4: SC in each ST around {18}
R5: (SC in next 2 ST, INC) x 6 {24}
R6: (SC in next 3 ST, INC) x 6 {30}
R7: (SC in next 4 ST, INC) x 6 {36}
R8: SC in each ST around {36} – leave your marker in at the start of R8 in order to place the eyes later on
R9: (SC in next 5 ST, INC) x 6 {42}
R10-R12 (3 rounds): SC in each ST around {42}
R13: (SC in next 12 ST, INV DEC) x 3 {39} – watch this step by step video tutorial on How to crochet an invisible decrease for Amigurumi
R14: SC in each ST around {39}
R15: (SC in next 11 ST, INV DEC) x 3 {36}
You can now place the eyes:
– stuff the head well first
– place eyes between rounds R8 and R9
– first eye – count 12 stitches from your marker at the start of R8 and place the eye between ST12 and ST13
– second eye – count 22 stitches from your marker at the start of R8 and place the eye between ST22 and ST23
– it helps to use pins with large heads to first mark the spots where the eyes will be placed – you can make a decision whether you are happy with the placement and if it looks symmetrical before you insert the safety eyes; the safety eyes usually make a large hole in between the stitches so it is not recommended to change the placement of the eyes once they are in
– you can now insert the safety eyes and if you are happy with the way they look then pull the stuffing out and put the safety backs on
– stuff the head well again and continue crocheting R16
R16: SC in each ST around {36}
R17: (SC in next 4 ST, INV DEC) x 6 {30}
R18: SC in each ST around {30}
R19: (SC in next 3 ST, INV DEC) x 6 {24}
R20-R238 (219 rounds): SC in each ST around {24}
Change colour to:
– Purple after ST2 in R23
– Yellow after ST4 in R33
– Blue after ST7 in R44
– Orange after ST8 in R51
– Pink after ST10 in R61
– Green after ST13 in R74
– Purple after ST16 in R83
– Yellow after ST17 in R94
– Blue after ST18 in R99
– Orange after ST20 in R112
– Pink after ST21 in R119
– Green after ST23 in R127
– Purple after ST2 in R140
– Yellow after ST6 in R158
– Blue after ST10 in R171
– Orange after ST12 in R180
– Pink after ST15 in R191
– Green after ST18 in R205
– Purple after ST19 in R215
– Yellow after ST22 in R222
– Blue after R233
R239: (SC in next 6 ST, INV DEC) x 3 {21}
R240-R242 (3 rounds): SC in each ST around {21} – change colour to orange after ST1 in R242
R243: (SC in next 5 ST, INV DEC) x 3 {18}
R244-R246 (3 rounds): SC in each ST around {18}
R247: (SC in next 4 ST, INV DEC) x 3 {15}
R248-R250 (3 rounds): SC in each ST around {15} – change colour to pink after ST3 in R249
R251: (SC in next 3 ST, INV DEC) x 3 {12}
R252-R253 (2 rounds): SC in each ST around {12}
R254: (SC in next 2 ST, INV DEC) x 3 {9}
R255-R256 (2 rounds): SC in each ST around {9}
R257: (SC in next ST, INV DEC) x 3 {6}
R258: SC in each ST around {6}, close the hole with a needle and FO
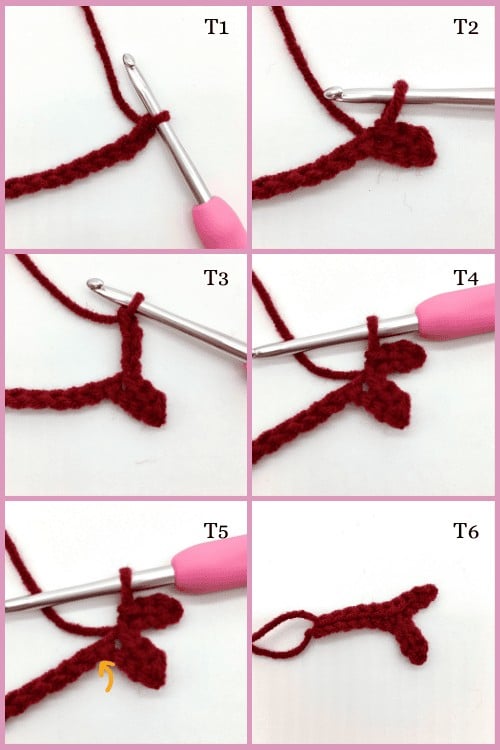
How to Crochet the Tongue
Step 1: Chain 10 (Pic T1)
Step 2: Slip stitch into 3 chains (starting from 2nd chain from the hook) (Pic T2)
Step 3: Chain 4 (Pic T3)
Step 4: Slip stitch into 3 chains – from the new chain (starting from 2nd chain from the hook) (Pic T4)
Step 5: Slip stitch into the remaining 6 chains from the original chain (Pic T5 & T6)
Step 6: FO and leave a long tail for sewing
Step 7: Sew the tongue to the head through the MC
You have now finished your crochet animal. And if you enjoyed the easy no-sew assembly then you will love these patterns:
No-Sew Amigurumi Crochet Patterns
Low-Sew Amigurumi Crochet Patterns
Explore More of My Free Amigurumi Crochet Patterns
If you like this free crochet snake pattern, you may also love these patterns. Why don’t you give them a try?!
Free crochet fox pattern
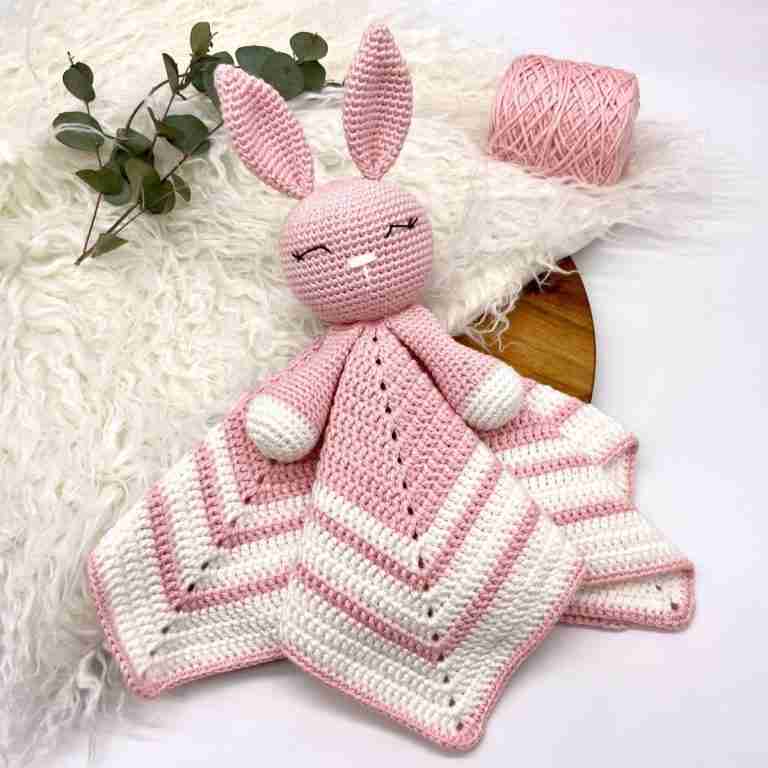
Free crochet bunny lovey pattern
Free crochet dinosaur pattern
Or explore more of my crochet forest animals patterns. And create adorable woodland characters that are perfect if you want to create something cute and unique for your loved ones!
Happy crocheting!


Hello, I am using your snake pattern to finish my 2023 Temp blanket. I’m just working on the heads and I bought some eyes from Hobby Lobby. I can’t get the ends on past the ridges. I thought it would stay on , but it wouldn’t. I guess I could glue it. Any other ideas?
Hi Ella,
Yes, sometimes the backings are really difficult to put on but you can use a straw to help to push them in place. Otherwise you can always use hot glue gun to glue them on from the inside or use a lighter to melt the end of the eyes and push it flat while it’s still on.
Hope this helps but please let me know if you have more questions.
Love,
Petra x
Hello,
I can’t find the free download pattern. Will you please send me the link?
Thank you
Paula
Hi Paula, my patterns are only available for free online. If you would like to download my patterns as a PDF then you can purchase them for a small fee from my Etsy store here:
https://cuddlystitchescraft.etsy.com
Thank you.
Love, Petra x
Hi! I saw this picture, and was so excited to make it that i went right to it. Somehow in my excitement i crocheted almost 7 feet of snake only to find out i started at the tail. Huh? I don’t know how i managed it, but i did. Sooo I’m so flustered right now, i cannot figure out how to continue with the head. Perhaps you could tell me at which row i should start (and go backward) to crochet the head from neck to tongue. Any tips and guidance will be greatly appreciated as i’m sooooooo close to finishing. Thank you so much for the cutest snake pattern EVER!!! Next time, i’ll start at the proper end! i plan on making several! 🙂
Hi Debbie, I am so pleased you like my snake pattern but it’s so funny you managed to start from the tail rather than the head end! 🙂 But not to worry, there is a way around it. 🙂 Once you have achieved the length you are after, go to R19 and follow the instructions going backwards from R19 to R1 in the pattern, except you will do INC instead of INV DEC and you will do INV DEC instead of INC. In R1, just single crochet all the way round and close the hole with a needle.
I hope this helps but please let me know if you have more questions. 🙂
Love, Petra x
Thanks for the pattern!
I was just looking for a snake head really, because the snake body will be my color change practice, but this is really easy to follow, turned out well, and I love the little tongue :).
Hi Trish, thank you so much for your comment. Really happy to hear you like my snake pattern and it’s tongue! 🙂
Love, Petra x
Hi Petra!
Having such fun using this as my “learn to crochet” project! As my grandson is obsessed with the idea of venomous snakes, I looked up a colourful, venomous snake and found the coral snake. Then I started to follow your pattern, but in colours and pattern to approximate that of a coral snake. As I go, I am varying from the single crochet to other stitches and slowly figuring them all out. I find if I stuff the white stuffing into cheap black socks before stuffing them into the snake, the black looks better where it shows through the pattern and it doesn’t allow any stuffing to poke out. Unfortunately, I didn’t figure this out until it was too late to stuff the head and the first few colours. Still, it is coming along nicely and I am getting a kick out of learning my stitches, increases and decreases in a forgiving pattern that allows me to make mistakes without it mattering too much.
Hi Donna, thank you for your comment. I am really pleased to hear you are having fun crocheting my snake and learning lots of new techniques. 🙂
And yes, inserting the stuffin into a stocking first definitelly helps if you have larger gaps in your work. 🙂 I am sure your grandson loves the snake you made for him! 🙂
Love, Petra x
Love this pattern. Can’t wait to get started. I am thinking of using yarn that is self stripped or variegated Like Jeans Tropical or Jeans crazy. How many balls of yarn should I get? thanks
Hi Marilou, I think YarnArt Jeans Tropical and Crazy will look really nice. I used them both before. To make the snake I think you will need 2-3 balls (50g each).
I hope this helps!
Love, Petra 🙂
thanks so much. I will probably make several of your patterns. great job!
Hi Marilou,
Thank you so much for your lovely comment! 🙂 I hope you enjoy my patterns!
Love, Petra 🙂
How did you make your snake bendable? I stuffed the body lightly, so I’m wondering if I should use something like hair curlers for flexibility? Thank you for the pattern, by the way!
Hi Jane,
thank you for your comment. The snake needs to be really long to bend and also it helps to stuff it quite well as it keeps the shape better that way.
And of course you can use hair curlers or craft wire if you wish.
I hope this helps but please let me know if you have more questions.
Love, Petra
Thank you so much!! I noticed that the longer it gets, the more bendy it becomes, so that helps out! Have a great day! 😁
Hi Jane, that’s great. I am really pleased the snake is now more flexible. Thank you and have a nice day also!
Love, Petra 🙂
I am very new to crochet and I wanted to thank you for not only a free pattern but also a very well written, easy to follow, pattern! Again Thank You!
Hi Heather, thank you so much for your lovely comment! 🙂 I am very happy you liked the pattern and found it easy to follow being new to crochet!
Love, Petra
Hello, Petra! Thank you so much for sharing your patterns! I love this cute snake pattern! I made one using your pattern but after round171, I started with closing the tail. I just followed you in IG and when I post my work in IG, may I share your link? So that others, like me, can have fun too! My nephew really loved his snake toy! Thank you very much! 🥰🥰🥰
Hi Jo, thank you for your comment and I am so pleased to hear you liked my snake pattern. Also, thank you for following me on IG and yes of course, you can share my link on there. It will be very helpful so thank you very much! 🙂
Love, Petra x