
This post may contain affiliate links, please read my full disclosure policy for more details.

This free crochet frog pattern was a real fun to make and I especially enjoyed making the eyes. Why don’t you have a go at this pattern and let me know what your favourite part is. 🙂
This Amigurumi frog was a special request by my hubby who has recently set up his first terrarium and wanted to have a cuddly friend for his new dart frogs. Frederick the Frog now proudly sits on the top of the terrarium guarding our little family members.

Free Crochet Frog Pattern – Notes
Skill level: intermediate to advanced crochet skills and knowledge
Finished size when seated: 20.5cm / 8 inches
Finished size from eyes to toes: 35.5cm / 14 inches
Free Crochet Frog Pattern – Materials and Equipment
Yarn I used for this free crochet frog pattern:
– Fine Sport #2 = 4 ply
– 55% cotton and 45% acrylic blend
– 1x ball of dark green yarn – YarnArt Jeans – colour 52 – (50g/160m)
– 1x ball of light green yarn – YarnArt Jeans – colour 60 – (50g/160m)
– 1x ball of cream yarn – YarnArt Jeans – colour 03 – (50g/160m)
I like to purchase my YarnArt Jeans from Amazon or from Etsy. If you would like to check some great substitutes for YarnArt Jeans then have a read of my Best Yarn for Amigurumi Crochet tutorial. You can find the substitutes towards the end of the article.
Or just simply use any 100% cotton that will work just as well. You can also use 100% acrylic if you prefer to work with this type of yarn.
Other materials used: polyester fibre fill
Crochet hook: I used 2.5mm = B/1, if using different weight of yarn then refer to hook size recommendations on the yarn but go one size smaller. I highly recommend this ergonomic crochet hook set from Amazon as it comes in a stylish case and with other accessories such as stitch markers etc.
Other equipment used: scissors, yarn needle, pins with large heads, stitch marker or thin yarn to use instead, 12mm safety eyes
Choking hazard warning: the use of safety eyes or buttons poses a choking risk for children under the age of 3 therefore I recommend using embroidery instead.
Free Crochet Frog Pattern – Abbreviations Used
This free crochet frog pattern is written using US crochet terminology
– MR: magic ring
– ST: stitch
– SC: single crochet stitch
– HDC: half double crochet stitch
– DC: double crochet stitch
– TC: triple crochet stitch
– CH: chain stitch
– SL: slip stitch
– INC: increase = two single crochet stitches in the same stitch
– L INC: large increase = three single crochet stitches in the same stitch
– DEC: standard decrease
– INV DEC: invisible decrease = insert the hook into the front loop of the first stitch (two loops on hook) and immediately insert it again into the front loop of the next stitch (three loops on the hook). Yarn over and draw through the first two loops on the hook (two loops on the hook). Yarn over and draw through the two loops on the hook to finish your invisible decrease.
– BLO: back loops only
– FO: fasten off
– (…..) x 6: repeat the pattern inside the brackets by the given number (in this example, repeat the pattern in the brackets 6 times)
– {…}: number shown inside these brackets equals the number of total stitches at the end of each round
Free Crochet Frog Pattern – Let’s Get Started!
You may find these Amigurumi tutorials handy before you get started with this free crochet frog pattern. And don’t forget to watch my step by step video tutorials for extra help with my patterns.
To view the free online pattern, please continue to scroll down. You can also download the ad-free and printable version of this pattern for a small fee from my Etsy shop. Your generous contribution will help towards the cost of materials and running this website so I can continue to publish my free online patterns for everyone to enjoy.
Join our Cuddly Stitches Community Facebook group to share your creations, chat to fellow Amigurumi makers or to exchange tips and tricks. You can also share feedback and ask for support when working with my patterns.
Take advantage of this AMAZING OFFER…open an Etsy shop and list your first 40 items for FREE!

How to Crochet the Eye Sockets
Crochet from the top of the eye socket towards the base.
R1: MR – 6 x SC into the ring {6} – watch this step by step video tutorial on How to crochet a magic ring for Amigurumi
R2: INC in each ST around {12}
R3: (SC in next ST, INC) x 6 {18}
R4: SC in next ST, INC, (SC in next 2 ST, INC) x 5, SC in next ST {24}
R5: (SC in next 3 ST, INC) x 6 {30}
R6: SC in next 2 ST, INC, (SC in next 4 ST, INC) x 5, SC in next 2 ST {36}
R7-R10 (4 rounds): SC in each ST around {36}
FO and leave a long piece of yarn for sewing.
Do not stuff.

How to Crochet the Eye Balls
Crochet two balls.
R1: MR – 6 x SC into the ring {6} – don’t make the MR too tight and leave a small hole in the middle for the safety eyes
R2: INC in each ST around {12}
R3: (SC in next ST, INC) x 6 {18}
R4: SC in each ST around {18}
You can now insert the safety eyes in the middle of the MR and place the safety backs on.
R5-R6 (2 rounds): SC in each ST around {18}
R7: (SC in next ST, INV DEC) x 6 {12} – watch this step by step video tutorial on How to crochet an invisible decrease for Amigurumi
Stuff well before crocheting R8.
R8: DEC all around {6}
FO closing the hole with a yarn needle and weave the yarn end in.
How to Crochet the Head and the Body
Crochet the head and the body in one piece starting from the top of the head down to the bottom of the body.
R1: MR – 6 x SC into the ring {6}
R2: INC in each ST around {12}
R3: (SC in next ST, INC) x 6 {18}
R4: SC in next ST, INC, (SC in next 2 ST, INC) x 5, SC in next ST {24}
R5: (SC in next 3 ST, INC) x 6 {30}
R6: SC in next 2 ST, INC, (SC in next 4 ST, INC) x 5, SC in next 2 ST {36}
R7: (SC in next 5 ST, INC) x 6 {42}
R8: SC in next 3 ST, INC, (SC in next 6 ST, INC) x 5, SC in next 3 ST {48}
R9: (SC in next 7 ST, INC) x 6 {54}
R10: SC in next 4 ST, INC, (SC in next 8 ST, INC) x 5, SC in next 4 ST {60}
R11: (SC in next 9 ST, INC) x 6 {66}
R12: SC in next 5 ST, INC, (SC in next 10 ST, INC) x 5, SC in next 5 ST {72}
R13: (SC in next 11 ST, INC) x 6 {78}
R14-R22 (9 rounds): SC in each ST around {78}
Change yarn to light green colour.
R23: SC in each ST around {78} – BLO
R24-R25 (2 rounds): SC in each ST around {78}
R26: (SC in next 11 ST, INV DEC) x 6 {72}
R27: SC in next 5 ST, INV DEC, (SC in next 10 ST, INV DEC) x 5, SC in next 5 ST {66}
R28: (SC in next 9 ST, INV DEC) x 6 {60}
R29: SC in next 4 ST, INV DEC, (SC in next 8 ST, INV DEC) x 5, SC in next 4 ST {54}
R30: (SC in next 7 ST, INV DEC) x 6 {48}
R31: SC in next 3 ST, INV DEC, (SC in next 6 ST, INV DEC) x 5, SC in next 3 ST {42}
R32: (SC in next 5 ST, INV DEC) x 6 {36}
Start stuffing the head and continue to stuff as you go along.
R33: SC in next 2 ST, INV DEC, (SC in next 4 ST, INV DEC) x 5, SC in next 2 ST {30}
R34: (SC in next 3 ST, INV DEC) x 6 {24}
R35: SC in next ST, INV DEC, (SC in next 2 ST, INV DEC) x 5, SC in next ST {18}
R36: SC in each ST around {18}
Do not FO as you will continue to crochet the body from here onwards.
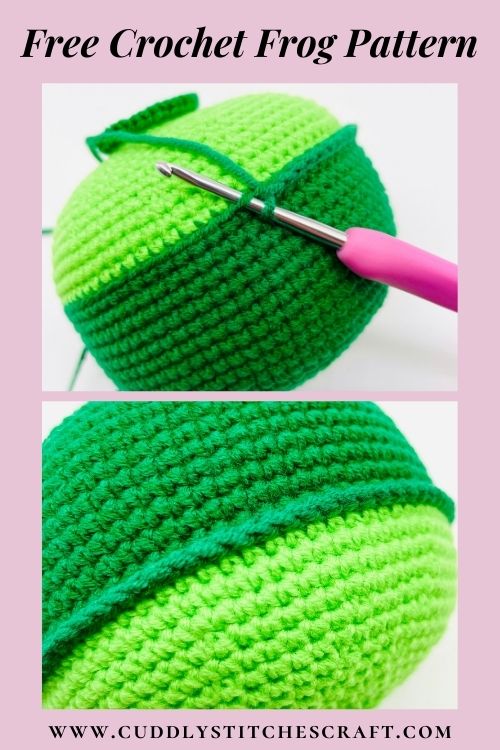
Before you continue with the body, you need to crochet one row of slip stitches into the front loops of R22 of the head:
– insert your hook into the first front loop of R22
– grab a long piece of dark green yarn and pull it through the front loop
– chain 1x ST
– SL ST in each front loop around {78}
– FO and weave the yarn end in
You can now continue to crochet the body.
Change yarn to dark green colour.
R37: Continue where you finished with R36 of the head –INC in each ST around {36}
R38: SC in each ST around {36}
R39: (SC in next 5 ST, INC) x 6 {42}
R40: SC in next 3 ST, INC, (SC in next 6 ST, INC) x 5, SC in next 3 ST {48}
R41: (SC in next 7 ST, INC) x 6 {54}
R42: SC in each ST around {54}
R43: SC in next 4 ST, INC, (SC in next 8 ST, INC) x 5, SC in next 4 ST {60}
Stuff the neck really well to stop the head from being floppy or insert a crafting wire or a hair curler. I just stuff really well.
Continue to stuff as you go along.
R44-R45 (2 rounds): SC in each ST around {60}
R46: (SC in next 9 ST, INC) x 6 {66}
R47-R48 (2 rounds): SC in each ST around {66}
R49: SC in next 5 ST, INC, (SC in next 10 ST, INC) x 5, SC in next 5 ST {72}
R50-R53 (4 rounds): SC in each ST around {72}
R54: (SC in next 11 ST, INC) x 6 {78}
R55-R59 (5 rounds): SC in each ST around {78}
R60: (SC in next 11 ST, INV DEC) x 6 {72}
R61-R62 (2 rounds): SC in each ST around {72}
R63: SC in next 5 ST, INV DEC, (SC in next 10 ST, INV DEC) x 5, SC in next 5 ST {66}
R64: SC in each ST around {66}
R65: (SC in next 9 ST, INV DEC) x 6 {60}
R66: SC in next 4 ST, INV DEC, (SC in next 8 ST, INV DEC) x 5, SC in next 4 ST {54}
R67: (SC in next 7 ST, INV DEC) x 6 {48}
R68: SC in next 3 ST, INV DEC, (SC in next 6 ST, INV DEC) x 5, SC in next 3 ST {42}
R69: (SC in next 5 ST, INV DEC) x 6 {36}
R70: SC in next 2 ST, INV DEC, (SC in next 4 ST, INV DEC) x 5, SC in next 2 ST {30}
R71: (SC in next 3 ST, INV DEC) x 6 {24}
R72: SC in next ST, INV DEC, (SC in next 2 ST, INV DEC) x 5, SC in next ST {18}
R73: (SC in next ST, INV DEC) x 6 {12}
R74: SC in each ST around {12}
Stuff well, FO closing the hole using a yarn needle – watch this step by step video tutorial on How to close a hole in an Amigurumi piece

How to Crochet the Fingers
Fingers – 3x for each arm:
R1: MR – 6 x SC into the ring {6}
R2: INC in each ST around {12}
R3: (SC in next 3 ST, INC) x 3 {15}
R4: SC in each ST around {15}
R5: (SC in next ST, INV DEC) x 5 {10}
R6: (SC in next ST, INV DEC) x 2, SC in next 2 ST, INV DEC {7}
R7-R8 (2 rounds): SC in each ST around {7}
1st and 2nd finger: FO after R8 and weave yarn ends in
3rd finger: do not FO and leave your hook in after R8
Stuff the fingers and continue with R9 in the next section of the pattern.
How to Crochet the Arms
You can now crochet the fingers together to finish the arm.
R9 – continue from where you finished with R8 in the 3rd finger (this will be your right finger): SC in next 3 ST, insert your hook in one of the stitches in the middle finger (Pic F2) and SC in next 4 ST, insert your hook in one of the stitches in the last finger (left finger) (Pic F4) and SC in next 7 ST, insert your hook back into the middle finger (Pic F6), SC in next 3 ST, insert your hook back into the right finger (Pic F8), SC in next 4 ST {21}

Stuff the arm as you go along.
R10: SC in each ST around {21}
R11: (SC in next 5 ST, INV DEC) x 3 {18}
R12: SC in next 2 ST, INV DEC, (SC in next 4 ST, INV DEC) x 2, SC in next 2 ST {15}
R13-R17 (5 rounds): SC in each ST around {15}
R18: INV DEC, SC in next 13 ST {14}
R19-R21 (3 rounds): SC in each ST around {14}
R22: INV DEC, SC in next 12 ST {13}
R23-R25 (3 rounds): SC in each ST around {13}
R26: INV DEC, SC in next 11 ST {12}
R27-R34 (8 rounds): SC in each ST around {12} – stop stuffing the arm after R30
R35: SC in next ST and then SC the opening together to close the arm – watch this step by step video tutorial on How to close a hole in a flat Amigurumi piece
FO and leave a long piece of yarn for sewing.

How to Crochet the Toes
First crochet three separate toes and then connect them together to finish the foot.
Toes – 3x for each foot:
R1: MR – 6 x SC into the ring {6}
R2: INC in each ST around {12}
R3: (SC in next 2 ST, INC) x 4 {16}
R4-R5 (2 rounds): SC in each ST around {16}
R6: (SC in next 2 ST, INV DEC) x 4 {12}
R7: (SC in next ST, INV DEC) x 4 {8}
R8-R9 (2 rounds): SC in each ST around {8}
1st and 2nd toe: FO after R9 and weave yarn ends in
3rd toe: do not FO and leave your hook in after R9
Stuff the toes and continue with R10 in the next section of the pattern.
How to Crochet the Feet
You can now crochet the toes together to make a foot. Watch my video tutorial on How to join toes in Amigurumi. I show how to connect dinosaur toes in this video but the technique will be the same for the frog too.
R10 – continue from where you finished with R9 in the 3rd toe (this will be your right toe): SC in next 4 ST, insert your hook in one of the stitches in the middle toe and SC in next 4 ST, insert your hook in one of the stitches in the last toe (left toe) and SC in next 8 ST, insert your hook back into the middle toe, SC in next 4 ST, insert your hook back into the right toe, SC in next 4 ST {24}
R11: SC in next 3 ST, INV DEC, SC in next 2 ST, INV DEC, SC in next 6 ST, INV DEC, SC in next 2 ST, INV DEC, SC in next 3 ST {20}
R12: INV DEC, SC in next 7 ST, INV DEC, SC in next 9 ST {18}
R13: SC in each ST around {18}
Start stuffing the foot.
R14: SC in next 2 ST, INV DEC, (SC in next 4 ST, INV DEC) x 2, SC in next 2 ST {15}
R15: (SC in next 3 ST, INV DEC) x 3 {12}
R16: SC in each ST around {12}
Finish stuffing the foot.
FO, close the hole using a yarn needle and weave the yarn end in.
How to Crochet the Legs
Surface crochet the base of the leg into the foot and continue to crochet upwards – watch this step by step video tutorial on How to surface crochet slip stitches on Amigurumi
R1: Surface crochet 18 slip stitches into the foot:
– First use some thread and needle to outline the base of the leg keeping in mind that you need to surface crochet 18 SL STs following the outline (Pic L1 & L2)
– Insert your hook into the back of the foot (in the middle of the closing circle), grab your yarn and pull a loop through (Pic L3), chain 1x ST, start surface crocheting slip stitches around your outline (Pic L4)
– Surface crochet 18 SL STs all the way round to the back of the foot (Pic L5) and continue to crochet R2 in continuous spiral
R2: SC in each ST around {18} – (Pic L6)

R3: SC in next 2 ST, INV DEC, (SC in next 4 ST, INV DEC) x 2, SC in next 2 ST {15}
R4: SC in each ST around {15}
R5: (SC in next 3 ST, INV DEC) x 3 {12}
R6: SC in each ST around {12}
R7: INC, SC in next 11 ST {13}
R8: INC, SC in next 12 ST {14}
R9: SC in each ST around {14}
R10: (SC in next 6 ST, INC) x 2 {16}
R11: (SC in next 7 ST, INC) x 2 {18}
R12-R14 (3 rounds): SC in each ST around {18}
Start stuffing the leg and stuff as you go along. But you don’t want to stuff too much around the knee otherwise it will be difficult to bend.
R15: SC in next 2 ST, INV DEC, (SC in next 4 ST, INV DEC) x 2, SC in next 2 ST {15}
R16: SC in each ST around {15}
R17: (SC in next 3 ST, INV DEC) x 3 {12}
R18: SC in next ST, INV DEC, (SC in next 2 ST, INV DEC) x 2, SC in next ST {9}
R19: (SC in next 2 ST, INC) x 3 {12}
R20: (SC in next ST, INC) x 6 {18}
R21-R22 (2 rounds): SC in each ST around {18}
R23: (SC in next 5 ST, INC) x 3 {21}
R24-R30 (7 rounds): SC in each ST around {21}
R31: (SC in next 5 ST, INV DEC) x 3 {18}
R32: SC in each ST around {18}
R33: SC in next 2 ST, INV DEC, (SC in next 4 ST, INV DEC) x 2, SC in next 2 ST {15}
Stop stuffing the leg.
R34-R35 (2 rounds): SC in each ST around {15}
R36: (SC in next 3 ST, INV DEC) x 3 {12}
R37: SC in each ST around {12}
R38: SC in next 3 ST and then SC the opening together to close the leg
FO and leave a long piece of yarn for sewing.
How to Assemble Your Crochet Frog Softie
Eyes: First place the eye balls inside the eye sockets and pin them to the head making sure they are symmetrical from the front, side and back. Then take the eye balls out of the sockets and sew the sockets to the head. I attached each eye socket between R5 and R14 of the head but you can attach them as per your preference. You can then place the eye balls back into the sockets and either sew them or glue them in.
Arms: Pin the arms to the body in a forward facing angle (at about 45°) making sure both arms are symmetrical from the front and back. Sew the arms to the body. I placed them between R40 and R45 of the body.
Legs: Turn the body upside down with the nose facing away from you. Pin the legs to the body as shown in the photo below making sure they look symmetrical. The best way to ensure you are happy with the placement of the legs is to sit your toy up and adjust the placement of the legs if needed. Sew the legs to the body. I placed them between R69 and R74 of the body.
You have now finished your crochet animal. I hope you found my free frog crochet pattern easy to follow and enjoyed making it.

Did You Enjoy Making this Amigurumi Frog?
- Leave a comment: share your feedback with us in the comment box below
- Pin this pattern: pin this pattern on Pinterest so you can return to it later
- Share your photos: I love to see your finished crochet toys so please share your photos on social media with the tag @cuddlystitchescraft
- Share this pattern: show me your love and link to this pattern on social media
- Subscribe: subscribe to my Newsletter to receive news and updates when I publish new patterns and video tutorials
- Join my Mystery Crochet Along: crochet a mystery Amigurumi toy along with other fellow crocheters for a lot of fun with a ‘surprise’ twist. Sign up for free!
- Explore more: visit my free Amigurumi crochet patterns for more crochet toys you will love!
Get a 15% discount on all PDF patterns!
Sign up and get a discount on all current and future patterns from my Etsy shop. Plus receive regular updates on latest patterns and video tutorials.
Explore More of My Free Amigurumi Crochet Patterns
If you like this free crochet frog pattern, you may also love these patterns. Why don’t you give them a try?!
Free crochet snail pattern
Free crochet bunny lovey pattern
Free crochet dinosaur pattern
Or explore more of my crochet garden animals patterns. And make a cute creepy crawly that will make a perfect gift for all little ones who love garden creatures!
Happy crocheting!


Hello Petra,
Made this frog a second time. A ‘not-give-away’, so I can enjoy looking at it all the time! 🙂
Perfect, I think it’s really nice to keep some of them on display. We do at home as well. 🙂
Love, Petra x
I just finished all of my pieces for the frog. I never comment because I don’t think the author will see it, but I LOVE THIS PATTERN!! I look forward to making more from you. The pattern was super easy to follow and it actually worked up cuter than I thought it would.
Hi Kristalinn, thank you so so much for your lovely comment! 🙂 And yes, I do see your comments on here. 🙂
I am really happy you liked the frog and found the pattern easy to follow. I hope you like my other patterns too! 🙂
Love, Petra X
R22 of the head –
The instructions say to slst using the front loop on R22 of the head before moving on to the body.
Should R22 be worked as BLO?
Hi,
R23 is worked into BLO which means that the front loops of R22 will be exposed. And you will slip stitch into the front loops of R22. If you follow the pattern it will be correct. 🙂
Love, Petra x
Oh my goodness! I see that now! Sorry!
I’m looking forward to starting this guy in the next day or two.
No worries at all, always happy to help! 🙂 If you need anything else, please let me know.
Love, Petra x
I am having trouble putting the eyes on. Do I fold the sockets in half or not? I can’t make heads or tails of it. HELP!
Hi Jean, yes you don’t stuff the sockets, fold them in half and shape them so they create a nice socket for the eye ball to slot into. To make it easier, you can glue them in using a fabric glue or a hot glue gun.
Love,
Petra x
Thank you Petra. I think I have it now. But the face looks too blank. My light green section came out way bigger than your picture for some reason. I will try to add a mouth.
Hi Jean, yes definitely plenty of space for a huge smile on the frog’s face. 🙂
Love,
Petra x
hi how do you close the back of the foot
Hi Keighley, thank you for your comment. To close the back of the foot, you need to use a needle, pull the needle with the yarn through all the stitches in the last round and pull on the yarn tight. You can watch this video for extra help. The number of stitches in the last round is different in the video, but the technique is the same.
https://www.cuddlystitchescraft.com/closing-amigurumi-hole-right/
I hope this helps but please let me know if you have more questions.
Love, Petra x
I just finished the frog and live how he turned out. Thank you so much for the pattern!
oh and “surface” stitch is a game changer!!!
Hi Lisa, thank you so much for your comment. I am really happy you liked the frog and found my tip about the surface crochet helpful. 🙂
It does make it much easier, doesn’t it? 🙂
Love, Petra
Love all the patterns
Hi Marian, thank you so much and I am so happy you like my patterns! 🙂
Love, Petra